|

Reference Guide
|
|
How to / Paper Handling
Loading Paper
 MP tray
 Standard and Optional Lower Cassettes
This section describes how to load paper into the MP tray, and the standard and optional lower cassettes. If you use special media such as EPSON Color Laser Transparencies or envelopes, see also Printing on Special Media.
MP tray
The MP tray is the most flexible paper source, accommodating various paper sizes and media types. It is also the paper source for feeding paper manually. See MP tray for details.
Follow these steps to load paper into the MP tray.
 |
Open the MP tray, then extend the expansion tray on the MP tray to accommodate the size of the media you want to load.
|

 |
If you want to load A3W-size paper, lay the left paper guide down. When loading media other than A3W-size paper, make sure the guide is standing up.
|
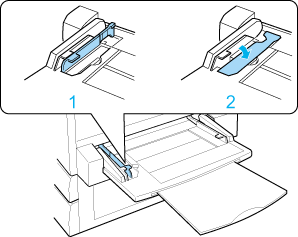
1. All sizes except A3W
2. A3W-size
 |
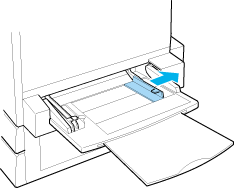
Slide the right paper guide all the way outward.
|
 |
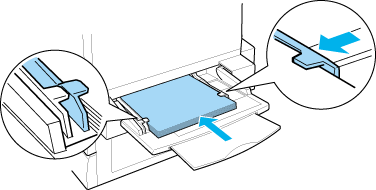
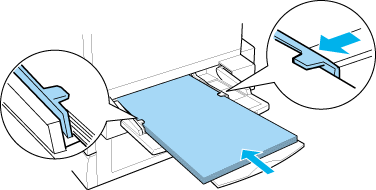
Load a stack of the desired media with the printable surface facing up. Then slide the right paper guide against the right side of the stack to obtain a snug fit.
|
All sizes except A3W:
A3W size:
 |
Set the Paper Source and Paper Size settings to match the loaded media through the printer driver or the control panel.
|
 |
Note:
|
 | -
To print on the back side of previously printed paper, use the MP tray. The optional Duplex Unit cannot be used for this purpose.
|
 | -
When you output your printouts to the face-up tray, you need to change the Out Bin setting in the printer driver or in the Setup Menu.
|

[Top]
Standard and Optional Lower Cassettes
The paper-loading procedure is the same for the standard lower cassette, the optional 250-Sheet Paper Cassette A3W, the optional 500-Sheet Paper Cassette Unit, and the optional Large Capacity Paper Unit.
In addition to plain paper, you can also use special media such as EPSON Color Laser Paper in the standard lower cassette.
 |
Note:
|
 | -
Use the included paper size labels to identify the size of paper being used in the cassettes.
|
 | -
To use the optional 250-Sheet Paper Cassette A3W, the optional 500-Sheet Paper Cassette Unit, or the optional Large Capacity Paper Unit, select it in the printer driver's Option menu after installing it on the printer.
|
Follow these steps to load paper into the standard and optional lower cassette. The illustrations are that for the standard lower cassette.
 |
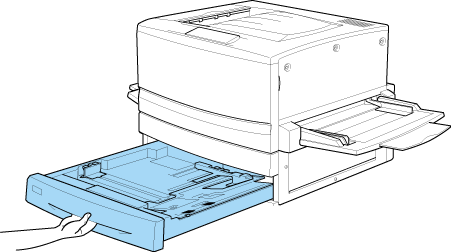
Pull the paper cassette out until it stops.
|
 |
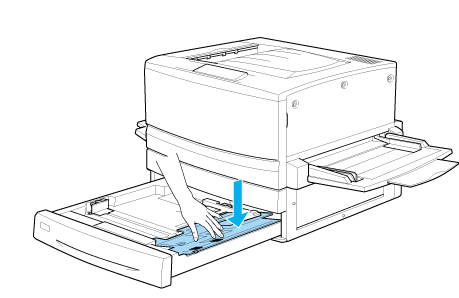
Press down on the metal plate in the cassette until it clicks into place.
|
 |
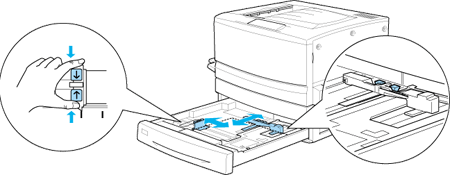
Press on the side and back paper guides, to slide them outward.
|
 |
Fan a stack of paper and tap the edge of the stack.
|
 |  |
Note:
|
 |  |
If your printouts are curled or do not stack properly when using plain paper, try turning the stack over and reloading it.
|
 |
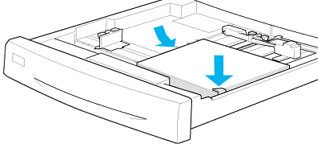
Insert the stack into the cassette, as shown below. Make sure that all the paper is under the metal retaining clip with the printable surface down.
|
 |  |
Note:
|
 |  |
Loading the cassette with too much paper may cause paper jams.
|
 |
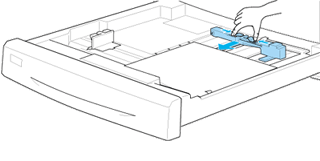
Slide the back paper guide until it just touches the edge of the stack of paper.
|
 |
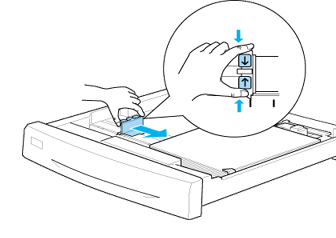
Slide the side paper guide so that it points to the size mark that matches the paper loaded.
|
 |  |
Note:
|
 |  |
Make sure you adjust the side paper guide to the correct position because the printer automatically senses the size of paper loaded in the cassette from the position of this paper guide.
|
 |
Push the cassette in all the way.
|
 |
Set the LC1 Type setting to match the type of loaded paper through the Tray Menu. For details, see Tray Menu.
|
 |  |
Note:
|
 |  |
If you have installed and loaded paper into other optional paper sources such as the 500-Sheet Paper Cassette Unit or the Large Capacity Paper Unit, set all paper type settings from LC1 Type through to LC3 Type.
|

[Top]
| Version 1.00E, Copyright © 2002, SEIKO EPSON CORPORATION |
MP tray
Standard and Optional Lower Cassettes