 |
 Precautions for clearing jammed paper Precautions for clearing jammed paper
Paper Jam A B
Paper Jam A
Paper Jam C A
Paper Jam B
Paper Jam C A B
When transparencies are jammed at the MP tray
If paper becomes jammed in the printer, the printer’s LCD panel and EPSON Status Monitor provide alert messages.
Precautions for clearing jammed paper
Be sure to observe the following points when you clear jammed paper.
 |
Warning: |
|
-
Be careful not to touch the fuser, which is marked CAUTION HIGH TEMPERATURE, or the surrounding areas. If the printer has been in use, the fuser and the surrounding areas may be very hot.
|
|
Follow the steps below to clear the jammed paper at cover A and B.
 |
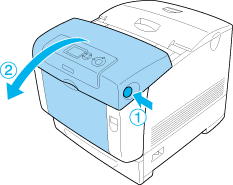
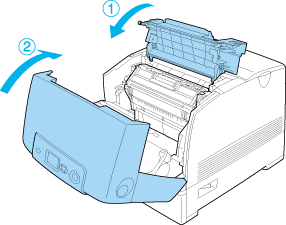
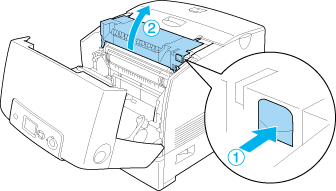
Press the latch on cover A and open the cover.
|

 |
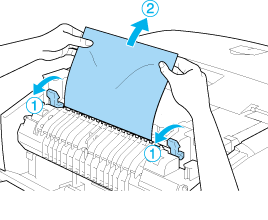
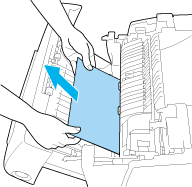
Push the inner green levers of the fuser unit down, and gently pull out any sheets of paper with both hands.
|

| |
Warning: |
| |
|
Be careful not to touch the fuser, which is marked CAUTION HIGH TEMPERATURE, or the surrounding areas. If the printer has been in use, the fuser and the surrounding areas may be very hot.
|
|
 |
Open cover D.
|

 |
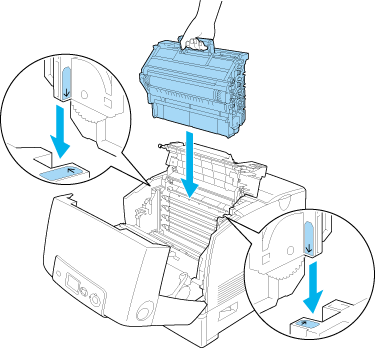
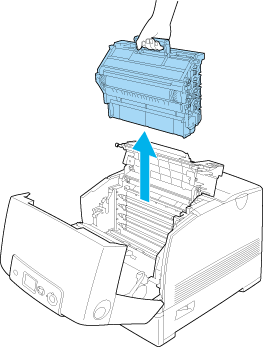
Grasp the handle of the photoconductor unit firmly and remove the unit from the printer.
|

| |
Warning: |
| |
|
Be careful not to touch the fuser, which is marked CAUTION HIGH TEMPERATURE, or the surrounding areas. If the printer has been in use, the fuser and the surrounding areas may be very hot.
|
|
|  |
Note: |
| |
|
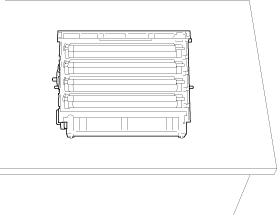
Make sure to place the photoconductor unit on the flat surface as shown below.
|
|

 |
Gently pull out any sheets of paper with both hands.
|

| |
Warning: |
| |
|
Be careful not to touch the fuser, which is marked CAUTION HIGH TEMPERATURE, or the surrounding areas. If the printer has been in use, the fuser and the surrounding areas may be very hot.
|
|
|  |
Caution: |
| |
|
Do not touch the rollers inside the printer.
|
|
 |
Reinstall the photoconductor unit, making sure the posts on the sides of the unit slide into the slots.
|
| |
Warning: |
| |
|
Be careful not to touch the fuser, which is marked CAUTION HIGH TEMPERATURE, or the surrounding areas. If the printer has been in use, the fuser and the surrounding areas may be very hot.
|
|
 |
Close cover D and A.
|
 |
Press the latch on cover B and open the cover.
|
 |
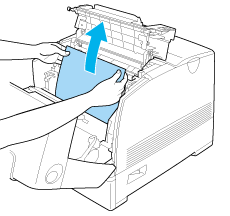
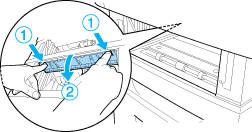
Pull down the outer green knobs to open the paper path, and gently pull out any sheets of paper with both hands.
|
| |
Warning: |
| |
|
Be careful not to touch the fuser, which is marked CAUTION HIGH TEMPERATURE, or the surrounding areas. If the printer has been in use, the fuser and the surrounding areas may be very hot.
|
|
 |
Close cover B.
|
When the paper jam is cleared completely and the covers are closed, printing resumes from the page that jammed.
Follow the steps below to clear the jammed paper at cover A.
|
|
Press the latch on cover A and open the cover.
|

|
|
Gently pull out any sheets of paper with both hands.
|
| |
Warning: |
| |
|
Be careful not to touch the fuser, which is marked CAUTION HIGH TEMPERATURE, or the surrounding areas. If the printer has been in use, the fuser and the surrounding areas may be very hot.
|
|
|
|
Open cover D.
|

|
|
Grasp the handle of the photoconductor unit firmly and remove the unit from the printer.
|
| |
Warning: |
| |
|
Be careful not to touch the fuser, which is marked CAUTION HIGH TEMPERATURE, or the surrounding areas. If the printer has been in use, the fuser and the surrounding areas may be very hot.
|
|
| |
Note: |
| |
|
Make sure to place the photoconductor unit on the flat surface as shown below.
|
|
|
|
Gently pull out any sheets of paper with both hands.
|
| |
Warning: |
| |
|
Be careful not to touch the fuser, which is marked CAUTION HIGH TEMPERATURE, or the surrounding areas. If the printer has been in use, the fuser and the surrounding areas may be very hot.
|
|
| |
Caution: |
| |
|
Do not touch the rollers inside the printer.
|
|
|
|
Reinstall the photoconductor unit, making sure the posts on the sides of the unit slide into the slots.
|

| |
Warning: |
| |
|
Be careful not to touch the fuser, which is marked CAUTION HIGH TEMPERATURE, or the surrounding areas. If the printer has been in use, the fuser and the surrounding areas may be very hot.
|
|
|
|
Close cover D and A.
|
When the paper jam is cleared completely and cover D and A are closed, printing resumes from the page that jammed.
Follow the steps below to clear the jammed paper at cover A and in the MP tray or paper cassette unit.
|
|
Remove the paper set in the MP tray. If the paper is jammed in the MP tray, gently pull out any sheets of paper with both hands.
|
|
|
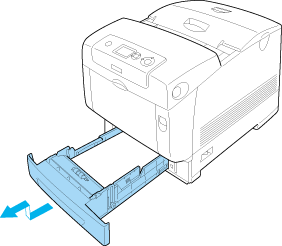
Remove the paper cassette from the printer and discard any crumpled paper.
|
| |
Note: |
| |
|
The illustration shows the standard lower cassette. If the optional paper cassette unit is installed, check the unit’s cassettes in the same way.
|
|
|
|
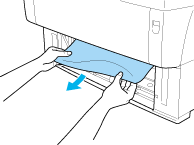
Gently pull out any sheets of paper with both hands.
|
| |
Note: |
| |
|
Confirm that the jammed paper is not still deep inside the printer.
|
|
|
|
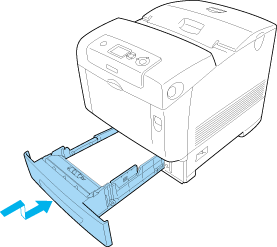
Reinsert the paper cassette into the printer.
|
|
|
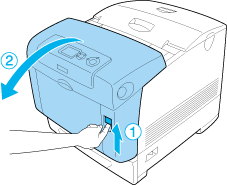
Press the latch on cover A and open the cover.
|
|
|
Gently pull out any sheets of paper with both hands.
|

| |
Warning: |
| |
|
Be careful not to touch the fuser, which is marked CAUTION HIGH TEMPERATURE, or the surrounding areas. If the printer has been in use, the fuser and the surrounding areas may be very hot.
|
|
|
|
Open cover D.
|
|
|
Grasp the handle of the photoconductor unit firmly and remove the unit from the printer.
|

| |
Warning: |
| |
|
Be careful not to touch the fuser, which is marked CAUTION HIGH TEMPERATURE, or the surrounding areas. If the printer has been in use, the fuser and the surrounding areas may be very hot.
|
|
| |
Note: |
| |
|
Make sure to place the photoconductor unit on the flat surface as shown below.
|
|

|
|
Gently pull out any sheets of paper with both hands.
|

| |
Warning: |
| |
|
Be careful not to touch the fuser, which is marked CAUTION HIGH TEMPERATURE, or the surrounding areas. If the printer has been in use, the fuser and the surrounding areas may be very hot.
|
|
| |
Caution: |
| |
|
Do not touch the rollers inside the printer.
|
|
|
|
Reinstall the photoconductor unit, making sure the posts on the sides of the unit slide into the slots.
|

| |
Warning: |
| |
|
Be careful not to touch the fuser, which is marked CAUTION HIGH TEMPERATURE, or the surrounding areas. If the printer has been in use, the fuser and the surrounding areas may be very hot.
|
|
 |
Close cover D and A.
|

| |
Note: |
| |
|
When a paper jam occurs repeatedly at the paper cassettes (Jam CA or Jam CAB), jammed or crumpled paper may still be inside the paper cassettes. Remove the paper cassettes, then open the green unit that is located on the top part of the inside of the cassette slot, and check whether any jammed paper is there. Before reinstalling the paper cassette, make sure to close the green unit completely, otherwise you may damage the printer.

|
|
When the paper jam is cleared completely and cover D and A are closed, printing resumes from the page that jammed.
Follow the steps below to clear the jammed paper at cover B.
|
|
Press the latch on cover B and open the cover.
|

|
|
Gently pull out any sheets of paper with both hands.
|
| |
Note: |
| |
|
Be sure to remove the jammed paper by pulling it upward.
|
|
| |
Warning: |
| |
|
Be careful not to touch the fuser, which is marked CAUTION HIGH TEMPERATURE, or the surrounding areas. If the printer has been in use, the fuser and the surrounding areas may be very hot.
|
|
|
|
Close cover B.
|
When the paper jam is cleared completely and cover B is closed, printing resumes from the page that jammed.
To clear the paper jam, first clear the jammed paper where paper feeds, as described in Paper Jam C A. Then, clear the jammed paper at the duplex unit as described in Paper Jam B.
|
Note: |
|
|
When a paper jam occurs repeatedly at the paper cassettes (Jam CA or Jam CAB), jammed or crumpled paper may still be inside the paper cassettes. Remove the paper cassettes, then open the green unit that is located on the top part of the inside of the cassette slot, and check whether any jammed paper is there. Before reinstalling the paper cassette, make sure to close the green unit completely, otherwise you may damage the printer.
|
|
When transparencies are jammed at the MP tray
When the LCD panel displays the Check Transparency error message, there may be paper jammed at the MP tray.
Remove the paper from the MP tray and remove any jammed paper. Open cover A, check that no jammed paper is left inside the cover, and close the cover to clear the message on the LCD panel. Then reload the paper. The printer resumes printing from the page that jammed.
|
Note: |
| |


 Top
Top