 |
Optional Paper Cassette Unit
 Handling precautions Handling precautions
Installing the optional paper cassette unit
Installing the two optional paper cassette units
Removing the optional paper cassette unit
For details about the paper types and sizes that you can use with the optional paper cassette unit, see Standard lower paper cassette and optional paper cassette unit. For specifications, see Optional paper cassette unit.
You can install the following optional paper cassettes on the printer:
Always pay attention to the following handling precautions before installing the option:

|  |
Warning: |
| |
|
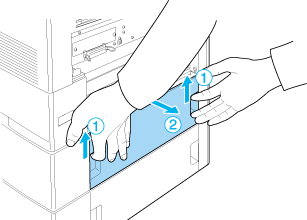
To lift the printer safely, you must hold it in the positions shown above. If carried incorrectly, the printer may be dropped and damaged or cause an injury.
|
|
Installing the optional paper cassette unit
Follow the steps below to install the optional 550-sheet or 1100-sheet paper cassette Unit.
 |
Note: |
|
|
The procedure for installing the 550-sheet paper cassette unit is the same as that for the 1100-sheet paper casette unit unless otherwise specified.
|
|
 |
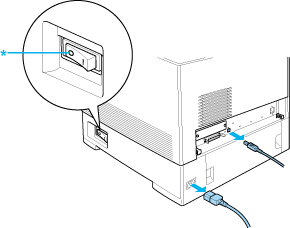
Turn the printer off and unplug the power cord and all the interface cables.
|
|  |
Caution: |
| |
|
Make sure to unplug the power cord from the printer to prevent getting an electrical shock.
|
|
 |
Carefully remove the optional paper cassette unit from its carton and place it on the floor.
|
| |
Note: |
 |
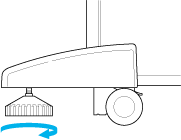
Lock the four feet at the bottom of the 1100-sheet paper cassette unit by turning the dials below the feet.
|
| |
Note: |
| |
|
The 550-sheet paper cassette unit does not have feet.
|
|
| |
Warning: |
| |
|
Be sure to lock all four feet before installing the unit on the printer. Otherwise, the unit may move and cause an accident.
|
|
 |
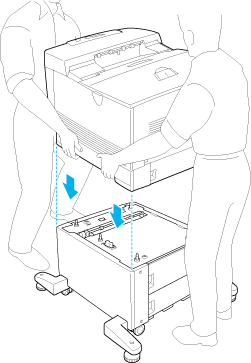
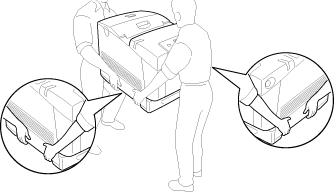
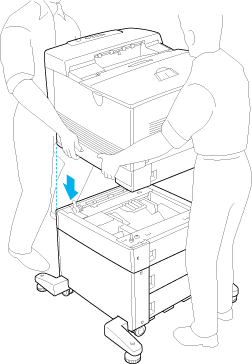
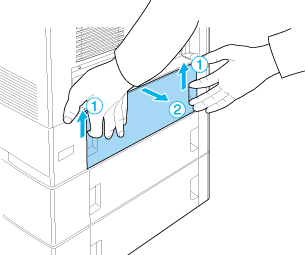
Carefully, grasp the printer at the position indicated below and lift it carefully with two people.
|

 |
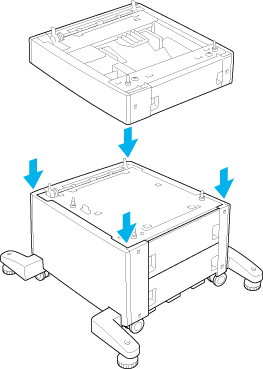
Align the corners of the printer and the unit, then lower the printer gently onto the unit so that the five pins on top of the unit fit into the holes on the bottom of the printer.
|
 |
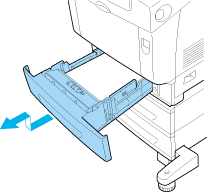
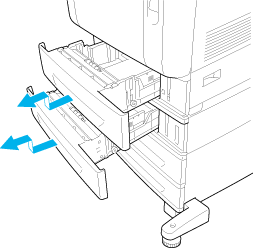
Remove the standard lower cassette from the printer.
|
 |
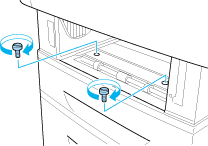
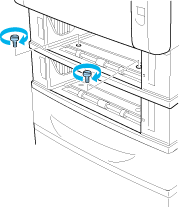
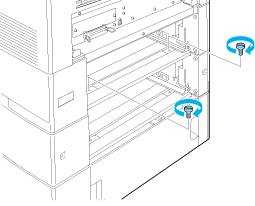
Fasten the front of the optional paper cassette unit to the printer with two of the provided screws.
|
 |
Remove the cover on the back of the standard lower cassette.
|

 |
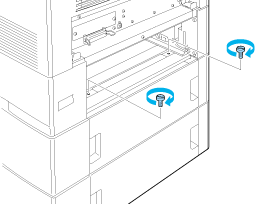
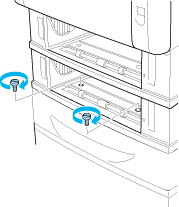
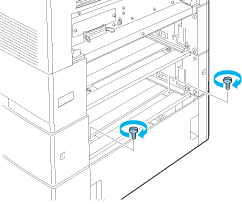
Screw the back of the unit to the printer with the remaining two screws.
|
 |
Reattach the cover.
|
 |
Reinsert the standard lower cassette into the printer.
|
 |
Reconnect all the interface cables and the power cord.
|
 |
Plug the printer’s power cord into an electrical outlet.
|
 |
Turn on the printer.
|
To confirm that the option is installed correctly, print a Status Sheet. See Printing a Status Sheet.
|
Note for Windows users: |
|
|
If EPSON Status Monitor is not installed, you have to make settings manually in the printer driver. See Making Optional Settings.
|
|
|
Note for Macintosh users: |
|
|
When you have attached or removed printer options, you need to delete the printer using Print Setup Utility (for Mac OS X 10.3), Print Center (for Mac OS X 10.2 or below), or Chooser (for Mac OS 9), and then re-register the printer.
|
|
Installing the two optional paper cassette units
|
|
Turn the printer off and unplug the power cord and all the interface cables.
|

| |
Caution: |
| |
|
Make sure to unplug the power cord from the printer to prevent getting an electrical shock.
|
|
|
|
Carefully remove the optional paper cassette units from their cartons and place them on the floor.
|
| |
Note: |
|
|
Lock the four feet at the bottom of the 1100-sheet paper cassette unit by turning the dials below the feet.
|

| |
Warning: |
| |
|
Be sure to lock all four feet before installing the unit on the printer. Otherwise, the unit may move and cause an accident.
|
|
|
|
Lift the 550-sheet paper cassette unit and align the corners of it and the 1100-sheet paper cassette unit. Then lower the 550-sheet paper cassette unit onto the 1100-sheet paper cassette unit so that five pins on top of the 1100-sheet paper cassette unit fit into the holes on the bottom of the 550-sheet paper cassette unit.
|
|
|
Carefully, grasp the printer at the position indicated below and lift it carefully with two people.
|
| |
Warning: |
| |
|
Two people should lift the printer by the correct positions as shown below.
|
|
|
|
Align the corners of the printer and the 550-sheet paper cassette unit, then lower the printer gently onto the unit so that the five pins on top of the unit fit into the holes on the bottom of the printer.
|
|
|
Remove the standard lower cassette from the printer and the 550-sheet paper cassette from the unit.
|
|
|
Fasten the front of the 550-sheet paper cassette unit to the printer with the two provided screws.
|
|
|
Fasten the front of the 1100-sheet paper cassette unit to the printer with the two provided screws.
|
|
|
Remove the cover on the back of the standard lower cassette.
|
|
|
Remove the cover on the back of the 550-sheet paper cassette.
|
|
|
Screw the back of the 550-sheet paper cassette unit to the printer with the remaining two screws.
|
|
|
Screw the back of the 1100-sheet paper cassette unit to the 550-sheet paper cassette unit with the remaining two screws.
|
|
|
Reattach the two covers.
|
 |
Reinsert the standard lower cassette into the printer and 550-sheet paper cassette into the unit.
|
 |
Reconnect all the interface cables and the power cord.
|
 |
Plug the printer’s power cord into an electrical outlet.
|
 |
Turn on the printer.
|
To confirm that the option is installed correctly, print a Status Sheet. See Printing a Status Sheet.
|
Note for Windows users: |
|
|
If EPSON Status Monitor is not installed, you have to make settings manually in the printer driver. See Making Optional Settings.
|
|
|
Note for Macintosh users: |
|
|
When you have attached or removed printer options, you need to delete the printer using Print Setup Utility (for Mac OS X 10.3), Print Center (for Mac OS X 10.2 or below), or Chooser (for Mac OS 9), and then re-register the printer.
|
|
Removing the optional paper cassette unit
Perform the installation procedure in reverse.
| |


 Top
Top