|

Reference Guide
|
|
How to / Using Options
Large Capacity Paper Unit
 Installing the Large Capacity Paper Unit
 Removing the Large Capacity Paper Unit
You can increase the printer's paper-feeding capacity by installing the optional Large Capacity Paper Unit (C12C813861). This option has two paper cassettes, each holding up to 500 sheets of paper.
The following table summarizes the paper types and sizes that you can use with the Large Capacity Paper Unit.
|
Paper Type
|
Paper Size
|
Capacity
|
|
Plain paper
|
A4, A5, B5
Letter (LT),
Legal (LG),
Government Legal (GLG)
Executive (EXE),
|
Up to 500 sheets in each cassette
(Total thickness:
less than 58 mm for one cassette)
(Weight: 60 to 105 g/m2, 16 to 28 lb)
|
|
EPSON Color Laser Paper
|
A4, Letter (LT)
|
Up to 500 sheets in each cassette
|
|
EPSON Color Laser Coated Paper*
|
A4
|
Up to 500 sheets in each cassette
|
 |
* This media can be fed from this paper source only when Plain is selected as the Paper Type setting in the printer driver.
|
 |
Note:
|
 |
Load paper with the printable surface facing up.
|
Handling precautions
Note the following handling precautions before installing this option:
-
The Large Capacity Paper Unit weighs approximately 18.5 kg (8.4 lb); always lift it with two or more people.
-
When installing this option on the printer, make sure to lock the two casters at the front of the unit.
-
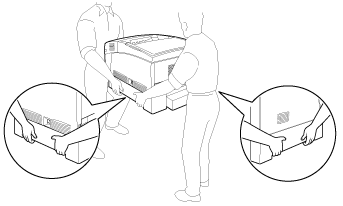
The printer weighs about 34.5 kg (76 lb) with consumable products installed. One person should not attempt to lift or carry the printer. Two or more people should carry it, lifting it only by the positions shown below.

 |
Warning:
|
 |
If you lift the printer improperly, it may fall and injure you.
|
Installing the Large Capacity Paper Unit
Follow these steps to install the Large Capacity Paper Unit:
 |
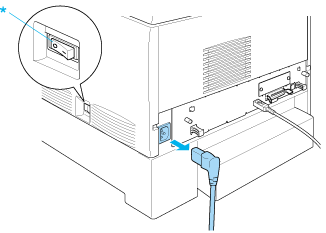
Turn the printer off and unplug the power cord.
|

* OFF
 |
Remove all interface cables from the interface connectors.
|
 |
Carefully remove the Large Capacity Paper Unit from its carton and place it on the floor.
|
 |  |
Note:
|
 |  | -
Make sure you have the four screws packed with the Large Capacity Paper Unit.
|
 |  | -
Remove the protective materials from the unit.
|
 |  | -
Keep all protective materials in case you want to ship the Large Capacity Paper Unit in the future.
|
 |
Remove the protective materials inside of the cassette trays.
|

 |
Lock the two casters at the front of the unit.
|

 |  |
Warning:
|
 |  |
Be sure to lock both casters before installing the unit on the printer. Otherwise, the unit may move and cause an accident.
|
 |
Carefully, grasp the printer at the positions indicated below and lift it carefully with two or more people.
|
 |  |
Warning:
|
 |  |
Two people should lift the printer by the correct positions as shown below.
|

 |
Align the corners of the printer and the unit, then lower the printer gently onto the unit so that the five pins on top of the unit fit into the holes on the bottom of the printer.
|

 |
Remove the standard lower cassette from the printer.
|

 |
Fasten the front of the Large Capacity Paper Unit to the printer with two of the provided screws.
|

 |
Remove the cover on the back of the standard lower cassette, and secure the back of the unit to the printer with the remaining two screws. Then reattach the cover.
|

 |
Reinsert the standard lower cassette into the printer.
|
 |
Reconnect all interface cables and the power cord.
|
 |
Plug the printer's power cord into an electrical outlet.
|
 |
Turn on the printer.
|
To confirm that the Large Capacity Paper Unit is installed correctly, use the printer's control panel menus to print a status sheet. See Printing a Status Sheet for instructions. If the unit is not listed on the status sheet, make sure the cable connectors are secure.
 |
Note:
|
 |
If you are using Windows, and EPSON Status Monitor 3 is not installed, you have to make settings manually in the printer driver. Click the Update the Printer Option Information Manually button on the Optional Settings menu, then click Settings. Then select Large Capacity Paper Unit from the Optional Paper Sources list on the Optional Settings dialog box and click OK.
|

[Top]
Removing the Large Capacity Paper Unit
Follow these steps to remove the Large Capacity Paper Unit:
 |
Turn the printer off and unplug the power cord.
|
 |
Remove all interface cables from the interface connectors.
|
 |
Lock the two casters at the bottom of the unit.
|

 |  |
Warning:
|
 |  |
Be sure to lock both casters before removing the unit from the printer. Otherwise, the unit may move and cause an accident.
|
 |
Remove the standard lower cassette from the printer.
|

 |
Remove the two screws securing the front of the unit to the printer.
|

 |
Warning:
|
 |
Removing other screws and covers will expose high voltage areas.
|
 |
Remove the cover on the back of the standard lower cassette, and remove the two screws securing the back of the unit. Then reattach the cover.
|

 |
Warning:
|
 |
Removing other screws and covers will expose high voltage areas.
|
 |
Insert the standard lower cassette into the printer.
|

 |
Carefully lift up the printer with two or more people until the holes on the bottom of the printer are free from the five pins on the top of the unit, and place it on a flat stable surface.
|

 |
Repack the Large Capacity Paper Unit in its original carton.
|
 |
Reconnect all interface cables and the power cord.
|
 |
Plug the printer's power cord into an electrical outlet.
|
 |
Turn on the printer.
|

[Top]
| Version 1.00E, Copyright © 2002, SEIKO EPSON CORPORATION |
Installing the Large Capacity Paper Unit
Removing the Large Capacity Paper Unit