|

Reference Guide
|
|
Setup & Maintenance / Replacing Consumable Products
Photoconductor Unit
Prepare a new photoconductor unit for replacement when you see a message informing you to do so.
Handling precautions
Note the following handling precautions before replacing the photoconductor unit:
-
The photoconductor unit weighs 4.5 kg (9.9 lb). Be sure to hold it firmly by the handle when carrying it.
-
When replacing the photoconductor unit, avoid exposing it to room light any longer than necessary.
-
Be careful not to scratch the surface of the drum. Also, avoid touching the drum, since oil from your skin may permanently damage its surface and affect print quality.
-
To get the best print quality, do not store the photoconductor unit in an area subject to direct sunlight, dust, salty air, or corrosive gases (such as ammonia). Avoid locations subject to extreme or rapid changes in temperature or humidity.
-
Do not tilt the photoconductor unit.
 |
Warning:
|
 | -
Do not dispose of the used photoconductor unit in fire, as it may explode and cause injury. Dispose of it according to local regulations.
|
|
 | -
Keep the photoconductor unit out of the reach of children.
|
|
Replacing the photoconductor unit
Follow these steps to replace the photoconductor unit.
 |
Turn off the printer.
|
 |
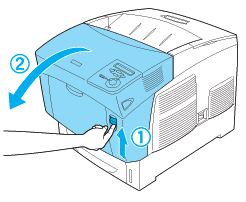
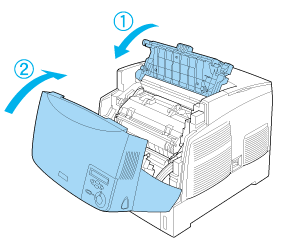
Press the latch on cover A and open the cover.
|
 |
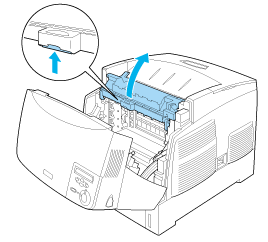
Raise cover D.
|
 |
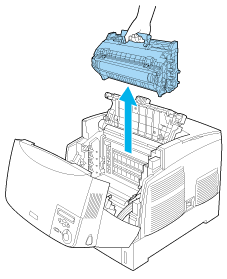
Hold the photoconductor unit by the handle, and slowly lift it straight out of the printer.
|
 |
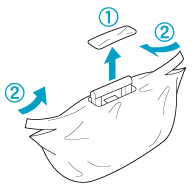
Take the new photoconductor unit and tear away the top portion of the bag along the dotted line to expose the handle. Then, grab the handle and remove the styrofoam insert and tear open the bag along the dotted line.
|
 |  |
Note:
|
 |  | |
Always keep the cartridge positioned as shown in the illustration.
|
|
 |
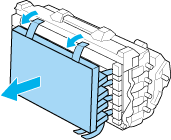
Remove the protective material.
|
 |  |
Caution:
|
 |  | -
Be careful not to touch or scratch the surface of the drum.
|
|
 |  | -
Avoid touching the drum, since oil from your skin may permanently damage its surface and affect print quality.
|
|
 |
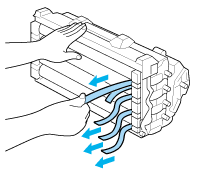
Remove the protective tapes.
|
 |
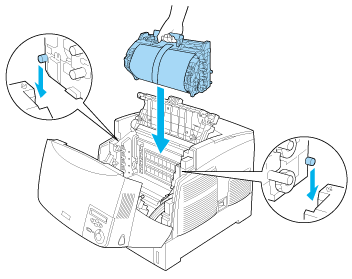
Holding the handle firmly, lower the photoconductor unit into the printer, making sure the posts on the sides of the unit slide into the slots.
|
 |
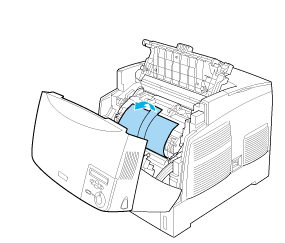
Remove the protective sheet.
|
 |
Close covers D and A.
|

[Top]
| Version NPD0667-01, Copyright © 2004, SEIKO EPSON CORPORATION |