|

Reference Guide
|
|
How to / Using Options
Adobe PostScript 3 Kit
 Installing the Adobe PostScript 3 ROM module
 Removing the Adobe PostScript 3 ROM module
In some locations, the Adobe PostScript 3 Kit (C832421) ROM module is available as an option. This module allows your printer to print documents in the PostScript printing language. When installed, it requires 1 GB of free disk space for downloaded fonts.
To install the Adobe PostScript 3 ROM module, see the following section or the Setup Guide.
Installing the Adobe PostScript 3 ROM module
Follow these steps to install the optional Adobe PostScript 3 ROM module:
 |
Caution:
|
 |
Before you install the ROM module, be sure to discharge any static electricity by touching a grounded piece of metal. Otherwise, you may damage static-sensitive components.
|
 |
Warning:
|
 |
Be careful when working inside the printer as some components are sharp and may cause injury.
|
 |
Turn off the printer.
|
 |
Unplug the printer's power cord from the electrical outlet.
|
 |
Remove all interface cables from the interface connectors.
|
 |
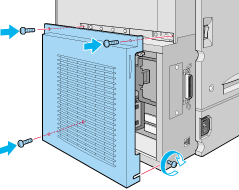
Remove the screws and the circuit board cover on the back of the printer.
|

 |
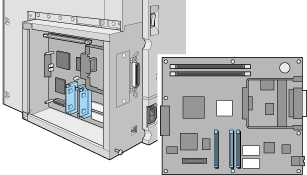
Identify the ROM slot. It's relative position is shown below.
|

 |  |
Caution:
|
 |  |
You should not remove any modules from the circuit board. Otherwise, the printer will not work.
|
 |
Remove the ROM module from its package.
|
 |
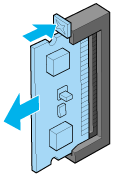
Insert the module all the way into slot A in the orientation shown below. The X tab at the top of the slot will jut out when the module is inserted correctly.
|
 |  |
Caution:
|
 |  | -
Do not force the ROM module into the slot.
|
 |  | -
Be sure to insert the module facing the correct way.
|
 |
Replace the circuit board cover and fasten the screws.
|

 |
Reconnect all interface cables.
|
 |
Plug the printer's power cord into an electrical outlet.
|
 |
Turn on the printer.
|
To confirm that the Adobe PostScript 3 ROM module is installed correctly, print a status sheet. If PS3 is not listed as an installed emulation on the status sheet, try reinstalling the module making sure that it is securely fastened to the ROM slot.

[Top]
Removing the Adobe PostScript 3 ROM module
Follow these steps to remove the Adobe PostScript 3 ROM module:
 |
Caution:
|
 |
Before you remove the ROM module, be sure to discharge any static electricity by touching a grounded piece of metal. Otherwise, you may damage static-sensitive components.
|
 |
Warning:
|
 |
Be careful when working inside the printer as some components are sharp and may cause injury.
|
 |
Turn off the printer.
|
 |
Unplug the printer's power cord from the electrical outlet.
|
 |
Remove all interface cables from the interface connectors.
|
 |
Remove the screws and the circuit board cover on the back of the printer.
|

 |
Push the tab on slot A to release the ROM module.
|

 |
Gently but firmly pull the ROM module out of slot A.
|
 |  |
Caution:
|
 |  |
You should not remove any other modules from the circuit board. Otherwise, the printer will not work.
|
 |
Replace the circuit board cover and fasten the screws.
|

 |
Reconnect all interface cables.
|
 |
Plug the printer's power cord into an electrical outlet.
|
 |
Turn on the printer.
|

[Top]
| Version 1.00E, Copyright © 2001, SEIKO EPSON CORPORATION |
Installing the Adobe PostScript 3 ROM module
Removing the Adobe PostScript 3 ROM module