|

Reference Guide
|
|
How to / Using Options
Hard Disk Drive
 Installing the Hard Disk Drive
 Removing the Hard Disk Drive
The optional Hard Disk Drive (C82377 ) allows you to expand the printer's receive buffer when the Ethernet interface is used, and gives you additional memory for graphics and faster multi-page, multi-output sorting.
When the optional Adobe PostScript 3 ROM module is also installed, downloaded PostScript 3 fonts require 1 GB of free hard disk space on the optional Hard Disk Drive.
Installing the Hard Disk Drive
Follow these steps to install the optional Hard Disk Drive:
 |
Caution:
|
 |
Before you install the Hard Disk Drive, be sure to discharge any static electricity by touching a grounded piece of metal. Otherwise, you may damage static-sensitive components.
|
 |
Warning:
|
 |
Be careful when working inside the printer as some components are sharp and may cause injury.
|
 |
Turn off the printer.
|
 |
Unplug the printer's power cord from the electrical outlet.
|
 |
Remove all interface cables from the interface connectors.
|
 |
Remove the screws and the circuit board cover on the back of the printer.
|

 |
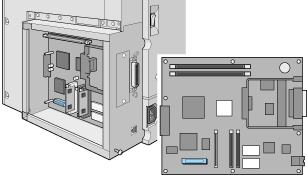
Identify the Hard Disk Drive socket. It's relative position is shown below.
|
 |
Remove the Hard Disk Drive from its package.
|
 |
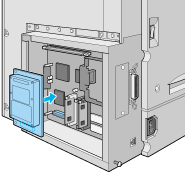
Hold the Hard Disk Drive such that its electrical connector is on the same end as the Hard Disk Drive socket, then press the Hard Disk Drive down until the socket and connector are firmly connected.
|
 |
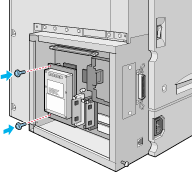
Secure the Hard Disk Drive by fastening it with the provided screws.
|
 |  |
Caution:
|
 |  |
You should not remove any modules from the circuit board. Otherwise, the printer will not work.
|
 |
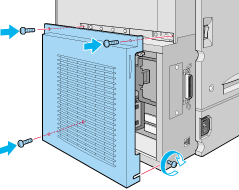
Replace the circuit board cover and fasten the screws.
|
 |
Reconnect all interface cables.
|
 |
Plug the printer's power cord into an electrical outlet.
|
 |
Turn on the printer.
|
To confirm that the Hard Disk Drive is installed correctly, print a status sheet. If the drive is not listed on the status sheet, try reinstalling the drive. Make sure that the electronic connector on the Hard Disk Drive is securely connected to the socket on the circuit board.

[Top]
Removing the Hard Disk Drive
Follow these steps to remove the Hard Disk Drive:
 |
Caution:
|
 |
Before you remove the Hard Disk Drive, be sure to discharge any static electricity by touching a grounded piece of metal. Otherwise, you may damage static-sensitive components.
|
 |
Warning:
|
 |
Be careful when working inside the printer as some components are sharp and may cause injury.
|
 |
Turn off the printer.
|
 |
Unplug the printer's power cord from the electrical outlet.
|
 |
Remove all interface cables from the interface connectors.
|
 |
Remove the screws and the circuit board cover on the back of the printer.
|

 |
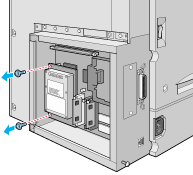
Remove the screws that secure the Hard Disk Drive onto the circuit board.
|
 |
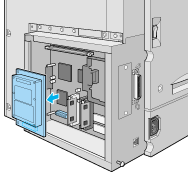
Grasp both sides of the Hard Disk Drive and pull it out of the socket.
|
 |
Keep the Hard Disk Drive in an anti-static packet such as the one it came packaged in.
|
 |
Replace the circuit board cover and fasten the screws.
|

 |
Reconnect all interface cables.
|
 |
Plug the printer's power cord into an electrical outlet.
|
 |
Turn on the printer.
|

[Top]
| Version 1.00E, Copyright © 2001, SEIKO EPSON CORPORATION |
Installing the Hard Disk Drive
Removing the Hard Disk Drive
) allows you to expand the printer's receive buffer when the Ethernet interface is used, and gives you additional memory for graphics and faster multi-page, multi-output sorting.