|

Reference Guide
|
|
How to / Replacing Consumable Products
Photoconductor Kit
The photoconductor kit consists of the following items:
These items are sold as a kit because they usually need replacement at the same time. However, the waste toner collector is also sold individually as you may need to replace it separately depending on use.
Photoconductor unit
Prepare a new photoconductor unit for replacement when the you see a message informing you to do so.
Handling precautions
Always pay attention to the following handling precautions before replacing the photoconductor unit:
-
When replacing the photoconductor unit, avoid exposing it to room light any longer than necessary.
-
Be sure not to scratch the surface of the drum. Also, avoid touching the drum, since oil from your skin may permanently damage its surface and affect print quality.
-
To get the best print quality, do not store the photoconductor unit in an area subject to direct sunlight, dust, salty air, or corrosive gases (such as ammonia). Avoid locations subject to extreme or rapid changes in temperature or humidity.
-
Keep the photoconductor unit out of the reach of children.
 |
Warning:
|
 |
Do not dispose of the used photoconductor unit in fire, as it may explode and cause injury. Dispose of it according to local regulations.
|
Waste toner collector
Prepare a new waste toner collector for replacement when the you see a message informing you of to do so. The waste toner collector is sold as part of the Photoconductor Kit because it usually needs replacement at the same time as the photoconductor unit. However, the waste toner collector is also sold individually as sometimes you may need to replace the waste toner collector separately depending on use.
Handling precautions
Always pay attention to the following handling precautions before replacing the waste toner collector:
-
Do not reuse toner found in the waste toner collector.
-
Keep the waste toner collector out of the reach of children.
 |
Warning:
|
 |
Do not dispose of the used waste toner collector in fire, as it may explode and cause injury. Dispose of it according to local regulations.
|
Print head filter
The print head filter is sold as part of the Photoconductor Kit because it needs replacement at the same time as the photoconductor unit.
Handling precautions
Always pay attention to the following handling precautions before replacing the print head filter:
-
Do not reuse toner found on the print head filter.
-
Keep the print head filter out of the reach of children.
 |
Warning:
|
 |
Do not dispose of the used print head filter in fire, as it may explode and cause injury. Dispose of it according to local regulations.
|
Replacing the photoconductor unit, waste toner collector, and print head filter
Follow these steps to replace the photoconductor unit, waste toner collector, and print head filter:
 |
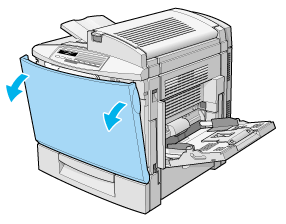
Open the front cover.
|
 |
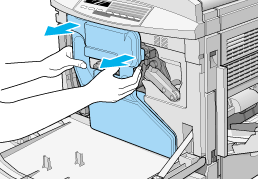
Detach the waste toner collector, as shown below.
|
 |  |
Note:
|
 |  |
Be careful not to spill toner when handling the waste toner collector.
|
 |
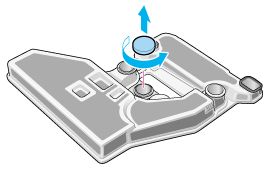
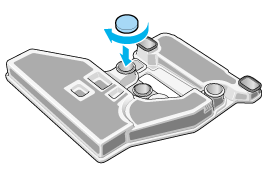
Turn and remove the two round caps off the center of the used waste toner collector and attach them to the openings. (The illustrations show the procedure for one cap only.)
|
 |
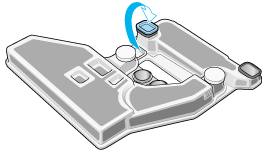
Remove the rectangular cap and attach it to the rectangular opening, as shown in the illustration below.
|
 |
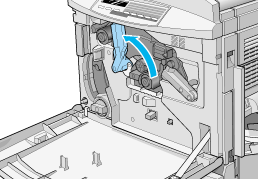
Turn the large lever counterclockwise to an upright position.
|
 |
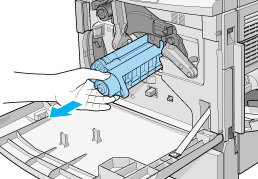
Pull the photoconductor unit out of the printer.
|
 |
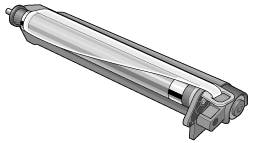
Take the new photoconductor unit out of its package.
|
 |  |
Caution:
|
 |  | -
Be sure not to touch or scratch the surface of the drum.
|
 |  | -
Avoid touching the drum, since oil from your skin may permanently damage its surface and affect print quality.
|
 |  |
Note:
|
 |  |
Install the photoconductor unit with its protective sheet in place. Do not remove it yet.
|
 |
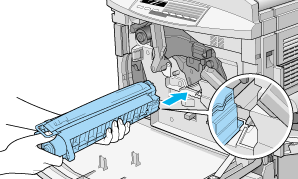
Hold the photoconductor unit as shown below, and insert it firmly into the slot making sure that the bottom of the unit slide into the guide rails.
|
 |  |
Caution:
|
 |  |
Make sure the photoconductor unit is inserted correctly. Otherwise, it may damage the printer.
|
 |  |
Note:
|
 |  |
Be sure the unit is completely inserted into the slot. Otherwise, the large lever cannot be restored to a position that accommodates the waste toner collector.
|
 |
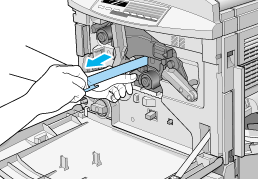
While keeping the photoconductor unit in place with your left hand, pull the ring toward you to remove the protective sheet.
|
 |  |
Caution:
|
 |  |
Failure to remove the protective sheet may damage your printer.
|
 |
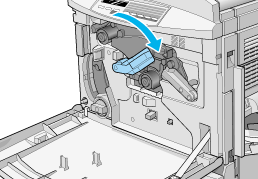
Turn the large lever clockwise, until the lever rests on the photoconductor unit as shown below.
|
 |
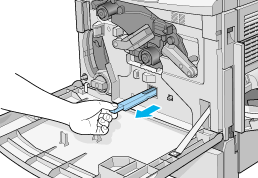
Press down on the handle of the print head filter with your thumb and gently pull it straight out of the slot.
|
 |  |
Note:
|
 |  |
Be careful not to spill toner that has accumulated on the print head filter.
|
 |
Remove the new print head filter from its package.
|
 |  |
Note:
|
 |  |
Be careful not to touch the glass surface. Oil from your skin may cause the print quality to decline.
|
 |
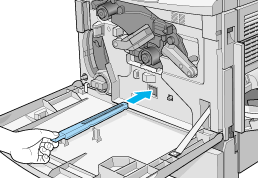
Hold the new print head filter by the handle and gently insert it all the way into the slot.
|
 |
Take out the new waste toner collector.
|
 |
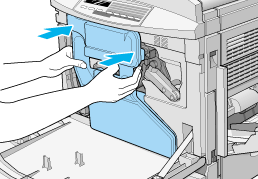
Attach the new waste toner collector, making sure that it is securely in place.
|
 |
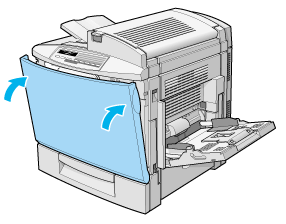
Close the front cover.
|

[Top]
| Version 1.00E, Copyright © 2001, SEIKO EPSON CORPORATION |