|

Reference Guide
|
|
How To / Installing Options
Hard Disk Drive
Follow these steps to install the optional Hard Disk Drive.
 |
Warning:
|
 | |
Be careful when working inside the printer as some components are sharp and may cause injury.
|
|
 |
Caution:
|
| |
Before you install the Hard Disk Drive, be sure to discharge any static electricity by touching a grounded piece of metal. Otherwise, you may damage static-sensitive components.
|
|
 |
Note:
|
| |
If you used the Hard Disk Drive in other EPSON's printer before, such as the AcuLaser-C8600 or the AcuLaser-C4000, you have to format the Hard Disk Drive. See Formatting the Hard Disk Drive for details.
|
|
 |
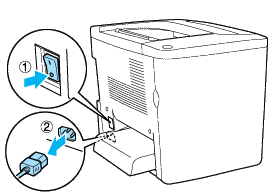
Turn the printer off and unplug the power cord.
|
 |
Remove all interface cables from the interface connectors.
|
 |
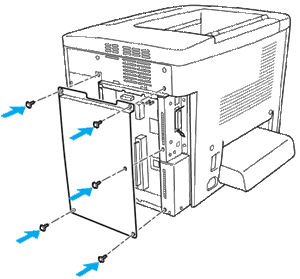
Loosen the five screws on the back of the printer, and remove the shield.
|
| |
Warning:
|
| | |
Removing other screws and covers will expose high voltage areas.
|
|

 |
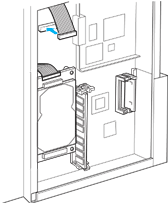
Identify the Hard Disk Drive socket.
|
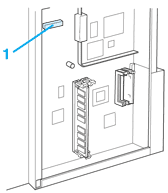
1. socket
 |
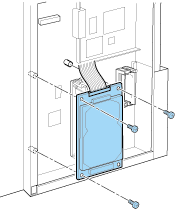
Install the Hard Disk Drive securely with the screws.
|
| |
Caution:
|
| | |
You should not remove any modules from the circuit board. Otherwise, the printer will not work.
|
|
 |
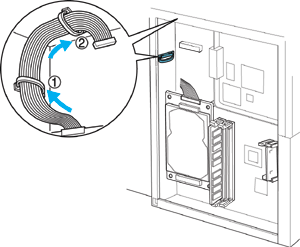
Use the two clamps as shown below to hold the IDE cable in place.
|
 |
Connect the connector of the cable as shown below.
|
 |
Return the printer to its original state, as shown below.
|
 |
Plug the printer's power cord into an electrical outlet.
|
 |
Turn on the printer.
|
Removing the Hard Disk Drive
Perform the installation procedure in reverse.
Formatting the Hard Disk Drive
To format the Hard Disk Drive, follow the instructions below.
|
|
Make sure the printer is off and all interface cables are disconnected.
|
|
|
Hold down the  Down button while you turn on the printer. Down button while you turn on the printer.
|
|
|
When you see the message Support Mode on the LCD panel, select HDD Format in the support menu.
|
|
Note:
|
| -
After formatting the Hard Disk Drive, the printer will automatically reboot.
|
|
| -
When you want to erase only the fonts installed from the optional Adobe PostScript 3 (PS3), follow steps 1 through 3 above. Select PS3 HDD Init when the optional Adobe PostScript 3 Kit is installed.
|
|
| -
Other fonts installed from PS3 will also be erased.
|
|
| -
When installing a Hard Disk Drive from other products, format it with this function.
|
|

[Top]
| Version 1.00E, Copyright © 2002, SEIKO EPSON CORPORATION |


