|

Reference Guide
|
|
Using Optional Product
Using the Auto Take-up Reel Unit
 Control box
 Adjusting the sensor
 Loading roll paper onto the take-up reel core
 Taking-up your prints
 Removing paper after take-up
When you want to print your data on roll paper and do not want to cut it or feed it out onto the floor, you can use this optional Auto Take-up Reel Unit to roll up your print out.
See the Auto Take-up Reel Unit User's Guide for installing the unit onto your printer.
 |
Note:
|
 | -
Auto Take-up Reel Unit is for Stylus Pro 9600 only.
|
 | -
When using the Auto Take-up Reel Unit, be sure to set the Auto Cut setting to off (at the printer control panel and printer driver). See Auto Cut for Windows, and Auto Cut for Macintosh.
|
 | -
You can use the Auto Take-up Reel Unit while setting the paper basket in the feeding paper backward position (up to B1 size; landscape).
|
Control box
The control box is on the drive unit attached to the lower right side of the printer.
The roles of switches and meanings of the Sensor light are as follows.
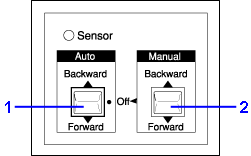
1 Auto Switch
2 Manual Switch
Sensor light
|
ON
|
Indicates that the light detector is aligned with the light emitter. This means that the Auto Take-up Reel Unit is ready to wind your print out.
|
|
Flashing
|
Indicates that the light detector and light emitter are not aligned properly. See Adjusting the sensor for details.
|
|
Flashing rapidly
|
Indicates that the Auto Take-up Reel Unit has encountered a problem and stopped operation.
|
|
OFF
|
Indicates that the Auto Take-up Reel Unit is off.
|
Switches
|
Auto
|
For automatic take-up of roll paper when roll paper feeds into the sensor unit's detection area.
|
|
Manual
|
For manual control of the take-up of roll paper.
|

[Top]
Adjusting the sensor
The angle of the sensors has already been adjusted when the unit is shipped. But, if the Sensor light on the control box is flashing, you need to adjust the sensor so that the light detector is aligned with the light emitter. When they are aligned, the Sensor light comes on.
 |
Caution:
|
 | -
Avoid locating the sensor in direct sunlight; otherwise, the auto take-up reel unit may not operate properly.
|
 | -
Prevent fans or air conditioners from blowing directly on the roll paper. If the paper is blown out of the sensor area, it will not be taken up properly.
|
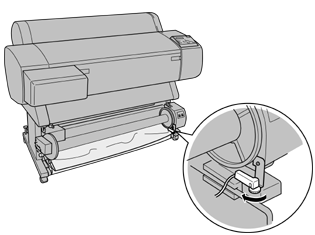
To adjust the sensor position, follow the steps below.
 |
Loosen the knob on the light emitter.
|
 |
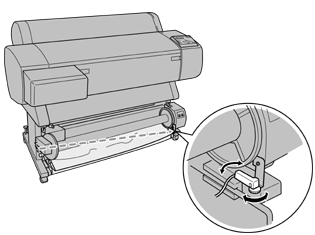
Adjust the horizontal angle of the emitter so that the Sensor light turns on.
|
 |
Holding the detector in position, retighten the knob.
|

[Top]
Loading roll paper onto the take-up reel core
 |
Warning:
|
 | -
Turn off the Auto Take-up Reel Unit before loading paper. If the take-up reel unit operates unexpectedly, bodily injury may occur.
|
 | -
Make sure the take-up reel unit is installed properly and securely. Bodily injury may occur if it falls.
|
Before you load roll paper onto the take-up reel core, check the following:
-
Make sure that the leading edge of the roll paper is straight.
-
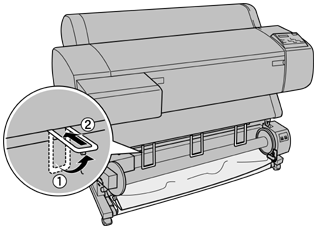
Make sure that the paper guides on the printer are in the storage position as show below.
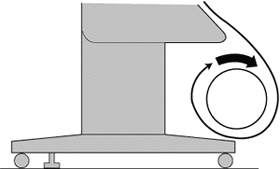
Winding paper forward
When you want paper wound onto the take-up reel core with the print on the outside, set the take-up reel unit to wind paper forward. Follow the steps below.
 |
Make sure that the roll paper is loaded in the printer properly. For instructions, see Loading the roll paper.
|
 |
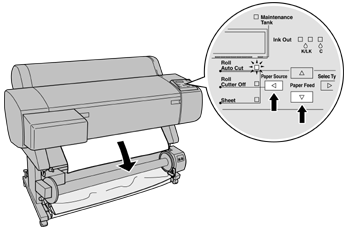
Press the Paper Source button on the printer until the Roll Cutter Off light turns on.
|
 |
Press the Paper Feed ( ) button on the printer to advance the roll paper. ) button on the printer to advance the roll paper.
|
 |
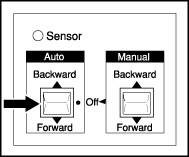
Set the Auto switch on the control box to Off.
|
 |
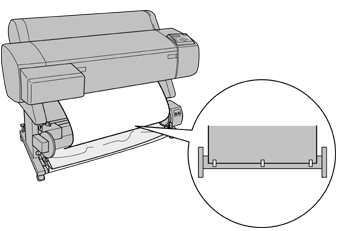
Tape the leading edge of the roll paper to the take-up reel core in three places.
|
 |
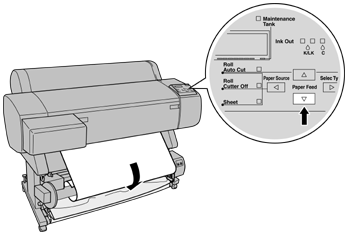
Press the Paper Feed ( ) button to feed the paper forward and create a loop of slack. ) button to feed the paper forward and create a loop of slack.
|
 |
Set the Manual switch on the Auto Take-up Reel Unit to the Forward position, and take up at least one turn of paper on the take-up reel core. Make sure that adequate slack remains between the roll paper and the take-up reel core.
|
Winding paper backward
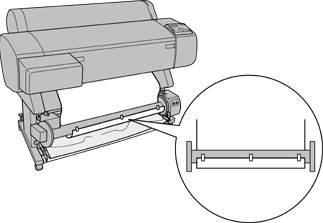
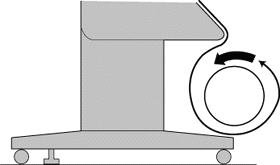
When you want the paper wound onto the take-up reel core with the print on the inside, set the take-up reel unit to wind paper backward. Follow the steps below.
 |
Set the Auto switch on the control box to Off.
|

 |
Pull the bottom of the roll paper around the back of the reel core as shown below. Then tape the leading edge of the paper to the reel core in three places.
|
 |
Press the Paper Feed button ( ) to feed the paper forward and create a loop of slack. ) to feed the paper forward and create a loop of slack.
|
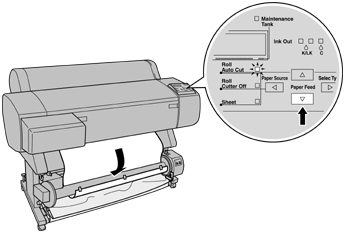
 |
Set the Manual switch on the Auto Take-up Reel Unit to the Backward position and take up at least one turn of paper on the take-up reel core. Make sure that adequate slack remains between the roll paper and the take-up reel core.
|

[Top]
Taking-up your prints
When the Auto Take-up Reel Unit is installed, and the take up reel core is loaded with paper to take-up in the desired direction, you can use the unit to take-up your prints.
 |
Warning:
|
 | -
Do not touch the Auto Take-up Reel Unit while it is operating. Doing so may result in injury.
|
 | -
Do not look directly at the sensor beam. Doing so may cause permanent eye damage.
|
 |
Caution:
|
 |
During operation, be sure to stay out of the sensor detection area. Interrupting the sensor beam can cause paper to be taken up under tension and adversely affect printing.
|
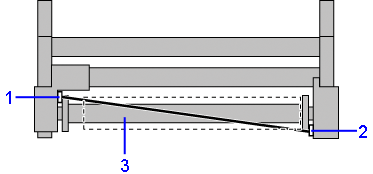
1 Light detector
2 Light emitter
3 Light detector sensor detection area
 |
Press the Paper Source button on the printer repeatedly until the Roll Cutter Off light comes on.
|
 |
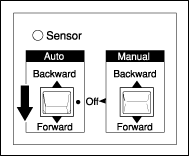
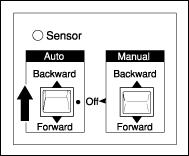
Set the direction of take-up with the Auto switch on the control box.
|
|
To wind forward
|
To wind backward
|
|
|
 |
Send a print job to the printer. The printer starts printing. The Auto Take-up Reel Unit takes-up the roll paper in the direction you set in step 2.
|
 |  |
Note:
|
 |  |
Do not touch the Manual switch while printing is in progress. Doing so may damage your prints.
|

[Top]
Removing paper after take-up
After paper take-up, remove the take-up reel core as follows.
 |
Turn off the Auto Take-up Reel Unit.
|
 |  |
Warning:
|
 |  |
Turn off the Auto Take-up Reel Unit before removing the take-up reel core. If the take-up reel unit operates unexpectedly, injury may occur.
|
 |
Press the Paper Source button repeatedly on the printer until the Roll Auto Cut light comes on.
Then press the Cut/Eject button. The roll paper is cut automatically.
|
 |  |
Note:
|
 |  |
If you are printing on very thick roll paper, it is recommended that you set the Auto Cut setting to off (at the printer's control panel and printer driver) and press the Paper Feed button on the printer to feed the paper, then cut the paper yourself; otherwise the paper cutter may be damaged. See Cutting the roll paper manually.
|
 |
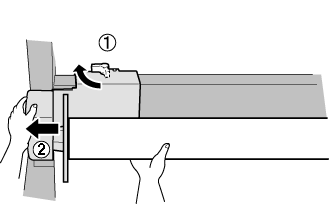
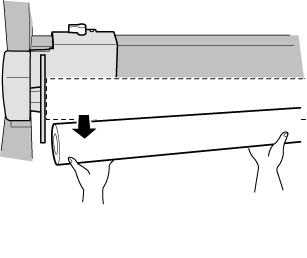
Turn the lever to unlock the movable unit, and slide it to the left so that the flange knob clears the end of the take-up reel core. While doing this, support the take-up reel core with one hand to keep it from falling.
|
 |
Remove the take-up reel core from the flange knob on the movable unit.
|
 |
Similarly, remove the take-up reel core from the flange knob on the drive unit.
|

[Top]
| Version 1.10E, Copyright © 2002, SEIKO EPSON CORPORATION |
Control box
Adjusting the sensor
Loading roll paper onto the take-up reel core
Taking-up your prints
Removing paper after take-up