|

User's Guide
|
|
Paper Handling
Using Roll Paper
 Attaching the roll paper to the spindle
Removing the roll paper from the spindle
Attaching and removing the spindle from the printer
Loading roll paper
Using the roll paper belt
Cutting the roll paper or printing page lines
Using the Auto Take-up Reel Unit
Attaching the roll paper to the spindle
When installing the roll paper onto the spindle, follow the steps below.
 |
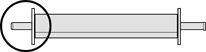
Slide the black movable flange off the end of the spindle.
|
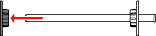
 |
When attaching roll paper with a 2-inch core, remove the gray attachments from the flanges.
|
 |  |
Note:
|
| | |
Keep the gray attachments in a safe place for future use.
|
|
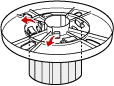
When attaching roll paper with a 3-inch core, slide the gray attachments to the black and white ones, matching the four arrows.
 |
Place the roll paper on a flat surface so that it does not unwind. Slide the roll paper onto the spindle and onto the white flange until it fixes into place.
|

| |
Note:
|
| | |
Do not stand the spindle when attaching the roll paper. It may cause slant paper feeding.
|
|
 |
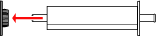
Slide the black movable flange (removed in step 1) onto the spindle and into the end of the roll paper until it fixes into place.
|


[Top]
Removing the roll paper from the spindle
To remove the roll paper from the spindle, follow the steps below.
|
|
Place the paper loaded spindle down on a flat surface.
|
|
|
Slide the black movable flange off the end of the spindle by tapping the same end of the spindle with your hand to loosen it. The flange is removed.
|
|  |
Caution:
|
| | |
To remove the black movable flange from the spindle, do not hold the spindle vertically and tap the end on the floor; otherwise, damage may occur.
|
|
|
|
Remove the roll paper from the spindle.
|

|
Note:
|
| |
Store unused roll paper in its original package. Put the roll paper into the plastic bag and outer package so as to avoid moisture problems.
|
|
[Top]
Attaching and removing the spindle from the printer
To attach the paper loaded spindle to the printer, follow the steps below. When you remove the spindle from the printer, clear the roll paper from the paper insertion slot, then reverse the steps below.
|
|
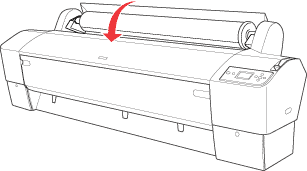
Open the roll paper cover.
|
|
|
Make sure that the movable flange is fixed into the end of the roll paper properly.
|
|
|
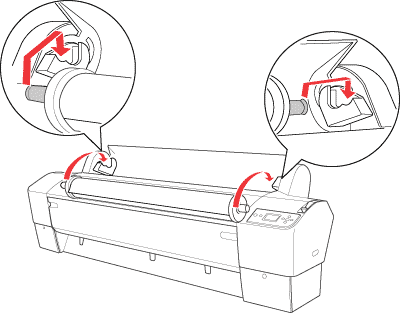
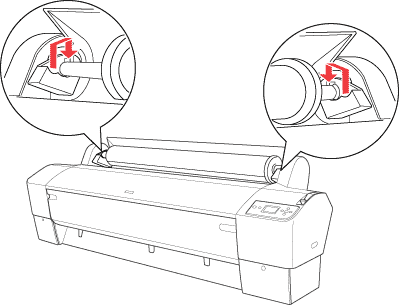
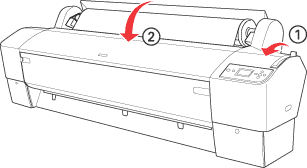
Hold the roll paper spindle so that the fixed flange is on the right side. Then place the spindle on the groove on top of the printer once.
|
| |
Note:
|
| | |
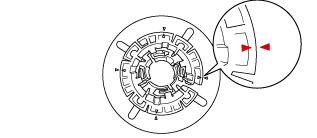
To mount the spindle correctly, match the color on the end of the spindle with the mounting bracket.
|
|
|
|
Lift the spindle again, then place it on the mounting brackets inside the printer.
|
[Top]
Loading roll paper
To load roll paper, follow the steps below.
|
Note:
|
|
|
Open the roll paper cover. Make sure that the roll paper is attached to the printer properly.
|
|
|
Make sure that the printer is on.
|
|
|
Make sure that the Power light is not flashing, and then set the paper lever to the released position. The LEVER RELEASED. LOAD PAPER appears on the LCD panel.
|
| |
Caution:
|
| | |
Do not set the paper lever to the released position while the Power light is flashing. Doing so may damage the printer.
|
|
|
|
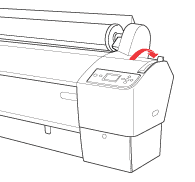
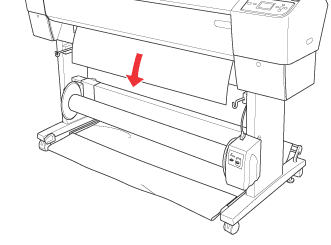
Load the paper into the paper insertion slot.
|

 |
Pull the paper down through the paper insertion slot so that it comes out below.
|
| |
Note:
|
| | |
If the roll paper does not come out, follow the instructions below.
|
|
-
Adjust the feed strength by pressing the Paper Feed buttons on the control panel. When using thick, heavy, or curled paper, press the Paper Feed
 button to increase the power. When using thin or light paper, press the Paper Feed
  button to decrease the power.
-
If the paper does not come out even after you execute the procedure above, open the front cover and then pull the paper out manually.
 |
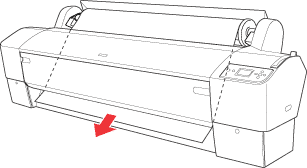
Holding the bottom edge of the paper, turn the roll paper to remove the slack. Make sure that the bottom edge of the paper is straight, and that it is aligned with the horizontal line.
|
| |
Note:
|
| | |
You do not have to align the right end of the paper with the vertical line.
|
|

 |
Set the paper lever to the secured position, and then close the roll paper cover. PRESS PAUSE BUTTON appears.
|
 |
Press the Pause  button. button.
|
The print heads move and the paper feeds into the printing position automatically. READY appears on the LCD panel.
| |
Note:
|
| | |
Even if you do not press the Pause button, the print heads move and paper feeds into the printing position automatically. READY appears on the LCD panel.
|
|
 |
Press the Paper Source  button to select Roll Auto Cut On button to select Roll Auto Cut On  or Roll Auto Cut Off or Roll Auto Cut Off  . .
|
| |
Caution:
|
| | |
If you are loading thick roll paper, select Auto Roll Cut Off . Paper that is too thick may damage the paper cutter.
|
|
Now the printer is ready to print. While the printer is printing, do not open the front cover. If the front cover is opened while printing is in progress, the printer stops printing, and then restarts printing when the front cover is closed. Stopping and restarting printing may reduce the print quality.
|
Caution:
|
| |
Do not leave the paper in the printer for a long period of time; its quality will deteriorate. We recommend that you remove the paper from the printer after printing.
|
|
[Top]
Using the roll paper belt
The roll paper belt is packed with the optional 2/3 inch Dual Roll Feed Spindle. You can also purchase the optional roll paper belt.
To use the roll paper belt, tap the end of the roll paper belt lightly on the roll paper. The belt will wrap itself around the roll paper.

To remove the roll paper belt, simply unwrap it from the paper. When not using the roll paper belt, keep it wound around the end of the spindle.
[Top]
Cutting the roll paper or printing page lines
When your print job is finished, the printer cuts the roll paper automatically or prints page lines around the printed data according to your settings. You can make these settings using the control panel or printer software.
|
Note:
|
| -
Printer driver settings usually override the control panel settings. Use your printer driver settings whenever possible.
|
|
| -
When the printer cuts the printout, it may take a little time to proceed with cutting after printing is finished.
|
|
Cutting the roll paper automatically
To cut the roll paper automatically after printing, follow the steps below.
|
|
Before printing, press the Paper Source button to select Roll Auto Cut On .
|
|
|
Print your data.
|
To make the auto cut setting using the printer driver, see Making the Auto Cut setting for Windows, Making the Auto Cut setting for Mac OS 9.x, or Auto Cut for Mac OS X.
Cutting the roll paper manually
To cut printouts manually, follow the steps below.
|
|
Press the Paper Source button to select Roll Auto Cut Off .
|
|
|
Press the Enter  button. button.
|
|
|
The printer automatically feeds the paper to the cutter guide, and then the printer becomes offline. Pause appears on the LCD.
|
|
|
If necessary, adjust the cutting position by using the Paper Feed button or Paper Feed button.
|
|
|
Cut the paper along the cutter guide using the manual cutter unit.
|
|
|
After cutting the paper, press the Pause button. The printer becomes online.
|
Printing page lines
If you want to print continuously on roll paper and then cut the pages yourself after you finish printing, use the Print Page Line setting.
To make the Print Page Line setting using the control panel, see PAGE LINE.
To make the Print Page Line setting using the printer software, see Print Page Line for Windows, Print Page Line for Mac OS 9.x, or Print Page Line for Mac OS X.
[Top]
Using the Auto Take-up Reel Unit
When you want to print your data on roll paper and do not want to cut it or feed it out onto the floor, you can use this optional Auto Take-up Reel Unit to roll up your printout.
See the Auto Take-up Reel Unit User's Guide for information on installing the unit onto your printer.
|
Note:
|
| -
Auto Take-up Reel Unit is designed for EPSON Stylus Pro 9800/9400 only.
|
|
| -
You can use the Auto Take-up Reel Unit while setting the paper basket in the backward paper feeding position (up to B1 size; landscape).
|
|
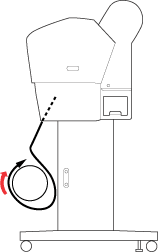
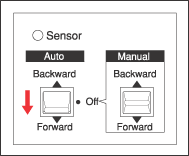
Control box
The control box is located on the drive unit attached to the lower right side of the printer.
The roles of switches and meanings of the Sensor light are as follows.
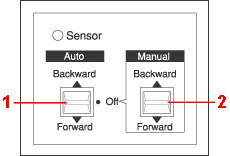
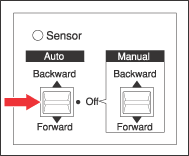
1 Auto Switch
2 Manual Switch
Sensor light
|
ON
|
Indicates that the light detector is aligned with the light emitter. This means that the Auto Take-up Reel Unit is ready to wind your printout.
|
|
Flashing
|
Indicates that the light detector and light emitter are not aligned properly. See Adjusting the sensor for details.
|
|
Flashing rapidly
|
Indicates that the Auto Take-up Reel Unit has encountered a problem and stopped operation.
|
|
OFF
|
Indicates that the Auto Take-up Reel Unit is off.
|
Switches
|
Auto
|
For automatic take-up of roll paper when roll paper feeds into the sensor unit's detection area
|
|
Manual
|
For manual control of the take-up of roll paper
|
Adjusting the sensor
The angle of the sensors has already been adjusted when the unit is shipped. But, if the Sensor light on the control box is flashing, you need to adjust the sensor so that the light detector is aligned with the light emitter. When they are aligned, the Sensor light comes on.
|
Caution:
|
| -
Avoid placing the sensor in direct sunlight; otherwise, the auto take-up reel unit may not operate properly.
|
|
| -
Prevent fans or air conditioners from blowing directly on the roll paper. If the paper is blown out of the sensor area, it will not be taken up properly.
|
|
To adjust the sensor position, follow the steps below.
|
|
Loosen the knob on the light emitter.
|
|
|
Adjust the horizontal angle of the emitter so that the Sensor light turns on.
|
|
|
Holding the detector in position, retighten the knob.
|
Loading roll paper onto the take-up reel core
 |
Warning:
|
| -
Turn off the Auto Take-up Reel Unit before loading paper. If the take-up reel unit operates unexpectedly, bodily injury may occur.
|
|
| -
Make sure the take-up reel unit is installed properly and securely. Bodily injury may occur if it falls.
|
|
Before you load roll paper onto the take-up reel core, check the following:
-
Make sure that the leading edge of the roll paper is straight.
-
Be sure to remove the center shaft from the upper basket hooks and the lower shafts from the holes on the bottom of the base unit, and put the paper basket under the printer.
Winding paper forward
When you want paper wound onto the take-up reel core with the print on the outside, set the take-up reel unit to wind paper forward. Follow the steps below.
|
|
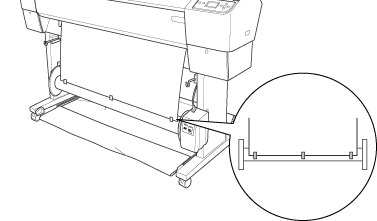
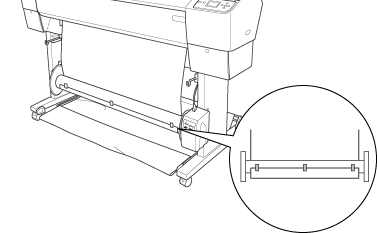
Attach the three paper guides packaged with the Auto Take-up Reel Unit evenly.
|
|
|
Make sure that the roll paper is loaded in the printer properly. For instructions, see Loading roll paper.
|
|
|
Press the Paper Source button to select Roll Auto Cut Off .
|
|
|
Press the Paper Feed button on the printer to advance the roll paper.
|
|
|
Set the Auto switch on the control box to Off.
|
|
|
Tape the leading edge of the roll paper to the take-up reel core in three places.
|
|
|
Press the Paper Feed button to feed the paper forward and create a loop of slack.
|

|
|
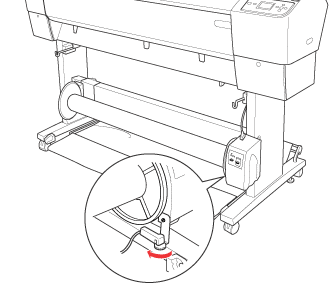
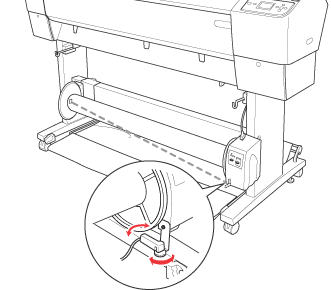
Move and hold the Manual switch on the Auto Take-up Reel Unit to the Forward position, and take up at least one turn of paper on the take-up reel core. Make sure that adequate slack remains between the roll paper and the take-up reel core.
|
Winding paper backward
When you want the paper wound onto the take-up reel core with the print on the inside, set the take-up reel unit to wind paper backward. Follow the steps below.
|
|
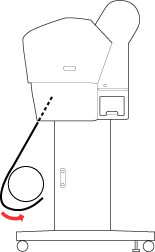
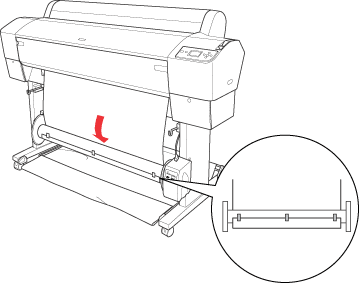
Remove the paper guides from the printer.
|
|
|
Make sure that the roll paper is loaded in the printer properly. For instructions, see Loading roll paper.
|
|
|
Press the Paper Source button to select Roll Auto Cut Off .
|
|
|
Press the Paper Feed button on the printer to advance the roll paper.
|
|
|
Set the Auto switch on the control box to Off.
|
|
|
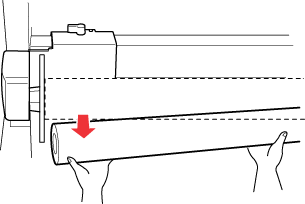
Pull the bottom of the roll paper around the back of the reel core as shown below. Then tape the leading edge of the paper to the reel core in three places.
|
|
|
Press the Paper Feed button to feed the paper forward and create a loop of slack.
|
|
|
Move and hold the Manual switch on the Auto Take-up Reel Unit to the Backward position and take up at least one turn of paper on the take-up reel core. Make sure that adequate slack remains between the roll paper and the take-up reel core.
|
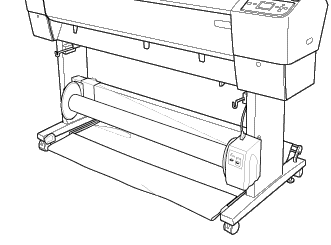
Taking-up your prints
When the Auto Take-up Reel Unit is installed, and the take up reel core is loaded with paper to take-up in the desired direction, you can use the unit to take up your prints.
|
Warning:
|
| -
Do not touch the Auto Take-up Reel Unit while it is operating. Doing so may result in injury.
|
|
| -
Do not look directly at the sensor beam. Doing so may cause permanent eye damage.
|
|
|
Caution:
|
| |
During operation, be sure to stay out of the sensor detection area. Interrupting the sensor beam can cause paper to be taken up under tension and adversely affect printing.
|
|
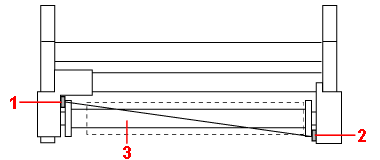
1 Light detector
2 Light emitter
3 Light detector sensor detection area
|
|
Press the Paper Source button to select Roll Auto Cut Off .
|
|
|
Set the direction of take-up with the Auto switch on the control box.
|
|
To wind forward
|
To wind backward
|
|

|
|
|
Send a print job to the printer. The printer starts printing. The Auto Take-up Reel Unit takes up the roll paper in the direction you set in step 2.
|
| |
Note:
|
| | |
Do not touch the Manual switch while printing is in progress. Doing so may damage your prints.
|
|
Removing paper after take-up
After paper take-up, remove the take-up reel core as follows.
|
|
Turn off the Auto Take-up Reel Unit.
|
| |
Warning:
|
| | |
Turn off the Auto Take-up Reel Unit before removing the take-up reel core. If the take-up reel unit operates unexpectedly, injury may occur.
|
|
|
|
Press the Paper Source button to select Roll Auto Cut On .
Then press and hold the Enter button for 3 seconds. The roll paper is cut automatically.
|
| |
Note:
|
| | |
If you are printing on very thick roll paper, it is recommended that you set the Auto Cut setting to off (on the printer's control panel and in the printer driver) and press the Paper Feed button on the printer to feed the paper, and then cut the paper yourself; otherwise the paper cutter may be damaged. See Cutting the roll paper manually.
|
|
|
|
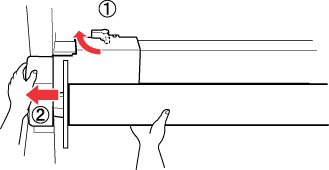
Turn the lever to unlock the movable unit, and then slide it to the left so that the flange knob clears the end of the take-up reel core. While doing this, support the take-up reel core with one hand to keep it from falling.
|
|
|
Remove the take-up reel core from the flange knob on the movable unit.
|
|
|
Similarly, remove the take-up reel core from the flange knob on the drive unit.
|
[Top]
| Version NPD1450-00, Copyright © 2005, SEIKO EPSON CORPORATION |

