|

Reference Guide
|
|
Printing with Mac OS 8.6 to 9.x
Sharing Your Printer
 Setting up your printer as a shared printer
 Accessing the shared printer
This section describes how to share your printer so that other computers on a network can use it.
The computer on a network can share the printer that is directly connected to one of them. The computer that is directly connected to the printer is the printer server, and the other computers are the clients which need permission to share the printer with the printer server. The clients share the printer via the printer server.
 |
Note:
|
 | |
To connect your printer directly to a network without setting it up as a shared printer, consult your network administrator.
|
|
Setting up your printer as a shared printer
To share a printer connected directly to your computer with other computers on an AppleTalk network, follow these steps.
 |
Turn on the printer.
|
 |
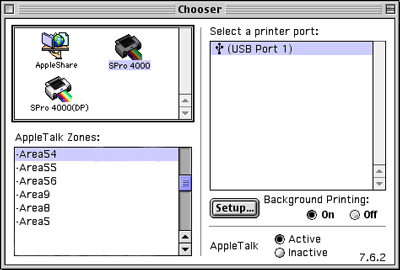
Select Chooser from the Apple menu and click the printer's icon. Select the port to which the printer is connected.
|

 |
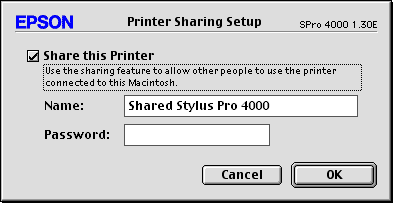
Click Setup. The Printer Sharing Setup dialog box appears.
|

 |
Select Share this Printer, and type the printer name and password information as needed.
|
 |
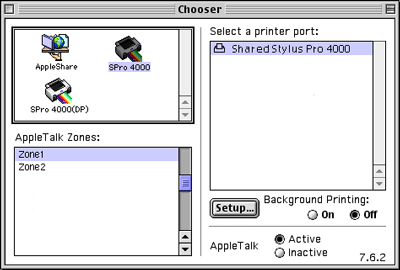
Click OK. The name of the shared printer appears in the port list in the Chooser.
|
 |
Close the Chooser.
|

[Top]
Accessing the shared printer
To access the shared printer from another computer on the network, follow these steps.
 |
Turn on your printer.
|
 |
On each computer from which you want to access the printer, select Chooser from the Apple menu. Click your printer's icon and select the printer port you want to use from the Select a printer port box on the right. You can only select from the printers connected to your current AppleTalk zone.
|

 |
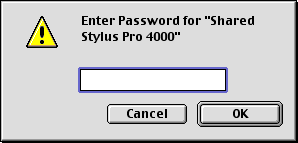
If the following dialog box appears, enter the password for the printer, then click OK.
|

 |
Select the appropriate Background Printing option button to turn background printing on or off.
|
 |
Close the Chooser.
|

[Top]
| Version 1.10E, Copyright © 2004, SEIKO EPSON CORPORATION |
Setting up your printer as a shared printer
Accessing the shared printer