 |
 About EpsonNet Print About EpsonNet Print
 System Requirements System Requirements
 Installing EpsonNet Print Installing EpsonNet Print
 For Windows XP/Server 2003/2000/NT 4.0 Users For Windows XP/Server 2003/2000/NT 4.0 Users
 For Windows Me/98/95 Users For Windows Me/98/95 Users
 Configuring the Printer Port Configuring the Printer Port
EpsonNet Print is a utility program that provides peer to peer printing to Epson printers on the TCP/IP network.
By using EpsonNet Print, you can find a printer located in the same segment or beyond a router. You can select LPR standard printing, LPR enhanced printing, or High-speed printing.
The following table lists the system requirements of EpsonNet Print.
|
Operating systems
|
Windows Me, 98, 98 Second Edition
Windows 95 OSR2 (with Internet Explorer version 5.0 or higher)
Windows XP Home Edition/Professional (with Service Pack 1 or higher)
Windows XP Professional x64 Edition
Windows Server 2003, Server 2003 x64 Edition
Windows 2000 (with Service Pack 4 or higher)
Windows NT 4.0 (with Service Pack 6 or higher)
|
|
CPU
|
Pentium II 400 MHz or better recommended
|
|
Memory
|
64 MB or more
|
|
Hard disk space
|
20 MB or more
|
|
Display
|
800 × 600 screen resolution, 256 color or more
|
Installing EpsonNet Print
Follow the steps below to install EpsonNet Print. Be sure to install it on a computer connected to the network.
 |
Note: |
 |
|
If EpsonNet Direct Print (the older version of EpsonNet Print) is already installed on your computer, you need to uninstall it before installing EpsonNet Print (the installation program will lead you through uninstalling EpsonNet Direct Print 2).
|
|
 |
Insert the Software CD-ROM in the CD-ROM drive.
|
 |
The Software Installation screen opens automatically.
|
If the Software Installation screen does not appear, double-click EPSETUP.EXE on the CD-ROM.
 |
Make sure that all applications are closed, and then click the Install Network Utility button.
|
 |
Click the icon located next to EpsonNet Print.
|
 |
Follow the on-screen instructions to complete the installation.
|
Your computer is now set up to print using LPR via EpsonNet Print. See the next section to set up your printer.
For Windows XP/Server 2003/2000/NT 4.0 Users
Follow the steps below to add a port using the Add Printer Wizard.
 |
Note: |
Adding a port for a printer assigned with a dynamic IP address
 |
For Windows XP: Click Start and then Printers and Faxes. Under Printer Tasks, click Add a printer to start the Add Printer Wizard.
|
For Windows Server 2003: Click Start and then Printers and Faxes. Double-click Add Printer in the Printers folder to start the Add Printer Wizard.
For Windows 2000: Click Start, point to Settings, and then select Printers. Double-click Add Printer in the Printers folder to start the Add Printer Wizard.
For Windows NT 4.0: Click Start, point to Settings, and then select Printers. Double-click the Add Printers icon.
 |
Click Next.
|
 |
For Windows XP/Server 2003: Click Local printer attached to this computer, clear the Automatically detect and install my Plug and Play printer check box, and then click Next. Select the Create a new port radio button, and then select EpsonNet Print Port from the list. Click Next.
|
 |  |
Note: |
 |  |
|
If the following screen appears, click the Unblock button, and then click the Search Again button to search the printers.

|
|
For Windows 2000: Click Local printer, clear the Automatically detect and install my Plug and Play printer check box, and then click Next. Select the Create a new port radio button, and then select EpsonNet Print Port from the list. Click Next.
For Windows NT 4.0: Select the My Computer radio button, and then click Next. Click the Add Port button in the Add Printer wizard dialog box. Select EpsonNet Print Port from the Available Printer Port list, and then click the New Port button.
 |
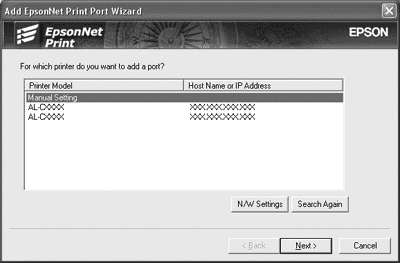
Select the target printer, and then click Next.
|

 |  |
Note: |
 |  |
-
If you want to search printers in other segments, click the N/W Settings button. Select the Specific Network Segments check box, and then enter the network address and subnet mask of the network segment for the search. Then click the Add button. You can also specify the time before declaring communication error.

|
|
 |
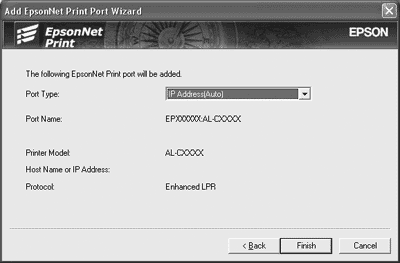
Confirm the information about the printer’s port you want to configure, and then click Finish.
|

|
Items
|
Explanations
|
|
Port Type
|
The following items are listed in the pull-down menu, and you can select the port type you need.
IP Address(Auto): Configure the port automatically. If the IP address of the printer is acquired automatically and the computer and the printer are in the same segment, you can select this port type.
IP Address(Manual): Use the printer’s IP Address for the port name.
HostName (DNS): Use the printer’s host name registered in the DNS server for the port name.
MS Network: Use the NetBIOS name registered in the printer for the port name.
|
|
The port Information
|
The following items are displayed:
- Port Name (If the port type is changed, the port name and the host name or IP address are also changed.)
- Printer Model
- Host Name or IP Address
- Protocol
|
|
Finish button
|
Register the port information to the system and close the Add EpsonNet Print Port Wizard.
|
|
Back button
|
Go back to the printer list window.
|
|
Cancel button
|
Close the Add EpsonNet Print Port Wizard.
|
Adding a port for a printer assigned with a static IP address
 |
For Windows XP: Click Start and then Printers and Faxes. Under Printer Tasks, click Add a printer to start the Add Printer Wizard.
|
For Windows Server 2003: Click Start and then Printers and Faxes. Double-click Add Printer in the Printers folder to start the Add Printer Wizard.
For Windows 2000: Click Start, point to Settings, and then select Printers. Double-click Add Printer in the Printers folder to start the Add Printer Wizard.
For Windows NT 4.0: Click Start, point to Settings, and then select Printers. Double-click the Add Printers icon.
 |
Click Next.
|
 |
For Windows XP/Server 2003: Click Local printer attached to this computer, clear the Automatically detect and install my Plug and Play printer check box, and then click Next. Select the Create a new port radio button, and then select EpsonNet Print Port from the list. Click Next.
|
For Windows 2000: Click Local printer, clear the Automatically detect and install my Plug and Play printer check box, and then click Next. Select the Create a new port radio button, and then select EpsonNet Print Port from the list. Click Next.
For Windows NT 4.0: Select the My Computer radio button, and then click Next. Click the Add Port button in the Add Printer wizard dialog box. Select EpsonNet Print Port from the Available Printer Port list, and then click the New Port button.
 |
Select Manual Setting from the list, and then click Next.
|

 |
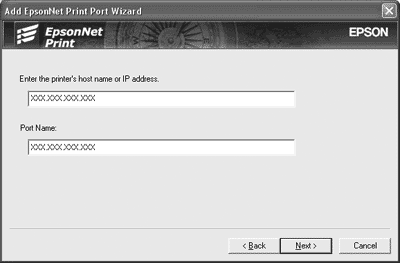
Enter the printer’s name and the port name is automatically entered to the Port Name edit box. Then click Next.
|

 |
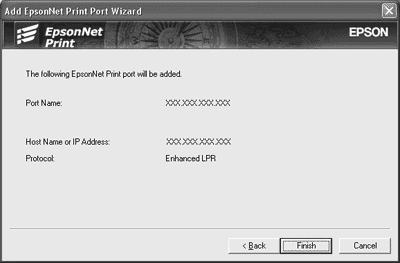
Confirm the information about the printer’s port you want to configure, and then click Finish.
|

|
Items
|
Explanations
|
|
The port Information
|
The following items are displayed:
- Port Name
- Host Name or IP Address
- Protocol
|
|
Finish button
|
Register the port information to the system and close the Add EpsonNet Print Port Wizard.
|
|
Back button
|
Go back to the printer list window.
|
|
Cancel button
|
Close the Add EpsonNet Print Port Wizard.
|
Installing the Printer Driver
Install the printer driver that comes with your printer.
 |
Insert the Software CD-ROM shipped with the printer.
|
 |
Close the EPSON Installation Program screen if it appears.
|
 |
Click the Have Disk button. The Install From Disk dialog box appears.
|
 |
Click Browse.
|
 |
Select the CD-ROM drive for Drives, and double-click the appropriate folder for your operating system. Click OK.
|
 |
Click OK in the Install From Disk dialog box.
|
 |
Select the model name of the printer, and then click Next.
|
 |  |
Note: |
 |  |
|
If the Add Printer wizard asks you to select either Keep existing driver or Replace existing driver, be sure to select the Replace existing driver radio button. Click Next.
|
|
 |
Click Finish and follow the on-screen instructions to complete the setup.
|
The printer is now ready for peer-to-peer printing. To configure the printer port, see Configuring the Printer Port.
For Windows Me/98/95 Users
Follow the steps below to add a port using the Add Printer Wizard.
 |
Note: |
Adding a port for a printer assigned with a dynamic IP address
Install the printer driver before adding a port for the printer. See the manual shipped with your printer for instructions on how to install the printer driver.
 |
Click Start, point to Settings, and then select Printers.
|
 |
Right-click the target printer icon, and then select Properties.
|
 |
Click the Details tab, and then click the Add Port button. Select the Other radio button, and then select EpsonNet Print Port. Click OK.
|
 |
Select the target printer, and then click Next.
|

 |  |
Note: |
 |  |
-
If you want to search printers in other segments, click the N/W Settings button. Select the Specific Network Segments check box, and then enter the network address and subnet mask of the network segment for the search. Then click the Add button. You can also specify the time before declaring communication error.

|
|
 |
Confirm the information about the printer’s port you want to configure, and then click Finish.
|

|
Items
|
Explanations
|
|
Port Type
|
The following items are listed in the pull-down menu, and you can select the port type you need.
IP Address(Auto): Configure the port automatically. If the IP address of the printer is acquired automatically and the computer and the printer are in the same segment, you can select this port type.
IP Address(Manual): Use the printer’s IP Address for the port name.
HostName (DNS): Use the printer’s host name registered in the DNS server for the port name.
MS Network: Use the NetBIOS name registered in the printer for the port name.
|
|
The port Information
|
The following items are displayed:
- Port Name (If the port type is changed, the port name and the host name or IP address are also changed.)
- Printer Model
- Host Name or IP Address
- Protocol
|
|
Finish button
|
Register the port information to the system and close the Add EpsonNet Print Port Wizard.
|
|
Back button
|
Go back to the printer list window.
|
|
Cancel button
|
Close the Add EpsonNet Print Port Wizard.
|
The printer is now ready for peer-to-peer printing. To configure the printer port, see Configuring the Printer Port.
Adding a port for a printer assigned with a static IP address
Install the printer driver before adding a port for the printer. See the manual shipped with your printer for instructions on how to install the printer driver.
 |
Click Start, point to Settings, and then select Printers.
|
 |
Right-click the target printer icon, and then select Properties.
|
 |
Click the Details tab, and then click the Add Port button. Select the Other radio button, and then select EpsonNet Print Port. Click OK.
|
 |
Select Manual Setting from the list, and then click Next.
|

 |
Enter the printer’s name and the port name is automatically entered to the Port Name edit box. Then click Next.
|

 |
Confirm the information about the printer’s port you want to configure, and then click Finish.
|

|
Items
|
Explanations
|
|
The port Information
|
The following items are displayed:
- Port Name
- Host Name or IP Address
- Protocol
|
|
Finish button
|
Register the port information to the system and close the Add EpsonNet Print Port Wizard.
|
|
Back button
|
Go back to the printer list window.
|
|
Cancel button
|
Close the Add EpsonNet Print Port Wizard.
|
Configuring the Printer Port
Follow the steps below to configure the printer port. The printing speed differs depending on your selection.
 |
For Windows Me/98/95/2000/NT 4.0:
Click Start, point to Settings, and then select Printers.
|
 |
Right-click the target printer, and then click Properties.
|
 |
For Windows Me/98/95:
Click the Details tab, and then click the Port Settings button.
|
For Windows XP/Server 2003/2000/NT 4.0:
Click the Ports tab, and then click the Configure Port button.
 |
Make the appropriate settings for the desired port.
|

LPR enhanced printing:
Select the LPR Printing radio button, and then specify the queue name (up to 32 characters). LPR enhanced printing sends a print job to the target network printer without spooling all of the print data. LPR enhanced printing is faster than LPR standard printing.
LPR standard printing:
Select the Confirm file size check box, and then specify the queue name (up to 32 characters). Print data is spooled by the computer before being sent to the target network printer.
 |  |
Note: |
 |  |
|
When the print data size is 20 MB or more, we recommend that you use LPR enhanced printing.
|
|
High-speed printing:
Select the High-Speed Printing (RAW) radio button. The Epson high-speed printing port sends a print job to the target network printer without spooling all of the print data. High-Speed printing is faster than the other two printing methods.
 |
Click OK.
|
If you select the High-Speed Printing (RAW) radio button and if the printer does not support High-Speed printing, or if you fail to connect to the printer, an error message appears. Follow the message to remedy the problem.
|  |


 About EpsonNet Print
 Top
Top


