 |
 |
|
||
 |
||||
Using EpsonNet Setup
This section explains how to change the printers connection or the network interface configuration with a computer using the bundled EpsonNet Setup software.
 Note:
Note:|
Before changing the printer connection method or environment, check that the network you are changing to is operating correctly.
For Macintosh users; to make network settings using EpsonNet Setup, QuickTime version 7.x (or later) must be installed on your computer.
|
Starting EpsonNet Setup
 Note:
Note:|
To install EpsonNet Setup, see Using the Printer from a Second Computer.
|
Windows
 |
Make sure that the printer is turned on.
|
 |
Click the Start button (or Start), Programs (or All Programs), EPSON, and then xxxxxxx Network Setup (where xxxxxxx is your printer name).
|
For Windows 7/Vista: Click Continue in the User Account Control dialog box.
Mac OS X
 |
Make sure that the printer is turned on.
|
 |
Double-click the Macintosh HD icon, Applications, and then the Epson Software folder.
|
 Note:
Note:|
If the Macintosh HD icon name has been changed, double-click the icon of the hard disk running Mac OS X.
|
 |
Double-click the EpsonNet folder and then the EpsonNet Setup folder.
|
 |
Double-click the xxxxxxx Network Setup icon (where xxxxxxx is your printer name) to start the software.
|
 Note:
Note:|
If the security alert screen appears, verify that the publisher is SEIKO EPSON, and click Unblock or Allow to create a Firewall exception. If you click Keep blocking, register EpsonNet Setup in Windows Firewall. If commercially available Firewall software is installed, the corresponding screen may appear. See the software User’s Guide, and allow the communication temporarily.
|
Changing the printer connection
When you change the network settings using EpsonNet Setup, the following cables are necessary.
|
To wireless LAN: USB cable
|
|
To wired LAN: LAN cable (Ethernet cable)
|
Follow the instructions for connecting and disconnecting the cables during setup.
 Note:
Note:|
If you want to make network settings, remove the memory card from the printer before beginning setup.
Before changing the printer connection method, check that the network you are changing to is operating correctly. Also, when changing the wireless LAN connection, make a note of the broadband router (access point) and computer settings because you need the SSID and security settings during setup.
The necessary software may not be installed on your computer if you have only been using the printer as a copy or fax machine, without connecting it to a computer. In that case, the method for changing the printer connection differs from the following. Follow the instructions on the Start Here Poster and use the Software CD-ROM to make the computer connection settings from the beginning.
|
 |
Turn on the printer and make sure that your LAN is working normally.
|
 |
Connect the cable to the printer.
|
 |
Launch EpsonNet Setup from the Start menu. Starting EpsonNet Setup.
|
 |
Check the Firewall Warning, select Allow Access (Windows Firewall only), and then click Next.
|
 Note:
Note:|
If an exception has already been created on the computer or if the Firewall on the computer is disabled, the Allow Access (Windows Firewall only) check box does not appear on the screen.
If the security alert screen for your OS or the application appears, verify that the publisher is SEIKO EPSON, and click Unblock or Allow to create a Firewall exception.
|
 |
On the Select a Printer screen, select the printer you want to use, and then click Next.
|
 |
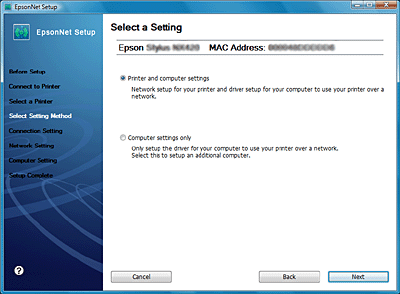
On the Select Settings screen, select Printer and computer settings, and then click Next.
|

 |
The current setting appears. Click Change Settings.
|
 |
Select the connection method that you want to change.
To change to Wired LAN: Select Print via Wired LAN, and then proceed to step 10. To change to a Wireless router compatible with WPS: Select Print via Wireless LAN - Automatic Setup, and then click Next. To change to another router or Ad Hoc connection: Select Print via Wireless LAN - Manual Setup, and then click Next. |
 |
Select the Network name (SSID) to which you want to connect, and then click Next.
|
 Note:
Note:|
If you want to set the SSID or the communication mode manually, select Enter Manually, and then fill in the appropriate settings.
|
 |
Enter the WEP Key or the WPA Passphrase set for the wireless network.
|
 Note:
Note:|
This step is skipped if there are no security protocols set for the wireless network.
|
 |
Confirm that the status has changed, and then click Next.
|
 |
Connect or disconnect the cable according to the instructions for changing the network settings.
|
 |
Follow the on-screen instructions to make the connection status settings.
|
