|

Reference Guide
|
|
Printer Software Functions / Macintosh OS 8.5.1, 8.6 and 9.x Users
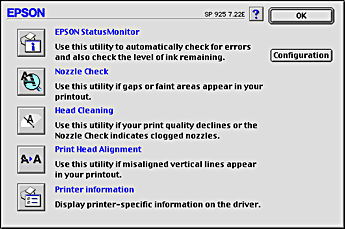
Using the Printer Utilities
 EPSON StatusMonitor
Nozzle Check
Head Cleaning
Print Head Alignment
Printer and option information
Configuration
EPSON printer utilities allow you to check the current printer status and to perform printer maintenance from your computer.
To use the utilities, click the  Utility icon button in the Print or Page Setup dialog box, then click the button for the utility that you want to use.
 |
Note:
|
 | |
Do not use the Nozzle Check, Head Cleaning, or Print Head Alignment utilities while printing is in progress, or your printout may be marred.
|
|
Refer to the appropriate section below.
EPSON StatusMonitor
The StatusMonitor utility monitors the printer status. If it detects a printer error, it will inform you with an error message.
You can also use this utility to check how much ink is remaining before printing.
To use the StatusMonitor, click the EPSON StatusMonitor button in the Utility dialog box. For details, see Using EPSON StatusMonitor.

[Top]
Nozzle Check
The Nozzle Check utility checks the print head nozzles for clogging. Check the nozzles if you notice print quality has declined, and after cleaning to confirm that the print head nozzles have been cleared. If the nozzle check indicates the print head needs cleaning, you can access the Head Cleaning utility directly from the Nozzle Check utility. For details, see Checking the Print Head Nozzles.
[Top]
Head Cleaning
The Head Cleaning utility cleans the print head. You may need to clean the print head if you notice print quality has declined. Use the Nozzle Check utility first to confirm that the print head needs to be cleaned. For details, see Cleaning the Print Head.
[Top]
Print Head Alignment
The Print Head Alignment utility aligns the print head. Use this utility if you notice a misalignment of vertical or horizontal lines. Follow the on-screen instructions to use this utility.
[Top]
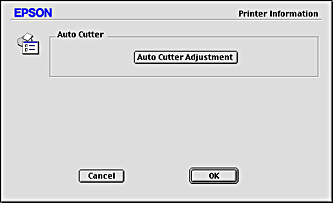
Printer and option information
This utility allows the printer driver to confirm printer configuration information.
Cutting position adjustment with Automatic Roll Paper Cutter
Make sure to adjust the cutting position to improve its precision. Follow the procedure described in the next section in order to adjust the cutting position of the auto cutter.
|
Note:
|
| -
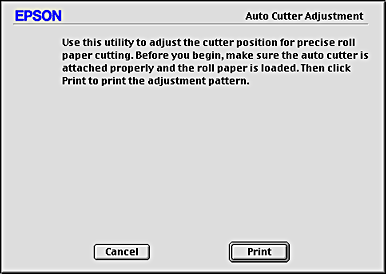
Before doing the following, it is necessary to turn the printer on and set the roll paper.
|
|
| -
If you want to maintain a precise cutting position, it is recommended that you adjust the cutting position each time you change the type or size (width) of roll paper.
|
|
 |
Click the Auto Cutter Adjustment button. The Cut Position Alignment dialog box opens.
|
 |
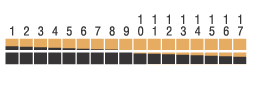
After making sure that the roll paper is set, click the Print button. The cutting position adjustment pattern is printed and cut off.
|
 |
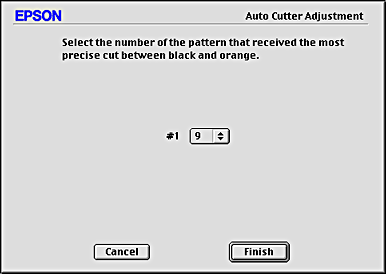
By using the cut roll paper, check the most precisely printed number among the color boundaries.
|
 |
Select the number of the most precisely printed color boundary form the list box. Click Finish to enable the adjustment.
|
[Top]
Configuration
Click this button to open the Configuration dialog box, where you can change how the StatusMonitor utility notifies you when the printer status changes. For details, see Using the Configuration Settings dialog box.
[Top]
| Version 1.00E, Copyright © 2002, SEIKO EPSON CORPORATION |


