|

Reference Guide
|
|
How to / Using Roll Paper
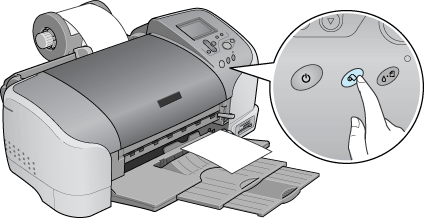
Cutting the Remaining Last Photo after Printing
 Printing area and margins
Follow the directions below to cut the last photo remaining in the printer when printing is completed.
 |
Wait until the last photo is printed and printing stops completely. The last photo remains in the printer without being cut.
|
 |
Press the  roll paper button to cut the photo. roll paper button to cut the photo.
|
 |
Caution:
|
 | -
After roll paper is cut, do not pull the printed roll paper until the paper is completely ejected. Otherwise you may damage the printer.
|
|
| -
If printing is done on premium glossy photo paper or premium semigloss photo paper, remove the photos from the output tray immediately after printing, and spread the photos one by one. If they are stacked, the color of the stacked areas may change.
|
|
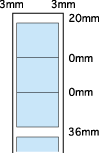
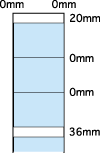
Printing area and margins
You can change the printing area and the margins for roll paper with the printer driver settings. There are two margin settings. One setting creates a 3 mm margin on both sides of your printout. The other setting prints with no margins on either side of your printout.
To print data with no margins between separate files, as shown below, do not press the roll paper button between print jobs.
|
Standard margins
|
No margins
|
|
|
 |
Note:
|
| |
The top margin is automatically set to 20 mm, regardless of the margin setting.
|
|

[Top]
| Version 1.00E, Copyright © 2002, SEIKO EPSON CORPORATION |

