|

Reference Guide
|
|
Printer Software Functions / For Users of Mac OS 8.1 or Later (Except Mac OS X)
Making Settings in the Page Setup Dialog Box
 Defining a custom paper size
 Printing on both sides of the paper
In the Page Setup dialog box, you can change the paper size and paper source, specify the paper orientation, set the printer to print on both sides of the paper, rotate your document by 180 degrees, reduce or enlarge your printout, and adjust the printable area.
Choose Page Setup from the File menu of your application. The Page Setup dialog box appears.
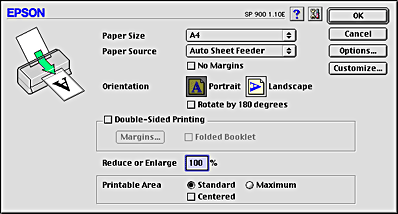
You can make the following settings in the Page Setup dialog box.
|
Paper Size
|
Select the paper size that you want to use. If you want to define a custom paper size, see Defining a custom paper size.
|
|
Paper Source
|
Select the paper source that you want to use from the options below.
Sheet Feeder:
Select this to leave a 3-mm margin on both the right and the left sides of the paper. This option is available when printing on normal paper.
Roll Paper:
Select this to leave a 3-mm margin on both the right and the left sides of the roll paper.
Manual Feed:
Select this to print on a matte board or on a CD/DVD loaded in Manual sheet slot.
|
|
No Margins
|
Check this box when you want to print without margins.
This feature prints to all four edges of the paper.
You can use the following media with this feature:
Photo Quality Ink Jet Paper:
A4, Letter, 5 x 8"
Matte Paper-Heavyweight:
A4, Letter
Photo Paper:
A4, Letter, 4 x 6", 4 x 6" (No Perforations), 100 x 150 mm, 210 x 594 mm
Premium Glossy Photo Paper
5 x 7"
Note:
If your application has margin settings, make sure they are set to zero before printing.
Printing with this feature takes longer than with normal printing.
Because this feature enlarges the image to a size slightly larger than the paper size when Sheet Feeder is selected as the Paper Source setting, the portion of the image that extends beyond the edges of the paper will not be printed.
Print quality may decline in the top and bottom areas of the printout, or the area may become smeared when printing on media other than those listed above. Print a single sheet to check the quality before printing large jobs.
You cannot use this feature with ColorLife Photo Paper, Photo Quality Glossy Film, Ink Jet Transparencies, Iron-On Cool Peel Transfer Paper, 360 dpi Ink Jet Paper, CD/DVD.
|
|
Orientation
|
Select Portrait (tall) or Landscape (wide) to change the orientation of your printout. To print close to the bottom of the page, select the Rotate by 180 degrees check box.
|
|
Double-Sided Printing
|
Select the Double-Sided Printing check box to print on both sides of the paper. Select the Folded Booklet check box to make single-fold booklets. For details, see Printing on both sides of the paper.
|
|
Reduce or Enlarge
|
Use this setting to reduce or enlarge the print size of your document between 25% and 400%.
|
|
Printable Area
|
This feature is not available when No Margins is selected.
To center the printout, select Centered. To increase the printable area, select Maximum.
Note:
The print quality may decline at the edges of the printout when Maximum is selected as the Printable Area setting. Before printing large jobs using this setting, print a single sheet to confirm quality.
When Maximum is selected, make sure that the paper loaded in the sheet feeder is not curled.
|
|
Roll Paper Option
|
The Roll Paper Option settings are only available when Roll Paper is selected as the Paper Source setting.
The available settings are described below.
Banner Mode:
Select this mode when you want to print multi-page data continuously rather than as individual pages. When this is selected, the Save roll paper check box is available.
Cut Sheet Mode:
Select this mode when you want to print multi-page data as individual pages, rather than continuously. When this is selected, the Print page frame check box is enabled.
Save roll paper:
Select this check box when you want to save roll paper. When this is selected, the blank portion of the last page of your document is not fed through the printer.
Print page frame:
Select this check box to print a line on the roll paper between pages in a multi-page document, to indicate where the paper should be cut. This feature is useful when it is unclear where the page breaks should be.
|
Defining a custom paper size
You can define a custom paper size. To do so, you can either create a new paper size, or base your custom paper size on a pre-existing paper size. Refer to the appropriate section below.
Creating a new paper size
If the appropriate paper size is not included in the Paper Size list in the Page Setup dialog box, follow the steps below to define a new custom paper size.
 |
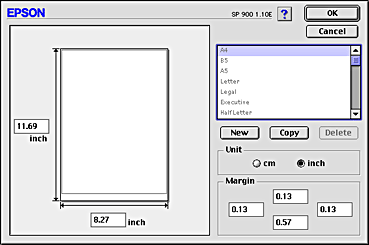
In the Page Setup dialog box, click Customize. The following dialog box appears.
|
 |
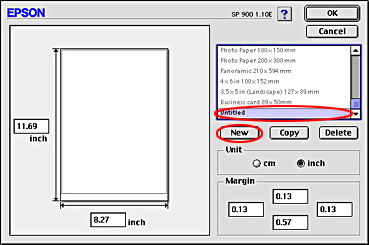
To define a new paper size, click New. The dialog box now allows you to enter a name for the new size.
|
 |
Type a unique name for the paper size in the Paper Size list.
|
 |
Specify the measurement unit as either inch or cm.
|
 |
Enter the width and the height of your paper by typing the text in the appropriate text boxes.
|
 |
Specify the margins by typing in the Margin text boxes or by manipulating the preview image.
|
 |
Click OK to return to the Page Setup dialog box.
|
You can define up to 100 paper sizes. The paper size names you create will appear in the Paper Size list in the Page Setup dialog box.
To delete a custom paper size, click Customize in the Page Setup dialog box, select the paper size from the list in the Custom Paper dialog box, and then click Delete.
Copying a pre-existing paper size to use as a template
Follow the steps below to copy an existing paper size to use as a template.
 |
Select the existing paper size to be copied and click Copy.
|
 |
Specify the measurement unit as either inch or cm.
|
 |
Specify the margins by typing in the Margin text boxes or by manipulating the preview image.
|
 |
Click OK.
|

[Top]
Printing on both sides of the paper
This printer supports double-sided printing. There are two types of double-sided printing available. Standard double-sided printing allows you to print the odd-numbered pages first. Once these pages are printed, they can then be reloaded to print the even-numbered pages onto the opposite side of the paper. Folded Booklet double-sided printing allows you to make single-fold booklets. Refer to the appropriate section below.
 |
Note:
|
 | -
The double-sided printing feature is not available when the printer is accessed over a network or is used as a shared printer.
|
|
 | -
Depending on the media type, stacks of up to 30 sheets can be loaded into the sheet feeder during double-sided printing.
|
|
 | -
Only use media types that are suitable for double-sided printing. Otherwise, the printout quality may deteriorate.
|
|
 | -
Depending on the media type and the amount of ink used to print text and images, ink may bleed through to the other side of the paper.
|
|
 | -
The surface of the paper may be smeared during double-sided printing.
|
|
Standard double-sided printing
Follow the steps below to print odd- and even-numbered pages onto opposite sides of the sheet.
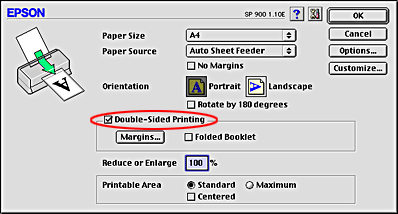
 |
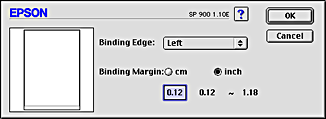
Click Margins. The following dialog box appears.
|
 |
Specify the edge of the paper where the binding will be placed. You can choose between Left, Top, and Right.
|
 |
Specify the width of the binding margin in the Binding Margin text box. You can enter any width from 3 mm to 30 mm.
|
 |  |
Note:
|
 |  | |
The actual binding margin may be different from specified settings depending on your application. Experiment with a few sheets to examine actual results before printing the entire job.
|
|
 |
Click OK to return to the Page Setup dialog box, and then click OK to save your settings.
|
 |
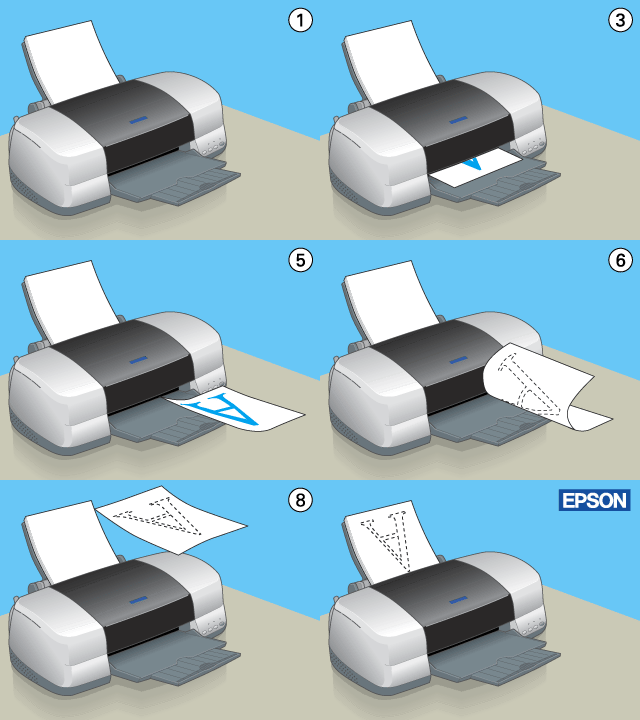
Load paper in the sheet feeder, and then send the print job from your application. Instructions for generating the even-numbered pages will be displayed while the odd-numbered pages are printed.
|
 |
Follow the on-screen instructions to reload the paper, or reload the paper as shown in the illustration below.
|
 |  |
Note:
|
 |  | -
The paper may curl during printing due to the amount of ink used. Should this occur, slightly curl the sheets in the opposite direction before reloading them into the printer.
|
|
 |  | -
Align the sheet stack by tapping its edges against a hard, flat surface before reloading the stack into the printer.
|
|
 |  | -
Follow the instructions provided when reloading the printouts. Paper jams or improperly placed binding margins may occur if the printouts are not reloaded correctly.
|
|
 |
Once the paper is reloaded, click Resume to print the even-numbered pages.
|
Folded Booklet double-sided printing
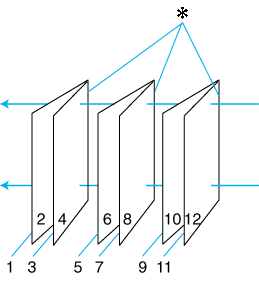
You can also make single-fold booklets using the double-sided printing feature. To create a single-fold booklet, the pages that appear on the outside (after the booklet is folded) are printed first. The pages that will appear inside the booklet can then be printed after the paper is reloaded into the printer as shown in the illustration below.
|
|
Single-fold booklet |
 |
 : Binding Edge : Binding Edge
|
A booklet can be created by printing pages 1 and 4 on the first sheet of paper, pages 5 and 8 on the second sheet of paper, and pages 9 and 12 on the third sheet of paper. After these sheets are reloaded into the sheet feeder, you can then print pages 2 and 3 on the back of the first sheet of paper, pages 6 and 7 on the back of the second sheet of paper, and pages 10 and 11 on the back of the third sheet of paper. The resulting pages can then be folded and bound together into a booklet.
Use the following steps to create a booklet as described above.
 |
Select the Double-Sided Printing check box in the Page Setup dialog box, and then select the Folded Booklet check box.
|
 |
Click Margins. The Margins dialog box appears.
|
 |
Specify the edge of the paper where the binding will be placed. You can choose from Left, Top, and Right.
|
 |  |
Note:
|
 |  | |
When Portrait is selected as the Orientation setting in the printer driver, the Left or Right binding positions are available. The Top binding position is supported when Landscape is selected as the Orientation setting.
|
|
 |
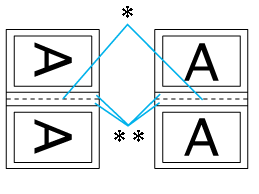
Specify the width of the binding margin in the Binding Margin text box. You can enter any width from 3 mm to 30 mm. The specified margin width will be used on both sides of the fold. For example, if a 10-mm margin is specified, a 20-mm margin will be inserted (a margin of 10 mm will be placed on each side of the fold).
|
|
|
Portrait |
Landscape |
 |
 : Folding Edge : Folding Edge
|
 |
Click OK to return to the Page Setup dialog box, and then click OK to save your settings.
|
 |
Load paper in the sheet feeder, and then send the print job from your application. Instructions for printing the inside pages will be displayed while the outside pages are printed.
|
 |  |
Note:
|
 |  | -
The paper may curl during printing due to the amount of ink used. Should this occur, slightly curl the sheets in the opposite direction before reloading them into the printer.
|
|
 |  | -
Align the sheet stack by tapping its edges against a hard, flat surface before reloading the stack into the printer.
|
|
 |  | -
Follow the instructions provided when reloading the printouts. Paper jams or improperly placed binding margins may occur if the printouts are not reloaded correctly.
|
|
 |
Once the paper is reloaded, click Resume to print the inside pages.
|
 |
Once printing is complete, fold the sheets and bind them together using a stapler or other binding method.
|

[Top]
| Version 1.00E, Copyright © 2002, SEIKO EPSON CORPORATION |
Defining a custom paper size
Printing on both sides of the paper