|

Reference Guide
|
|
How To / Paper Handling
Using EPSON Photo Paper (Roll Paper)
 Using the Roll Paper Holder
 Using cut roll paper
 Printing on EPSON Photo Paper (roll paper)
 Removing the roll paper from the printer
 Storing EPSON Photo Paper (roll paper)
EPSON Photo Paper also comes in a roll paper format, which is convenient for banner printing. EPSON recommends using the optional Roll Paper Holder (C81106 ) to load roll paper into the printer; however, it is possible to cut the roll paper to the appropriate size and load each sheet into the printer's sheet feeder individually.
Whether you are printing using the optional Roll Paper Holder or are printing on cut roll paper, keep the following in mind when printing on this media.
-
Load the paper printable side up.
-
Use flat, undamaged paper. If the paper is curled, flatten it before loading to avoid paper feeding problems.
-
Always handle paper by the edges.
-
Be sure to provide ample space in front of the printer.
-
Make sure that the output tray is down, and the output tray extension is closed.
-
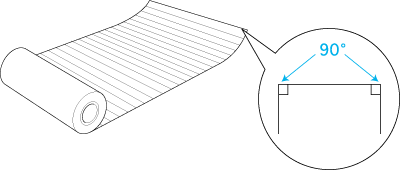
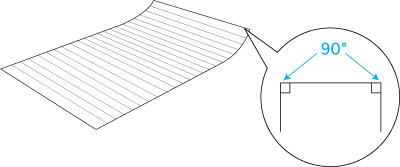
Check that the end of the paper is cut cleanly, perpendicular to the long axis of the paper. If it is cut on a diagonal or not cleanly, the paper may not feed smoothly or the print may extend off the edge of the paper.
-
EPSON recommends using media distributed by EPSON to ensure high-quality results.
Using the Roll Paper Holder
You will need the optional Roll Paper Holder (C81106 ), sold separately, to load roll paper into the printer in roll form.
Preparing the roll of Photo Paper
Before printing, always prepare the paper as described below.
 |
Check that the end of the roll is cut perpendicularly to the edges as shown. If it is cut on a diagonal, recut it to be perpendicular. For A4 and 329-mm width paper, cut along the parallel lines on the back. For 89- and 100-mm width paper, use a triangle.
|
 |  |
Caution:
|
 |  |
Always use a triangle or other tool to ensure that the end of the roll is cut perpendicularly. A diagonal cut may cause paper feed problems.
|
 |
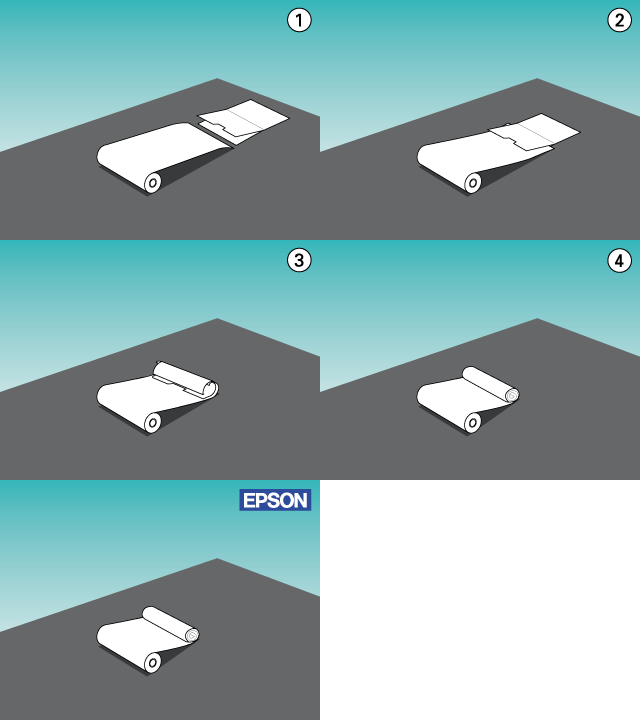
Roll the paper in the direction opposite of the paper's curl so that the curl disappears, as shown below. Use the protective film packaged with the optional Roll Paper Holder, or a thin booklet such as your Daily Use guide to roll the paper inside.
|
Loading the roll of Photo Paper
Follow the directions below to mount the optional Roll Paper Holder and load the roll of Photo Paper.
 |
Turn on the printer.
|
 |
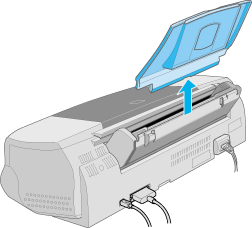
Remove the paper support.
|
 |
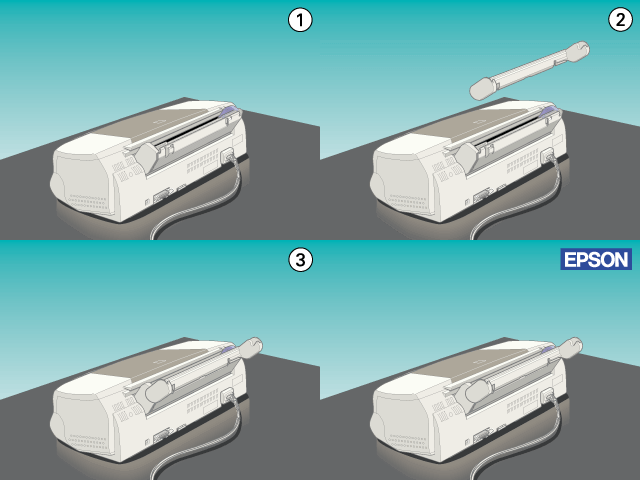
Mount the Roll Paper Holder by lowering it into the slot on the back of the sheet feeder where the paper support was mounted, as shown below.
|
 |  |
Note:
|
 |  |
Match the R and L markings on the Roll Paper Holder to those on the printer.
|
 |
Slide the roll of Photo Paper onto the spindle, and fit the spindle into the Roll Paper Holder. Make sure that the spindle is oriented correctly, as shown in the illustration below.
|
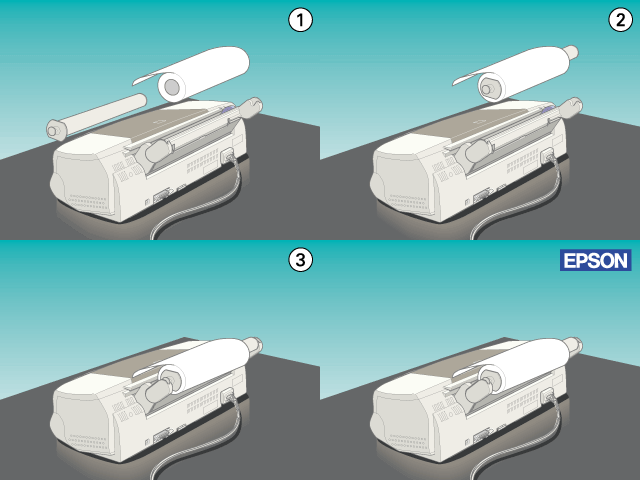
 |
Gently insert the end of the paper into the printer, flush with the right edge guide, as far as it will go. Slide the left edge guide against the left edge of the paper.
|
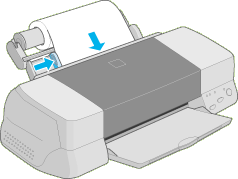
 |
To load the roll paper, lightly hold the paper in place while you press the  load/eject button. The paper feeds into the printer. load/eject button. The paper feeds into the printer.
|
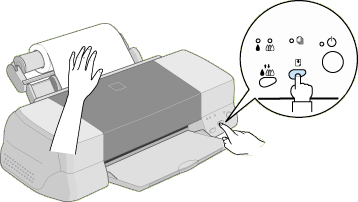
 |  |
Note:
|
 |  |
You must hold the paper edge in place with your hand while you press the  load/eject button to make sure the paper feeds correctly. load/eject button to make sure the paper feeds correctly.
|
 |
Open the printer cover and make sure that the paper is feeding correctly. If it is not straight, press the  load/eject button for three seconds to eject the paper, then feed the paper again. load/eject button for three seconds to eject the paper, then feed the paper again.
|
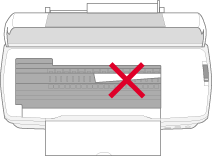
The roll paper is now loaded. Next, set up the printer driver and try printing. For details on setting up the printer driver, refer to Printing on EPSON Photo Paper (roll paper).

[Top]
Using cut roll paper
You do not need the Roll Paper Holder to load roll paper. However, if you are not using the holder, you must cut the paper into sheets of the correct size before loading it into the sheet feeder.
Preparing the roll paper sheets
Cut the roll paper into sheets as described below.
 |
Cut the paper at least 34 mm longer than the length of the printed data (we recommend that you add 50 mm or more to the length of the print data).
|
 |  |
Note:
|
 |  |
If the paper length is less than the length of the paper plus 34 mm, nothing will be printed on the last 14 mm of the paper.
|
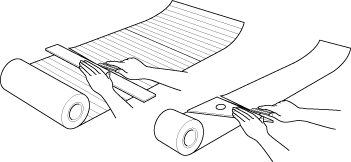
For A4 and 329-mm width roll paper, lines are printed on the back at 5-cm intervals, with bold lines printed at 50-cm intervals. Always cut perpendicular to the edges, using these lines as reference. Cut 89- and 100-mm width paper using a triangle.
 |  |
Caution:
|
 |  |
Always use a triangle or other tool to ensure that the end of the roll is cut perpendicularly. A diagonal cut may cause paper feed problems.
|
 |
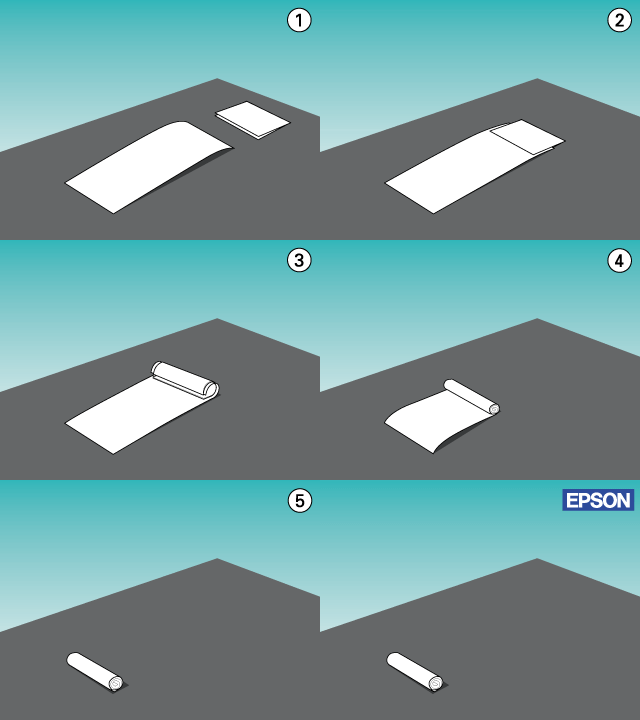
Roll the paper in the direction opposite of the paper's curl so that the curl disappears, as shown below. Use the protective film packaged with the optional Roll Paper Holder, or a thin booklet such as your Daily Use guide to roll the paper inside.
|
Loading a roll paper sheet
Follow the directions below to load a sheet of roll paper into the printer.
 |
Turn the printer on.
|
 |
Remove the paper support.
|

 |
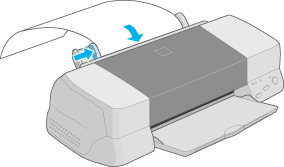
Load the paper into the sheet feeder and slide the left edge guide against the left edge of the paper.
|
 |
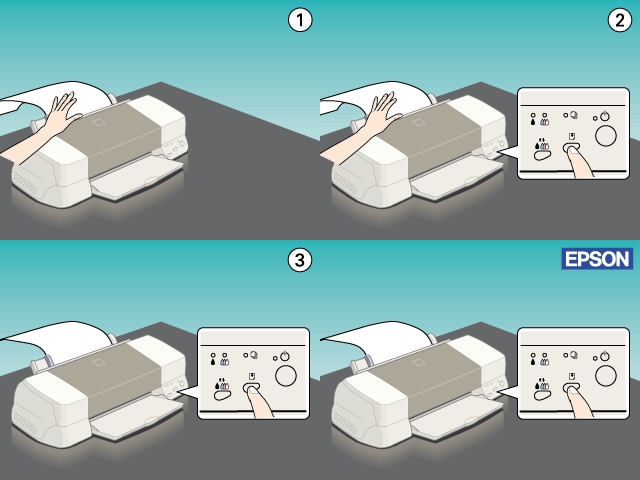
To load the sheet in the printer, lightly hold the paper in place while you press the  load/eject button, as shown below. Once the sheet is loaded, you are ready to print. load/eject button, as shown below. Once the sheet is loaded, you are ready to print.
|
 |  |
Note:
|
 |  | -
You must hold the paper edge in place with your hand while you press the
 load/eject button to make sure the paper feeds correctly. load/eject button to make sure the paper feeds correctly.
|
 |  | -
If the paper does not feed correctly, remove the paper completely and load it again. If you have difficulty removing the paper, hold the
 load/eject button for three seconds to eject it. load/eject button for three seconds to eject it.
|
The roll paper sheet is now loaded in your printer. Next, set up the printer driver and try printing. For details on setting up the printer driver, refer to Printing on EPSON Photo Paper (roll paper).

[Top]
Printing on EPSON Photo Paper (roll paper)
Once you have prepared your roll paper and loaded it into the printer, you must make the printer driver settings before you can print.
One of the first things you should decide is what width of roll paper you will be using. This will determine what Paper Source setting you will need to make. Select Roll Paper as the Paper Source in the printer driver if you are printing on A4 or 329-mm width roll paper. If you are using 89- or 100-mm width roll paper, select Roll Paper or Roll Paper [Zero Margins]. Refer to the table below for details.
|
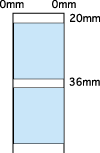
With Roll Paper selected as the Paper Source, a 3-mm margin will be left along both sides of the paper. The top margin above the print data will be set to 20 mm.
When printing is finished, press the  load/eject button once to print a cutting guideline about 12 mm from the bottom of the print data. load/eject button once to print a cutting guideline about 12 mm from the bottom of the print data.
To print the next page, press the  load/eject button again. The space between the two blocks of print data will be 36 mm. load/eject button again. The space between the two blocks of print data will be 36 mm.
|

|
|
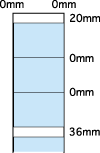
With Roll Paper selected as the Paper Source, a 3-mm margin will be left along both sides of the paper when printing data which spans multiple pages in your application. The margin between pages will be set to 0, but the margin between print jobs will remain 36 mm.
|

|
|
With Roll Paper [Zero Margins] selected as the Paper Source, no margin will be left along either side of the paper. The top margin above the print data will be set to 20 mm.
When printing is finished, press the  load/eject button once to print a cutting guideline about 12 mm from the bottom of the print data. load/eject button once to print a cutting guideline about 12 mm from the bottom of the print data.
To print the next page, press the  load/eject button again. The space between the two blocks of print data will be 36 mm. load/eject button again. The space between the two blocks of print data will be 36 mm.
|
|
|
With Roll Paper [Zero Margins] selected as the Paper Source, no margin will be left along either side of the paper when printing data which spans multiple pages in your application. The margin between pages will be set to 0, but the margin between print jobs will remain 36 mm.
|
|
For Windows users
 |
Note:
|
 | -
When printing on roll paper, you cannot use the Reverse Order or Rotate by 180° features, select Maximum or Centered as the Printable Area setting, or use the functions on the Layout tab.
|
 | -
Do not select PhotoEnhance in the printer driver, because it may cause offsets in the print area at logical page boundaries.
|
After the roll paper is loaded in the printer, follow the steps below to configure your driver for printing.
 |
Open the file you wish to print.
|
 |
Access the printer driver from the application.
|
 |  |
Note:
|
 |  |
For details on accessing the driver, refer to the application's user manual. In many applications, you can select Print directly from the File menu and access the printer driver by clicking the Properties button.
|
 |
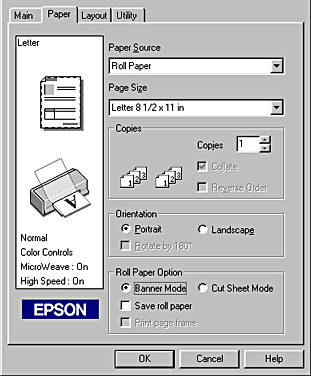
Click the Paper tab and select the appropriate Paper Source and Paper or Page Size.
|
|
Paper Source
|
Roll Paper
|
A 3-mm margin will be left along both sides of the paper.
|
|
Roll Paper [Zero Margins]
|
No left or right margins will be left. Select this for 89- and 100-mm width roll paper.
|
|
Paper Size
Page Size
|
Select a predefined paper or page size from the list or define a custom size.
If you select a predefined paper or page size, when the data exceeds the selected size, it will be printed in individual pages on the roll paper. A 36-mm margin will be printed between each page of data in a print job when you press the  load/eject button. load/eject button.
Define a custom size by selecting User Defined in the list. This will open the User Defined Paper or User Defined Page Size dialog box where you can specify the length and width of your document. As long as your paper or page size is large enough, the data will be printed as one page. This will allow continuous printing of the data without page breaks.
|
 |
Note:
|
 |
Do not select Auto Sheet Feeder as the Paper Source setting in the printer driver. Doing so will cause unnecessary paper to be fed after each print job. If you accidentally select Auto Sheet Feeder, cut the paper off at the back of the printer before it feeds into the sheet feeder, then turn the printer power off and back on again.
|
 |
Make the Roll Paper Option settings at the bottom of the dialog box.
|

|
Banner Mode
|
Select this mode when you wish to print multi-page data as continuous data on the roll paper, rather than as individual pages. When this check box is selected, the Save roll paper check box is enabled.
|
|
Cut Sheet Mode
|
Select this mode when you wish to print the multi-page data as individual pages, rather than as continuous data. When this check box is selected, the Print page frame check box is enabled.
|
|
Save roll paper
|
Select this check box when you do not wish any paper to be fed after the data is printed. This feature is only available when Banner Mode is selected.
|
|
Print page frame
|
Select this check box to print a line on the roll paper between pages in a multi-page document to indicate where the paper should be cut. This feature is useful when it is unclear where the page breaks should be or where to cut the paper after the last page has been printed. This feature is only available when Cut Sheet Mode is selected.
|
 |
Click the Main tab, and select Photo Paper as the Media Type setting.
|
For Macintosh users
 |
Note:
|
 | -
The procedures described in this section may vary, depending upon which application you are using. Check your application's user manuals for details.
|
 | -
When printing on roll paper, you cannot use the Reverse Order or Rotate by 180° features, select Maximum or Centered as the Printable Area setting, or use the functions in the Layout dialog box.
|
 | -
Do not select PhotoEnhance in the printer driver, because it may cause offsets in the print area at logical page boundaries.
|
After the roll paper is loaded in the printer, follow the steps below to configure your driver for printing. Make sure that the Stylus Photo 1270 is selected in the Chooser before proceeding.
 |
Open the file you wish to print.
|
 |
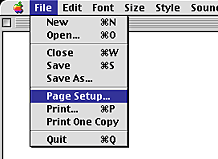
Open the printer driver.
|
 |  |
Note:
|
 |  |
In many applications, you can do this by selecting Page Setup (or Print Setup) from the File menu.
|
 |
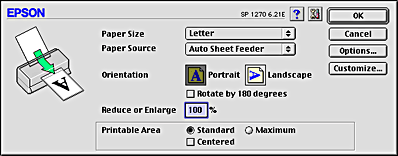
Select the appropriate Paper Source and Paper Size. You can select either a predefined paper size, or create a custom paper size.
|
 |
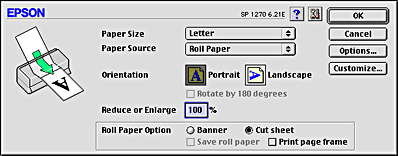
Make the other settings as necessary. Refer to the table below for details. When finished, click OK.
|
|
Banner Mode
|
Select this mode when you wish to print multi-page data as continuous data on the roll paper, rather than as individual pages. When this check box is selected, the Save roll paper check box is enabled.
|
|
Cut Sheet Mode
|
Select this mode when you wish to print the multi-page data as individual pages, rather than as continuous data. When this check box is selected, the Print page frame check box is enabled.
|
|
Save roll paper
|
Select this check box when you do not wish any paper to be fed after the data is printed. This feature is only available when Banner Mode is selected.
|
|
Print page frame
|
Select this check box to print a line on the roll paper between pages in a multi-page document to indicate where the paper should be cut. This feature is useful when it is unclear where the page breaks should be or where to cut the paper after the last page has been printed. This feature is only available when Cut Sheet Mode is selected.
|
 |
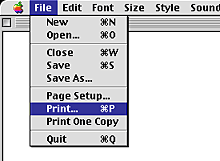
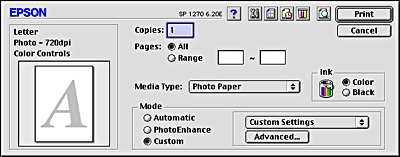
Select Print from the File menu to open the Print dialog box.
|
 |
Select Photo Paper as the Media Type setting, then click the Print button to print your document.
|
 |  |
Note:
|
 |  | -
Click Custom to display the specific printer menu for your application, or to make detailed settings.
|
 |  | -
Click the Preview icon button and the Print button will change to a Preview button. Click the Preview button to see a preview of the printout.
|

[Top]
Removing the roll paper from the printer
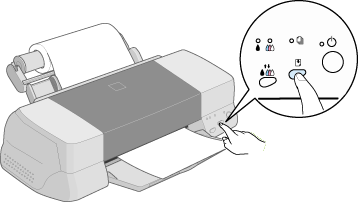
After the print job is finished, press the  load/eject buton; a line will be printed on the roll paper indicating where to cut the paper. Follow the directions below to remove the paper from the printer.
 |
Press the  load/eject button to feed the paper so that you can easily cut along the printed line. If you are printing on cut sheets of roll paper which you wish to eject, press the load/eject button to feed the paper so that you can easily cut along the printed line. If you are printing on cut sheets of roll paper which you wish to eject, press the  load/eject button until the paper ejects. load/eject button until the paper ejects.
|
 |  |
Note:
|
 |  | -
If you wish to print more data on the same sheet of paper, press the
 load/eject button and send the next print job. The paper will return to the printing start position before printing again. load/eject button and send the next print job. The paper will return to the printing start position before printing again.
|
 |  | -
You must press the
 load/eject button; otherwise, the printer will not operate even if you send a new print job. However, do not press the load/eject button; otherwise, the printer will not operate even if you send a new print job. However, do not press the  load/eject button more than is necessary; repeated motion may damage the printout. load/eject button more than is necessary; repeated motion may damage the printout.
|
 |
Cut the paper along the printed line. Never pull the paper as you cut it. Doing so may damage the printout. When cutting the paper, do not cut inside the line (closer to the printer) as this may cause paper feed problems.
|
 |  |
Note:
|
 |  |
EPSON recommends that you use a triangle or other tool to ensure that the end of the roll is cut perpendicularly. A diagonal cut may cause paper feed problems.
|
 |
Once you have cut the paper, hold down the  load/eject button for about 3 seconds. The paper will feed in reverse to a position where it can be easily removed from the sheet feeder at the back of the printer. If it does not feed to this position, repeat this step. load/eject button for about 3 seconds. The paper will feed in reverse to a position where it can be easily removed from the sheet feeder at the back of the printer. If it does not feed to this position, repeat this step.
|
 |
Gently remove the paper.
|
Your document has now been printed.

[Top]
Storing EPSON Photo Paper (roll paper)
Keeps the following points in mind when storing roll paper.
-
Return unused paper to the original package as soon as you finish printing, and avoid storing it in places exposed to high temperature, humidity, or direct sunlight.
-
EPSON recommends storing your printouts in a resealable plastic bag and keeping them away from high temperature, humidity, and direct sunlight.

[Top]
| Version 1.00E, Copyright © 2002, SEIKO EPSON CORPORATION |
Using the Roll Paper Holder
Using cut roll paper
Printing on EPSON Photo Paper (roll paper)
Removing the roll paper from the printer
Storing EPSON Photo Paper (roll paper)
) to load roll paper into the printer; however, it is possible to cut the roll paper to the appropriate size and load each sheet into the printer's sheet feeder individually.
), sold separately, to load roll paper into the printer in roll form.
load/eject buton; a line will be printed on the roll paper indicating where to cut the paper. Follow the directions below to remove the paper from the printer.