|

Reference Guide
|
|
How To / Replacing Ink Cartridges
Replacing an Empty Ink Cartridge
 Using the printer's control panel buttons
 Using the EPSON Status Monitor
This printer uses ink cartridges equipped with IC chips. The IC chip accurately monitors the amount of ink used by each cartridge, so even if a cartridge is removed and later reinserted, all of its ink can be used. However, some ink is consumed each time the cartridge is inserted because the printer automatically checks reliability.
You can replace an ink cartridge using the printer's control panel or using the EPSON Status Monitor utility. Refer to the appropriate section below for instructions.
Using the printer's control panel buttons
The printer's lights will inform you when it is time to obtain a replacement ink cartridge and when it is time to replace an empty cartridge.
This table describes the status of the lights on your printer and the required actions you need to take.
|
Lights
|
Action
|
|

|
Obtain a replacement black ink cartridge (T0321), cyan ink cartridge (T0422), magenta ink cartridge (T0423), or yellow ink cartridge (T0424).
|
|

|
Replace the empty ink cartridge.
|
 |
Warning:
|
 | -
Keep ink cartridges out of the reach of children. Do not allow children to drink from or otherwise handle the cartridges.
|
|
 | -
Be careful when you handle the used ink cartridges, as there may be some ink around the ink supply port. If ink gets on your skin, wash the area thoroughly with soap and water. If ink gets into your eyes, flush them immediately with water. If discomfort or vision problems remain after a thorough flushing, see a doctor immediately.
|
|
 |
Caution:
|
 | -
EPSON recommends the use of genuine EPSON ink cartridges. Other products, not manufactured by EPSON, may cause printer damage that is not covered by EPSON's warranties.
|
|
 | -
Leave the old cartridge installed in the printer until you have obtained a replacement; otherwise, ink remaining in the print head nozzles may dry out.
|
|
 | -
Do not refill the ink cartridges. The printer calculates the amount of ink remaining using an IC chip on the ink cartridge. Even if the cartridge is refilled, the amount of ink remaining will not be recalculated by the IC chip and the amount of ink available for use will not change.
|
|
 |
Note:
|
 | -
You cannot continue printing with one ink cartridge empty, even if the other cartridges still contains ink. Before printing, replace the empty cartridge.
|
|
 | -
In addition to the ink used during document printing, ink is consumed during the print head cleaning operation, during the self-cleaning cycle (performed when the printer is turned on), and during ink charging when the ink cartridge is installed in the printer.
|
|
For more information about ink cartridges, see When handling the ink cartridges.
To replace an ink cartridge using the  ink button, follow the steps below.
 |
Make sure that the printer is on. The  power light should be on, but not flashing. power light should be on, but not flashing.
|
 |
Lower the output tray, and then open the printer cover.
|
 |
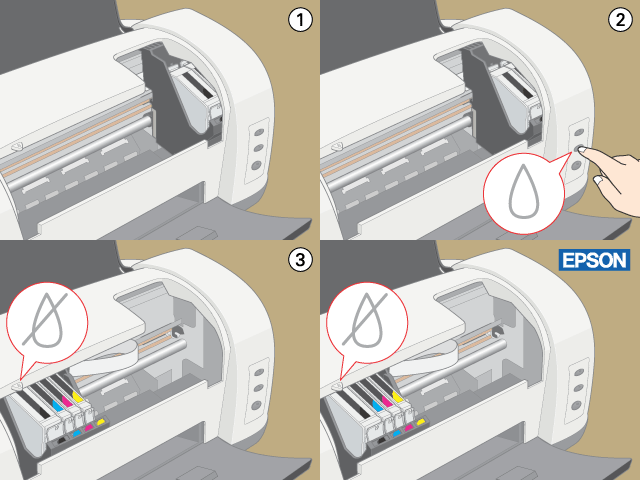
Press the  ink button. The print head moves to the ink cartridge check position and the ink button. The print head moves to the ink cartridge check position and the  power light begins to flash. The ink cartridge indicated by the power light begins to flash. The ink cartridge indicated by the  mark is either empty or low. mark is either empty or low.
|
 |  |
Note:
|
 |  | -
If an ink cartridge is low, you may continue to use it until it is empty. To confirm the level of ink remaining in each cartridge, use EPSON Status Monitor 3 (for Windows) or EPSON StatusMonitor (for Macintosh). For more information on using the Status Monitor, see Using EPSON Status Monitor 3 (for Windows), or Using EPSON StatusMonitor (for Macintosh).
|
|
 |  | -
Do not press the
 ink button for more than three seconds. The print head cleaning command will be initiated if the ink button for more than three seconds. The print head cleaning command will be initiated if the  ink button is pressed for more than three seconds. ink button is pressed for more than three seconds.
|
|
 |  |
Caution:
|
 |  |
Do not move or force the print head by hand, as this may damage the printer. Always press the  ink button to move the print head. ink button to move the print head.
|
|
 |
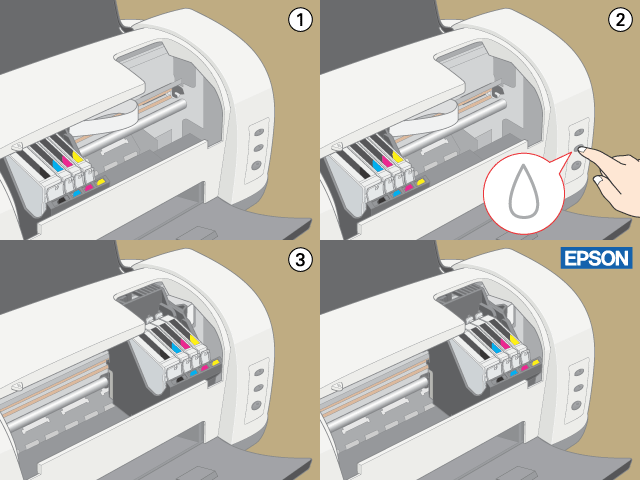
Press the  ink button. If another ink cartridge is empty or low, the print head moves to indicate it. This occurs each time the ink button. If another ink cartridge is empty or low, the print head moves to indicate it. This occurs each time the  ink button is pressed until all empty or low ink cartridges have been indicated. Once all of the empty or low ink cartridges have been indicated, the print head moves to the ink cartridge replacement position when the ink button is pressed until all empty or low ink cartridges have been indicated. Once all of the empty or low ink cartridges have been indicated, the print head moves to the ink cartridge replacement position when the  ink button is pressed. ink button is pressed.
|
 |  |
Note:
|
 |  | |
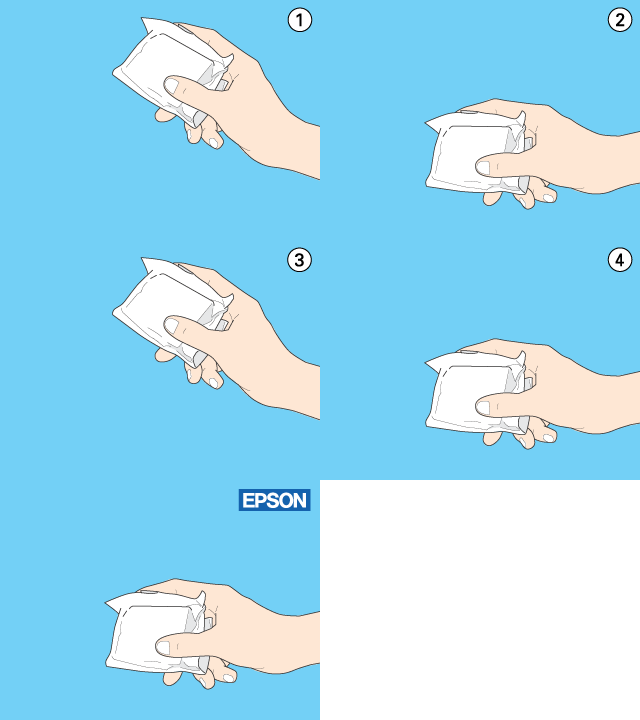
For best results, shake the ink cartridge four or five times before opening the package.
|
|
 |
Remove the new ink cartridge from its protective bag.
|
 |  |
Caution:
|
 |  | -
Be careful not to break the hooks on the side of the ink cartridge when you remove it from the package.
|
|
 |  | -
Do not remove or tear the label on the cartridge; otherwise, ink will leak.
|
|
 |  | -
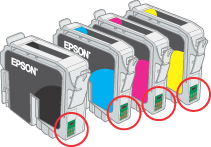
Do not touch the green IC chip on the side of the cartridge. This can damage the ink cartridge.
|
|
 |  | -
If an ink cartridge is temporarily removed from the printer, be sure to protect the ink supply port of the ink cartridge from dirt and dust. Store the ink cartridge in the same environment as the printer. When storing the cartridge, be sure that it stands as shown in the illustration below (the label that identifies the color of the ink cartridge should be displayed on the top of the ink cartridge). The valve in the ink supply port is designed to contain any excess ink that may be released. However, careful handling is recommended. Do not touch the ink supply port of the ink cartridge or its surrounding area.
|
|
 |  | -
Be sure to always install an ink cartridge into the printer immediately after removing an old ink cartridge. If the ink cartridge is not installed promptly, the print head may dry out, rendering it unable to print.
|
|
 |
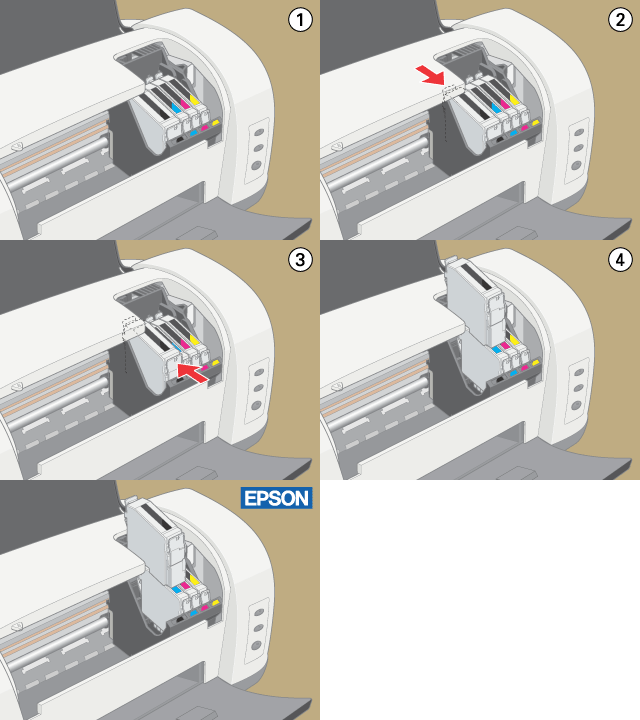
Pinch the sides of the ink cartridge that you want to replace. Lift the cartridge out of the printer and dispose of it properly. Do not take the used cartridge apart or try to refill it.
|
 |  |
Warning:
|
 |  | |
If ink gets on your hands, wash them thoroughly with soap and water. If ink gets into your eyes, flush them immediately with water. If discomfort or vision problems remain after a thorough flushing, see a doctor immediately.
|
|
 |
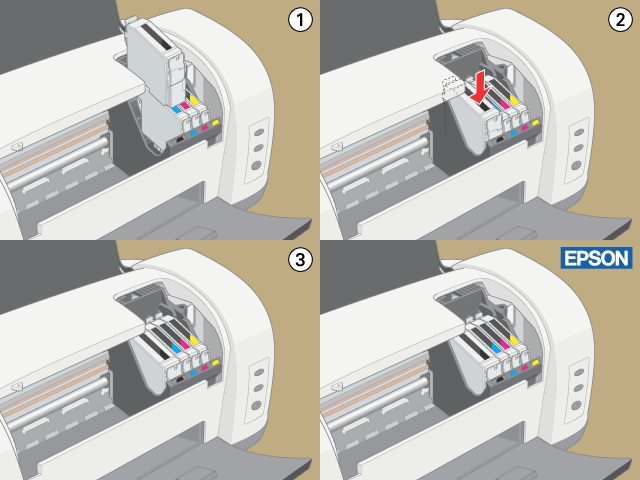
Place the ink cartridge vertically into the cartridge holder. Then, push the ink cartridge down until it clicks into place. Do not apply excessive force to the cartridge.
|
 |
When you are finished replacing the cartridge, close the printer cover.
|
 |
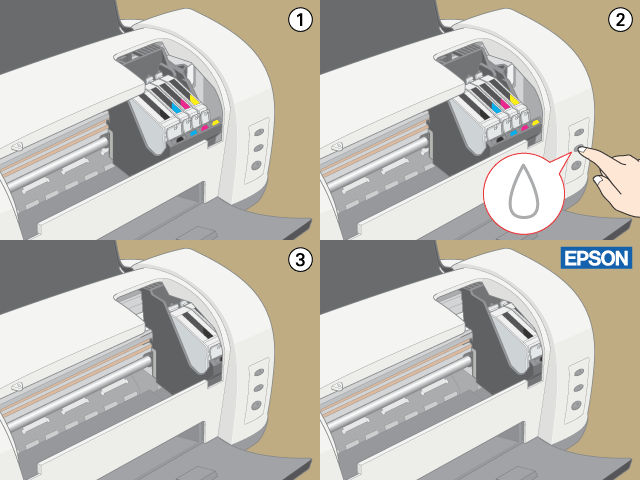
Press the  ink button. The printer moves the print head and begins charging the ink delivery system. This process takes about one minute to complete. When the ink charging process is finished, the printer returns the print head to its home position. The ink button. The printer moves the print head and begins charging the ink delivery system. This process takes about one minute to complete. When the ink charging process is finished, the printer returns the print head to its home position. The  power light stop flashing and remains on, and the power light stop flashing and remains on, and the  ink out light goes out. ink out light goes out.
|
 |  |
Caution:
|
 |  |
The  power light continue to flash while the printer is charging ink. Never turn off the printer while this light is flashing. power light continue to flash while the printer is charging ink. Never turn off the printer while this light is flashing.
|
|

[Top]
Using the EPSON Status Monitor
You can monitor the remaining ink levels from your computer and view on-screen instructions for replacing a low or empty ink cartridge using EPSON Status Monitor 3 (Windows) or EPSON StatusMonitor (Macintosh).
When an ink cartridge is low or empty, click How to in the EPSON Status Monitor window. Follow the on-screen instructions to replace the cartridge.
For more information on using EPSON Status Monitor, see Using the progress meter for Windows, or Using EPSON StatusMonitor for Macintosh.

[Top]
| Version 1.00E, Copyright © 2003, SEIKO EPSON CORPORATION |
Using the printer's control panel buttons
Using the EPSON Status Monitor
ink button, follow the steps below.