 |
Network Setup for Windows Me and 98 SE
 Setting up the printer as a shared printer Setting up the printer as a shared printer
 Accessing the printer through a network Accessing the printer through a network
These instructions tell you how to set up your printer so other users on the network can share it.
First you will set up the printer as a shared printer on the computer directly connected to it. Then you will add the printer to each network computer that will access it.
 |
Note: |
 |
|
These instructions tell you how to use the printer as a shared network printer. To connect the printer directly to a network without setting it up as a shared printer, consult your network administrator.
|
|
Setting up the printer as a shared printer
Follow the steps below on the computer that is connected directly to the printer:
 |
Click Start, point to Settings, and click Control Panel.
|
 |
Double-click the Network icon.
|
 |
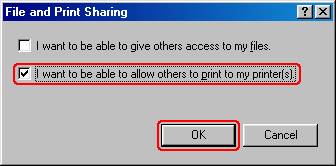
Click File and Print Sharing.
|
 |
Select I want to be able to allow others to print to my printer(s) and click OK.
|

 |
In the Network window, click OK.
|
 |
In the Control Panel window, double-click the Printers icon.
|
 |  |
Note: |
 |
Select the icon for your printer in the Printers folder.
|
 |
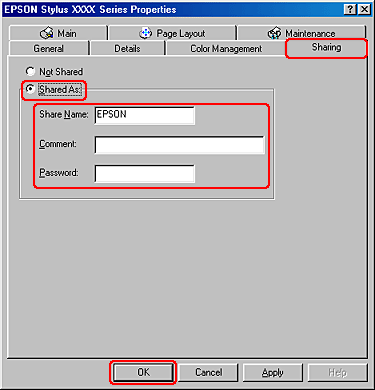
Open the File menu and click Sharing.
|
 |
Select Shared As, enter the information for your printer, and click OK.
|

Accessing the printer through a network
Follow these steps to add the printer to each network computer that will access it.
 |
Note: |
 |
Click Start, point to Settings, and click Printers.
|
 |
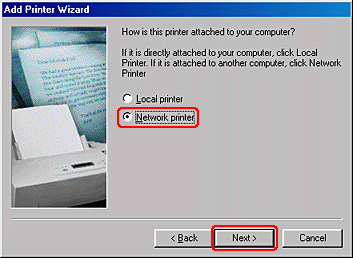
Double-click the Add Printer icon. The Add Printer Wizard appears.
|
 |
Click Next.
|
 |
Select Network printer and click Next.
|

 |
On the next screen, click Browse.
|
 |
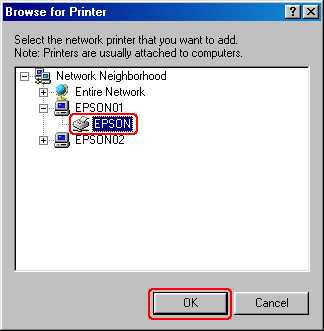
Double-click the icon of the computer that is directly connected to the printer. Then click the icon for your printer.
|

 |
Click OK and follow the on-screen instructions.
|
 |  |
Note: |
 |  |
|
To monitor the status of a shared printer, EPSON Status Monitor 3 must be installed on each computer. EPSON Status Monitor 3 is automatically installed when you install the printer software.
|
|
|  |


 Setting up the printer as a shared printer


 Top
Top See
See