![]()
Reference Guide
|
|
Index |
|
Search |
|
Glossary | |||||
|
|
Contents |
|
Help |
|
||||||
|
|
|
|||||||||||||||||||||||||||||||||
Product Information / Using the Bluetooth Photo Printer Adapter
 | Make sure the Bluetooth Photo Print Adapter is connected to this product and Bluetooth settings have been made. For details on connecting the Bluetooth Photo Print Adapter, see Connecting and Disconnecting the Bluetooth Photo Print Adapter. See Bluetooth Settings to set the Bluetooth settings. |
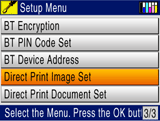
 | Press the Setup button. |
 | Select Direct Print Image Set. |
 |
 |
| 1. Select Direct print image set. |
| 2. Press the OK button. |
| Note for OPP profile users: |
|
 |
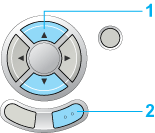
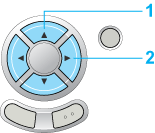
Select the required printing option using the  / / buttons, then change the setting item using the buttons, then change the setting item using the  / / buttons. buttons.
|
 |
 |
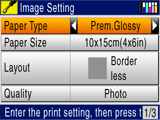
| 1. Select the Printing Option. |
| 2. Change the Setting Item. |
|
Menu Item |
Setting Item |
Description |
|
Paper Type |
Plain, Prem. Glossy*, GlossyPhoto, SemiGloss, Matte, PQIJ, Photo Paper, Bright White, Iron-on, Photo Stickers |
|
|
Paper Size |
A4, 10 x 15 cm (4 x 6 in)*, A6 |
|
|
Layout |
Borderless* |
Prints without margin. |
|
With Border |
Prints with a 3 mm margin along the top, bottom, and on both sides. |
|
|
Upper1/2 |
Prints on upper half part of paper. |
|
|
2-up, 4-up, 8-up, 20-up |
Prints multiple photos on one sheet. The size of each photo is adjusted automatically according to the number of photos to print and the size of paper. |
|
|
Stickers 16 |
Prints 16 stickers on one Photo Stickers sheet. |
|
|
[P.I.F.] |
Select this Layout when printing photos with PRINT Images Framer. |
|
|
Quality |
Normal, Photo*, Best Photo |
|
|
Filter |
Off* |
Does not print in sepia tone, but in color or gray scale. |
|
Sepia |
Prints in sepia tone. |
|
|
Auto Correct |
P.I.M.* |
Prints using the PRINT Image Matching function. If the photo data does not include P.I.M., try printing with PhotoEnhance. |
|
PhotoEnhance |
Prints enhanced images automatically. It requires longer time, but gives better quality. |
|
|
Exif |
Prints using the Exif Print function. It provides you with high-quality printouts. |
|
|
None |
Prints with no automatic correction. |
|
|
Small image |
On |
Removes digital noise and enhances the resolution. |
|
Off* |
Does not remove digital noise or enhance the resolution. |
|
|
Brightness |
Brightest |
Makes printouts very bright. |
|
Brighter |
Makes printouts slightly brighter. |
|
|
Standard* |
Makes no adjustment. |
|
|
Darker |
Makes printouts slightly darker. |
|
|
Darkest |
Makes printouts very dark. |
|
|
Contrast |
Highest |
Makes contrast of printouts very strong. |
|
High |
Makes contrast of printouts slightly stronger. |
|
|
Standard* |
Makes no adjustment. |
|
|
Sharpness |
Sharpest |
Makes the outline of subjects very sharp. |
|
Sharper |
Makes the outline of subjects slightly sharper. |
|
|
Standard* |
Makes no adjustment. |
|
|
Softer |
Makes the outline of subjects slightly softer. |
|
|
Softest |
Makes the outline of subjects very soft. |
|
|
Saturation |
Highest Sat. |
Makes printouts very vivid. |
|
More Sat. |
Makes printouts slightly more vivid. |
|
|
Standard Sat. |
Makes no adjustment. |
|
|
Less Sat. |
Makes printouts slightly duller. |
|
|
Least Sat. |
Makes printouts very dull. |
|
|
Date Prints the shooting date. |
None* |
Prints with no date information. |
|
yyyy.mm.dd |
e.g. 2003. 05. 18 |
|
|
mmm.dd.yyyy |
e.g. Oct. 18. 2003 |
|
|
dd.mmm.yyyy |
e.g. 18. Oct. 2003 |
|
| * Indicates the default setting. |
The available menu items and default settings will vary according to the profile being used.
| Note: |
|
 | Confirm the settings and press the OK button. The LCD returns to the Setup menu. |
 | Print the data from your Bluetooth enabled device. |
| Note: |
|
For more information about printing from Bluetooth wireless-capable digital still cameras, digital video cameras, PDAs, mobile PCs and other Bluetooth wireless-capable device, refer to the documentation for both the device and this product.
 Previous |
 Next |
| Version NPD0904-00, Copyright © 2005, SEIKO EPSON CORPORATION |