|

Reference Guide
|
|
Options and Consumables
Using the Optional Cut-Sheet Feeders
 Installing the high-capacity or double-bin cut-sheet feeder
 Loading paper in the high-capacity cut-sheet feeder
 Selecting the paper source (bin 1 or bin 2)
 Switching between continuous paper and single-sheet paper in the cut-sheet feeder
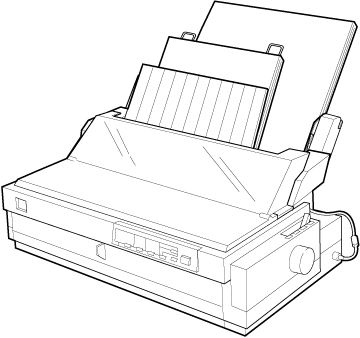
When you install the optional high-capacity cut-sheet feeder (C80673 ), you can load up to 150 single sheets of paper in the printer. Also you can create a double-bin cut-sheet feeder by connecting the second bin cut-sheet feeder (C80674
 ) to the high-capacity cut-sheet feeder. The double-bin cut-sheet feeder allows you to load two different types of single-sheet paper in the printer at the same time and easily switch between them. To assemble the double-bin cut-sheet feeder and load paper in the second-bin cut-sheet feeder, see the second-bin cut-sheet feeder manual. For instructions on selecting bin 1 or bin 2 of the double-bin cut-sheet feeder, see Selecting the paper source (bin 1 or bin 2).
 |
Note:
|
 | |
The second-bin cut-sheet feeder can be used only in combination with the high-capacity cut-sheet feeder; you cannot use it alone.
|
|
Installing the high-capacity or double-bin cut-sheet feeder
You install the high-capacity cut-sheet feeder and double-bin cut-sheet feeder in the same way. Follow the steps below.
 |
Note:
|
 | |
Before installing the double-bin cut-sheet feeder, assemble it as described in the cut-sheet feeder manual.
|
|
 |
Warning:
|
 | |
You will need to move the print head by hand before installing the cut-sheet feeder. If you have just used the printer, the print head may be hot; let it cool for a few minutes before touching it.
|
|
 |
Make sure the printer is turned off.
|
 |  |
Caution:
|
 |  | |
Be sure to turn off the printer. You will need to move the print head to the ribbon installation position before installing the high-capacity cut-sheet feeder, and moving the print head while the printer is on may damage the printer.
|
|
 |
Remove the paper guide and printer cover. Then press up the tabs on both sides of the paper tension unit and lift it up and off the printer. If a tractor is installed in the pull position, remove it as described in Removing the pull tractor. Store unused parts in a safe place.
|
 |
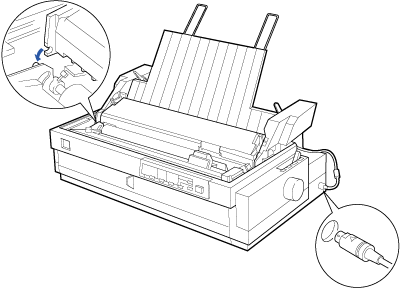
Hold the cut-sheet feeder in both hands and fit the feeder's notches over the mounting posts on the printer as shown below. Then release the latch levers and lower the cut-sheet feeder until it rests on the printer.
|
 |
Insert the cable into the connector as shown above.
|
 |
Replace the printer cover.
|
You are now ready to load paper in the cut-sheet feeder. To load paper in the high-capacity cut-sheet feeder, see the next section. To load paper in the second bin of the double-bin cut-sheet feeder, see the manual that comes with the second-bin cut-sheet feeder. If you installed the double-bin cut-sheet feeder, you need to select the paper source (bin 1 or bin 2) as described in Selecting the paper source (bin 1 or bin 2).
To remove the cut-sheet feeder, reverse the steps above.

[Top]
Loading paper in the high-capacity cut-sheet feeder
You can load up to 150 ordinary single sheets, 25 plain bond envelopes, or 30 postcards in the high-capacity cut-sheet feeder. You can also load a stack of single-sheet multi-part forms up to 15 mm (0.59 inch) thick in this feeder.
Follow the steps below to load paper in the high-capacity cut-sheet feeder.
 |
Caution:
|
 | |
Do not load carbon paper or labels in the high-capacity cut-sheet feeder.
|
|
 |
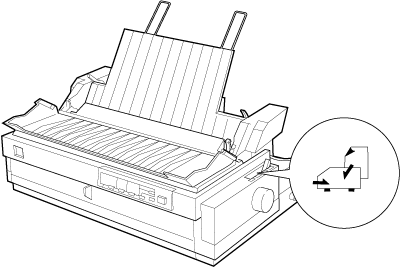
Open the paper guide cover, and set the paper release lever to the single-sheet position. Also make sure the paper thickness lever (located under the printer cover) is set to the proper position for your paper's thickness.
|
 |
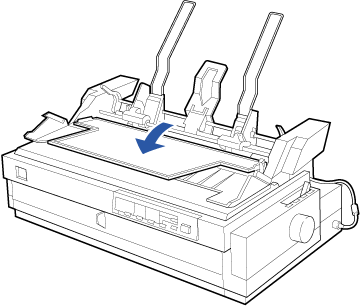
Pull down the center support.
|
 |
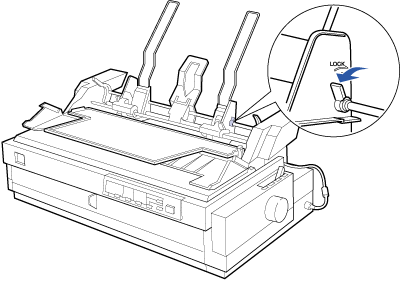
Release the left and right paper guides of the cut-sheet feeder by pulling the lock levers forward.
|
 |
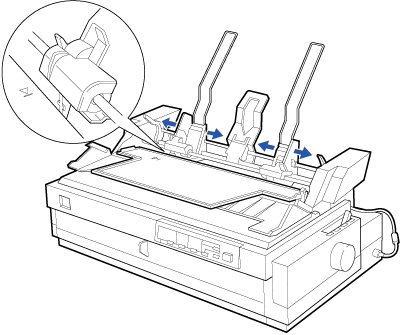
Holding the lower portion of the left paper guide, slide it until it is aligned with the arrow mark on the back of the center support. Then push the left lock lever backward to lock it in place. Holding the lower portion of the right paper guide, slide it to match the width of your paper, but do not lock it.
|
 |
Slide the paper stacker midway between the paper guides as shown above.
|
 |
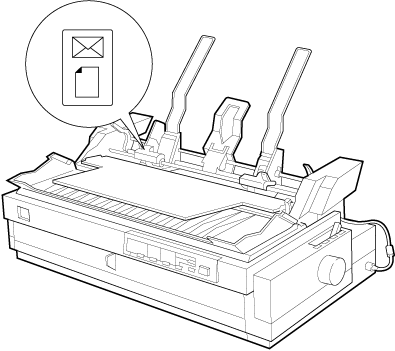
As shown below, set the cut-sheet feeder's paper type levers to the proper position for the paper you will load: single-sheet paper or postcards and envelopes.
|
 |  |
Note:
|
 |  | |
Always set the paper type levers before you load paper.
|
|
 |
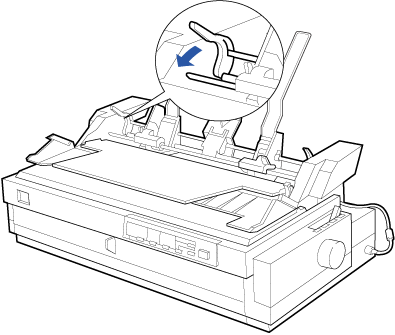
Pull both paper set levers forward until the paper guides retract and lock open to allow paper loading.
|
 |
Take a stack of paper (up to 150 sheets of plain paper) and fan it. Next, tap the side and bottom edges of the paper on a flat surface to even up the stack.
|
 |
Insert the paper stack printable side down along the left paper guide.
|
 |
Adjust the right paper guide so that it matches your paper's width. Make sure the position of the guide allows the paper to move up and down freely. Then push the lock lever backward to lock the paper guide.
|
 |
Push back the paper set levers to clamp the paper against the guide rollers.
|
 |
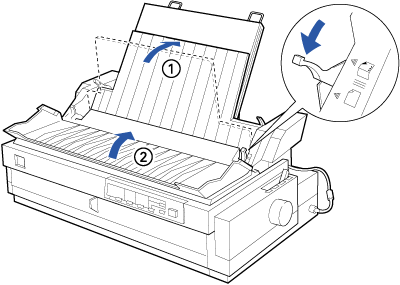
Move the cut-sheet feeder's paper selection lever to the single-sheet position, as shown below. Then lift up the center support and close the paper guide cover.
|
 |
Note:
|
 | -
Always close the printer cover before printing. The printer does not print when the cover is open.
|
|
 | -
When the cut-sheet feeder is installed, you can still load single sheets one at a time using the front paper slot.
|
|
The cut-sheet feeder automatically loads paper when the printer receives data. Printed pages are stacked on the center support. If you need to eject a sheet, press the Load/Eject button.
If the first printed line on your page appears too high or low, you can adjust its position using the micro adjust feature. See Adjusting the Top-of-Form Position.
 |
Caution:
|
 | |
Never use the knob to adjust the top-of-form position; this may damage the printer or cause it to lose the top-of-form position.
|
|

[Top]
Selecting the paper source (bin 1 or bin 2)
When the double-bin cut-sheet feeder is installed, you need to select the paper source (bin 1 or bin 2) using your application or the printer's control panel. As shown below, the high-capacity cut-sheet feeder is bin 1 and the second-bin cut-sheet feeder is bin 2.
It is best to select the paper source in your application program because software settings usually override the printer's control panel settings. However, if you cannot select the paper source in your application, press the Tear Off/Bin button until the lights indicate the bin you want as shown below. When the printer receives data, it automatically loads paper from the bin you select.

|
*
|
  Bin 1 (the high-capacity cut-sheet Bin 1 (the high-capacity cut-sheet
feeder) is selected.
  Bin 2 (the second-bin cut-sheet Bin 2 (the second-bin cut-sheet
feeder) is selected.
|

[Top]
Switching between continuous paper and single-sheet paper in the cut-sheet feeder
You can easily switch between continuous paper on a push tractor and single-sheet paper in the cut-sheet feeder without removing the continuous paper.
Switching to continuous paper
 |
If any single sheets are in the paper path, press the Load/Eject button to eject them.
|
 |
Move the printer's paper release lever to the front or rear push tractor position. Also set the paper thickness lever to the proper position for the thickness of your continuous paper.
|
 |
Move the cut-sheet feeder's paper selection lever to the continuous paper position.
|
Switching to single-sheet paper in the cut-sheet feeder
 |
If any continuous paper remains in the printer, press the Tear Off/Bin button to advance the paper to the tear-off position. Then tear off the printed pages.
|
 |  |
Caution:
|
 |  | |
Tear off your printed document before you press the Load/Eject button in the next step. Reverse feeding several pages at a time may cause a paper jam.
|
|
 |
Press the Load/Eject button. The printer feeds the continuous paper backward to the standby position. The paper is still attached to the push tractor but is no longer in the paper path.
|
 |
Move the printer's paper release lever to the single-sheet position. Also set the paper thickness lever to the proper position for the thickness of your single-sheet paper.
|
 |
Move the cut-sheet feeder's paper selection lever to the single-sheet position.
|

[Top]
| Version 1.00E, Copyright © 2002, SEIKO EPSON CORPORATION |
Installing the high-capacity or double-bin cut-sheet feeder
Loading paper in the high-capacity cut-sheet feeder
Selecting the paper source (bin 1 or bin 2)
Switching between continuous paper and single-sheet paper in the cut-sheet feeder
), you can load up to 150 single sheets of paper in the printer. Also you can create a double-bin cut-sheet feeder by connecting the second bin cut-sheet feeder (C80674
) to the high-capacity cut-sheet feeder. The double-bin cut-sheet feeder allows you to load two different types of single-sheet paper in the printer at the same time and easily switch between them. To assemble the double-bin cut-sheet feeder and load paper in the second-bin cut-sheet feeder, see the second-bin cut-sheet feeder manual. For instructions on selecting bin 1 or bin 2 of the double-bin cut-sheet feeder, see Selecting the paper source (bin 1 or bin 2).