|

Reference Guide
|
|
Basic Scanning / Using the Film Adapter
Option for Perfection 1660 Photo and 2400 Photo Users
 Unpacking the Film Adapter
Removing the integrated TPU
Installing the Film Adapter
Loading slides and film
Scanning normal (reflective) documents
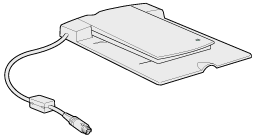
The optional Film Adapter (B81317 ) enables you to scan negative film strips and slides in the 4 x 5 inch (101.6 x 127 mm) simply by installing the unit on your scanner. The Film Adapter is compact so it can be attached or removed easily when you alternate scanning between transparent materials and normal reflective (paper) documents.
 |
Note for Perfection 1660 Photo users:
|
 | |
Most illustrations shown in this section are for the Perfection 2400 Photo, so they may be different in appearance from your scanner. The instructions are the same.
|
|
Unpacking the Film Adapter
When you first open the package, make sure that all the following items are included. If any items are missing or damaged, contact your EPSON dealer immediately. Do not throw away the package after unpacking the Film Adapter as it can be used again for storage.
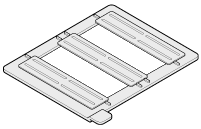
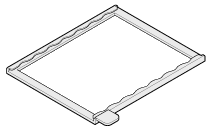
Film Adapter
Film holders
|
|
|
35-mm film strip
(multiple frames)
|
35-mm film strip
(single frame)
|
|
|
|
120/220
(6 x 9 cm film)
|
4 x 5 inch film
|

[Top]
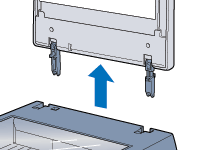
Removing the integrated TPU
You need to remove the integrated TPU before installing the Film Adapter.
Follow the steps below to remove the integrated TPU.
 |
Make sure the scanner is unplugged and disconnected from your computer.
|
 |
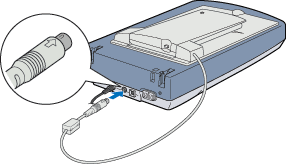
Disconnect the cable for the integrated TPU from the scanner's option connector.
|
 |
Open the integrated TPU.
|

 |
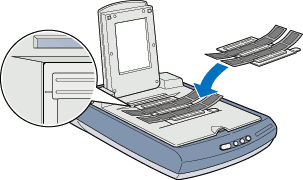
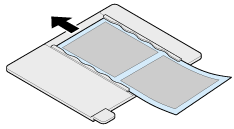
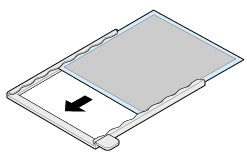
Pull the integrated TPU straight up.
|
|
Note:
|
| |
When you are finished scanning, reattach the integrated TPU in the reverse order that you removed it.
|
|
[Top]
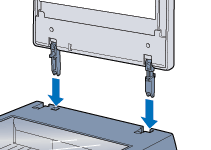
Installing the Film Adapter
Follow the steps below to install the optional Film Adapter on the scanner.
|
|
Make sure the scanner is unplugged and disconnected from your computer.
|
|
|
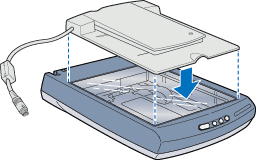
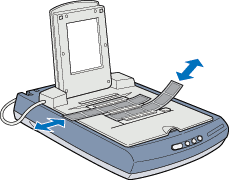
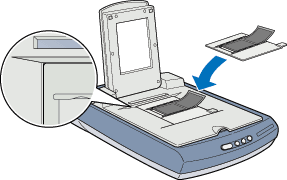
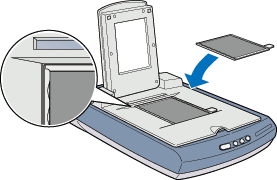
Place the optional Film Adapter on the document table so that the hinges face the rear of the scanner and it fits on the table.
|
|
|
Connect the Film Adapter connector to the scanner's option connector.
|
 |
Plug in the scanner.
|
 |
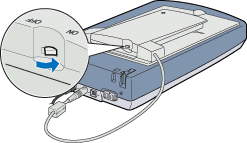
Turn on the Film Adapter.
|
[Top]
Loading slides and film
You can scan transparent materials such as positive or negative film, by passing light through the material. The following sections explain how to load slides and film.
You can scan slides and film strips in the 4 x 5 inch (101.6 x 127 mm) scanning area of the Film Adapter.
|
Note:
|
| -
If you plan to scan transparent materials from the EPSON Smart Panel application or the EPSON Photo Print utility, refer to the respective documentation for details.
|
|
| -
Wipe the inside of the Film Adapter cover, the scanner's document table, and the narrow window near the hinges before scanning transparencies. See Cleaning the Scanner.
|
|
Follow the steps below to load film or slides.
 |
Caution:
|
|
Hold the film at the edges, or else use gloves. Touching the film surface with bare hands can leave fingerprints or other traces on the film.
|
|
|
Make sure the Film Adapter connector is connected to the scanner's option connector and turn on the Film Adapter.
|
|
|
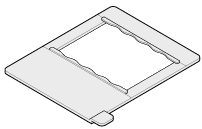
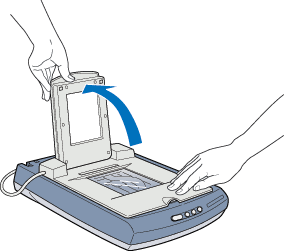
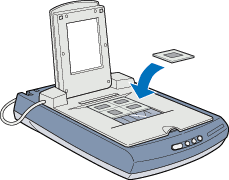
Open the top of the Film Adapter, holding the base down.
|
|
|
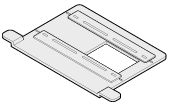
Load your transparencies into the film holder and position it on the scanner's document table in the window of the Film Adapter. Go to the section listed below that matches the type of transparency you want to scan.
|
35-mm film strip (multiple frames)
35-mm film strip (single frame)
120/220 (6 x 9 cm) film
4 x 5 inch film
35-mm slide
35-mm slides (multiple)
| |
Note:
|
| | |
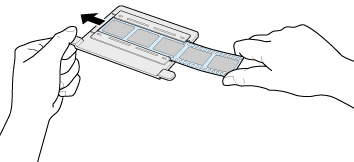
The base side of the film is the side where the film maker's name and film ID numbers can be read correctly. Also, when you look at an image on the film from the base side, the image should appear normally, not as the reverse of it.
|
|
35-mm film strip (multiple frames)
Insert a strip of film in the 35-mm film strip holder for multiple frames, base side facing down. Slide the strip until the frame you wish to scan is positioned inside the film holder opening.
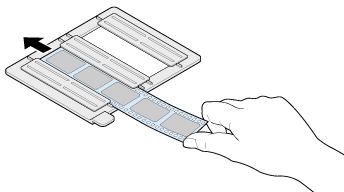
Place the film holder on the document table in alignment with the upper left-hand corner of the Film Adapter.
| |
Note:
|
| | |
You can move and adjust the position of 35-mm film by sliding the strips in the film holder so the frames you want to scan are positioned in the window.
|
|
35-mm film strip (single frame)
|
Note:
|
| |
In the Full Auto mode and in the Thumbnail preview of the Manual mode, you cannot scan an image using this film holder. Therefore, clear the Automatic Thumbnail Preview for Film check box in the Configuration dialog box, and then scan the image in the Manual mode.
|
|
Insert a strip of film in the 35-mm film strip holder for single frame, base side facing down. Slide the strip until the frame you wish to scan is positioned inside the film holder opening.
Place the film holder on the document table in alignment with the upper right-hand corner of the Film Adapter.
120/220 (6 x 9 cm) film
|
Note:
|
| |
In the Full Auto mode and in the Thumbnail preview of the Manual mode, you cannot scan an image using this film holder. Therefore, clear the Automatic Thumbnail Preview for Film check box in the Configuration dialog box, and then scan the image in the Manual mode.
|
|
Insert film in the 120/220 (6 x 9 cm) size film holder, base side facing down. Slide the strip until the frame you wish to scan is positioned inside the film holder opening.
Place the film holder on the document table in alignment with the upper left-hand corner of the Film Adapter.
4 x 5 inch film
|
Note:
|
| |
In the Full Auto mode and in the Thumbnail preview of the Manual mode, you cannot scan an image using this film holder. Therefore, clear the Automatic Thumbnail Preview for Film check box in the Configuration dialog box, and then scan the image in the Manual mode.
|
|
Insert film in the 4 x 5 inch film holder, base side facing down. Slide the strip until the frame you wish to scan is positioned inside the film holder opening.
Place the film holder on the document table in alignment with the upper left-hand corner of the Film Adapter.
35-mm slide
Place a slide directly on the document table and align it with the top right corner of the Film Adapter.
35-mm slides (multiple)
Place slides directly on the document table. For multiple slides, make sure each slide is placed right after the previous one with no space between them.
| |
Note:
|
| | |
If multiple slides are scanned and then displayed in the Thumbnail preview, the sequence of the thumbnail images does not follow the actual order of the scanned slides. The sequence of the thumbnail images starts from the top right image and runs vertically. See Thumbnail Preview.
|
|
|
|
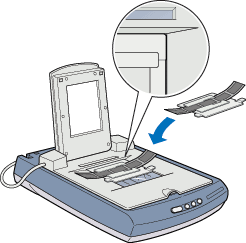
Close the unit.
|
|
Note:
|
| -
Make sure the unit is completely closed; otherwise you cannot obtain proper colored images.
|
|
| -
You need to select TPU: Color Neg. Film, TPU: Monochrome Neg. Film, or TPU: Pos. Film in the Document Source settings in the Manual mode window depending on the type of film (negative or positive, color or monochrome) you are scanning.
|
|
| -
To remove a film holder from the document table, slide it left or right then take it off of the window.
|
|
| -
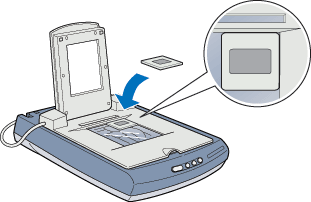
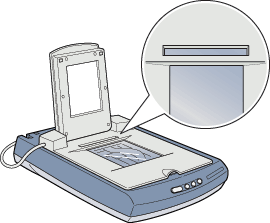
Leave the narrow window shown below uncovered, otherwise the colors in your scans will be affected.
|
|
[Top]
Scanning normal (reflective) documents
When you return to scanning normal (reflective) documents, you can simply turn off the Film Adapter, and then place documents between it and the document table. If you will not be using the Film Adapter for a long time, you can remove and then store it in its original package.
Remove the Film Adapter in the reverse order of the steps described in Installing the Film Adapter.
|
Caution:
|
|
Before removing the Film Adapter, be sure to turn it off first.
|
|
Note:
|
| -
When scanning thin documents, you may see an impression of the underside of the Film Adapter in your scans. If this happens, use the integrated TPU instead of the optional Film Adapter.
|
|
| -
When you use EPSON Smart Panel to scan and print reflective documents such as photos, remove the optional Film Adapter first and then replace the integrated TPU.
|
|
[Top]
| Version 1.00E, Copyright © 2002, SEIKO EPSON CORPORATION |
