![]()
Reference Guide
|
|
Index |
|
Search |
|
Glossary | |||||
|
|
Contents |
|
Help |
|
||||||
|
|
|
|||||||||||||||||||||||||||||||||
Setup & Maintenance / Installing Options
The following table summarizes the paper types and sizes that you can use with the optional Universal Cassette Unit.
|
Paper Type |
Paper Size |
Capacity |
|
Plain paper |
A4, A5, B5 |
Up to 550 sheets (64 g/m2) (Total thickness: 59.4 mm maximum) |
|
Labels |
A4, Letter (LT) |
Up to 290 sheets (Total thickness: 49.4 mm maximum) |
|
Transparencies |
A4, Letter (LT) |
Up to 100 sheets (Total thickness: 12.4 mm maximum) |
|
Envelopes |
Monarch (MON), C10, DL, C5, C6, IB5 |
Up to 80 sheets (Total thickness: 49.4 mm maximum) |
|
Thick paper/Extra thick paper |
A4, A5, B5 |
Up to 160 sheets (Total thickness: 49.4 mm maximum) |
| Note: |
|
Always pay attention to the following handling precautions before installing the cassette unit.
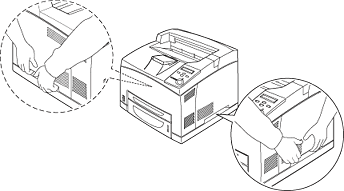
The printer weighs about 20.9 kg (46.1 lb). One person should never attempt to lift or carry it alone. Two people should carry the printer, lifting it from the positions shown below.
| Warning: |
|
| Note: |
|
Follow these steps to install the optional 550-Sheet Paper Cassette Unit A4.
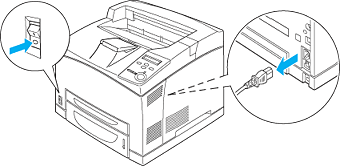
 | Turn the printer off and unplug the power cord and interface cable. |
| Caution: |
|
 | Place the printer onto the 550-Sheet Universal Paper Cassette Unit. Align each of the printer's corners with those of the unit, then lower the printer until it rests securely on the unit. |
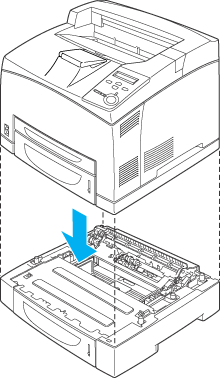
| Note: |
|
|
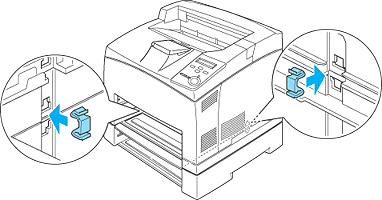
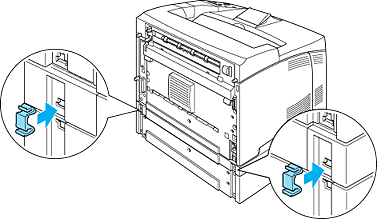
 | Pull out the MP tray and lower paper cassette from the printer, and then pull out the optional lower paper cassette from the unit. Then, secure the printer to the unit with the four fittings that are provided. Install two of the four fittings on both sides of the inside of the printer. |
 | Remove the protective materials from the cassette and load the paper. |
 | Reconnect the interface cable and power cord, then turn the printer on. |
 | To confirm that the option is installed correctly, print a Status Sheet. See Printing a Status Sheet. |
| Note: |
|
Perform the installation procedure in reverse.
 Previous |
 Next |
| Version NPD0274-00, Copyright © 2003, SEIKO EPSON CORPORATION |