|

Reference Guide
|
|
Setup & Maintenance / Replacing the Consumable Product
Fuser Unit
Prepare a new fuser unit for replacement when you get a message informing you to do so.
Handling precautions
Note the following handling precautions before replacing the fuser unit:
-
Do not touch the surface of the fuser unit. Doing so may impair print quality.
 |
Warning:
|
 | -
The fuser unit can be very hot if the printer has been in use. Turn the printer off and wait for 40 minutes until the temperature has subsided before replacing the fuser unit.
|
|
| -
Keep the fuser unit out of the reach of children.
|
|
Replacing the fuser unit
Follow these steps to replace the fuser unit.
 |
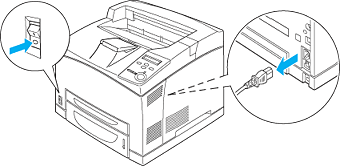
Turn off the printer and unplug the power cord and the interface cable.
|
|  |
Note:
|
| | |
If the printer has been in use, wait at least 40 minutes until the fuser cools down before replacing it.
|
|
 |
Lift the paper path lever.
|
 |
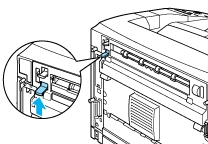
Open cover B.
|
 |
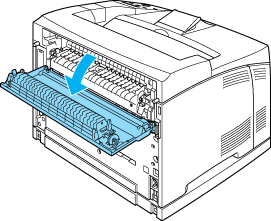
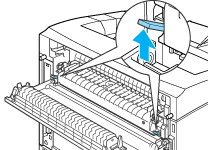
Pull down the two levers at either side of the fuser unit.
|
 |
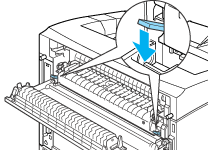
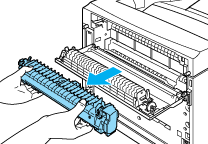
Remove the fuser unit slowly.
|
| |
Note:
|
| | |
When removing the fuser unit, hold your hands as shown above, on the three tabs on both sides of the bottom of the fuser unit.
|
|
 |
Slowly insert the new fuser unit.
|

 |
Lift up the two levers at either side of the fuser unit and push down the levers at both ends of the fuser unit to lock it.
|
 |
Close cover B.
|

 |
Reconnect the interface cable and power cord, and then turn on the printer.
|
 |
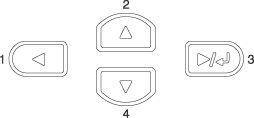
Press the  Up or Up or  Down button several times until Reset Menu appears on the control panel, and then press the Down button several times until Reset Menu appears on the control panel, and then press the  Enter button. Enter button.
|
 |
Press the Down button to display Reset Fuser Counter, and then press the Enter button.
|

[Top]
| Version NPD0274-00, Copyright © 2003, SEIKO EPSON CORPORATION |

