|

Network Guide
|
|
Tips for Administrator
Using HDD Form Overlay (Windows)
 Register the form overlay data on the hard disk drive
 Printing with HDD form overlay data
 Delete the form overlay data in the hard disk drive
This function enables faster printing with form overlay data. Windows users can use form overlay data registered on the optional hard disk drive installed in the printer. However, only an administrator can register or delete the form overlay data. You can access this function from the Form Selection dialog box in the printer driver.
 |
Note:
|
 | -
If you are using the color printer driver, this function is not available when the Color setting is set to Black in the printer driver's Basic Settings menu.
|
|
 | -
This function is not available if the optional hard disk drive is not installed.
|
|
 | -
Use this function by entering the registered form name after printing the Print List.
|
|
 | -
If the document's resolution, paper size or paper orientation settings are different from the form overlay data that you use, you cannot print the document with the form overlay data.
|
|
Register the form overlay data on the hard disk drive
Only a network administrator using Windows XP/2000/NT 4.0 is allowed to register the form overlay data on the optional hard disk drive, using the following steps.
 |
Note:
|
 | -
The form name must use only the characters shown below.
A - Z, a - z, 0 - 9, and ! ' ) ( - _ %
|
|
 | -
If you are using the color printer driver, monochrome form overlay data created in the black mode is not displayed.
|
|
 |
Prepare the form overlay data to register on the local PC Hard Disk Drive.
|
 |
Log in to Windows XP/2000/NT 4.0 as an administrator.
|
 |
Windows 2000/NT 4.0: Click Start, point to Settings, and then click Printers.
Windows XP: Click Start, point to Control Panel, and then double-click the Printers and Faxes icon.
|
 |
Right-click the EPSON AL-CXXXX Advanced or EPSON EPL-NXXXX Advanced icon and then click Properties.
|
 |
Click the Optional Settings tab.
|
 |
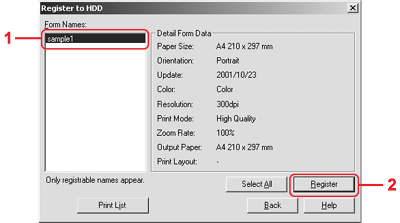
Click Register. The Register to HDD dialog box appears.
|
 |
Select the form name from the Form Names list, and then click Register.
|
 |  |
Note:
|
 |  | |
Only form names that can be registered appear on the Form Name list.
|
|

 |
If you plan to distribute the form list to the clients, click Print List to print the list.
|
 |
Click Back to close the Register to HDD dialog box.
|
 |
Click OK to close the window.
|

[Top]
Printing with HDD form overlay data
All Windows users can use form data registered on the optional hard disk drive. Follow these steps to print using the form overlay data.
 |
Select the Special menu.
|
 |
Select the Form Overlay check box, and then click the Overlay Settings button to open the Overlay Settings dialog box.
|
 |
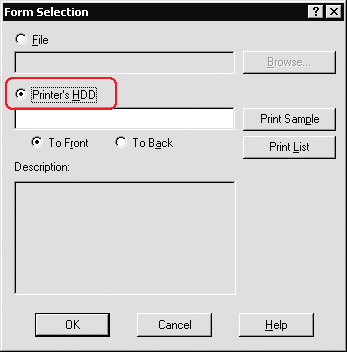
Specify No Form name in the Form text box, and then click Details. The Form Selection dialog box appears.
|
 |  |
Note:
|
 |  | |
Make sure that No Form Name is selected. Selecting any form name displays another dialog box.
|
|
 |
Click Printer's HDD, and then enter the registered form name. If you need a list of the registered form overlay data, click Print List to print it, and then check the form name.
Also, if you need a sample printout of the form overlay data, enter the form name and then click the Print Sample button.
|

 |
Choose To Back or To Front to print the form overlay data as background or foreground of the document.
|
 |
Click OK to print the data.
|

[Top]
Delete the form overlay data in the hard disk drive
Only a network administrator using Windows XP/2000/NT 4.0 is allowed to delete or edit the form overlay data in the optional hard disk drive, using the following steps.
 |
Log in to Windows XP/2000/NT 4.0 as an administrator.
|
 |
Windows 2000/NT 4.0: Click Start, point to Settings, and then click Printers.
Windows XP: Click Start, point to Control Panel, and then double-click the Printers and Faxes icon.
|
 |
Right-click the EPSON AL-CXXXX Advanced or EPSON EPL-NXXXX Advanced icon and then click Properties.
|
 |
Click the Optional Settings menu.
|
 |
Click Delete. The Delete from HDD dialog box appears.
|
 |
If you delete all form data, click the All button, then click Delete. If you want to delete some specific data, click the Selected button, enter the form name in the Form Name edit box, then click Delete.
|
 |  |
Note:
|
 |  |
If you need the list of the registered form data, click Print List to print it and confirm the form name.
Also, if you need a sample print-out of the form data, enter the form name and click the Print Sample button.
|
|

 |
Click Back.
|
 |
Click OK to close the dialog box.
|

[Top]
| Version NPD0133-03, Copyright © 2003, SEIKO EPSON CORPORATION |
Register the form overlay data on the hard disk drive
Printing with HDD form overlay data
Delete the form overlay data in the hard disk drive