|

Administrator's Guide
|
|
Settings by System / Settings for NetWare
Using Remote Printer (NetWare 3.1x/4.1x/5)
 Making the printer environment with PCONSOLE
Making the printer environment with Bindery mode
Making the printer environment with NDS mode
Configuring for NetWare using EpsonNet WinAssist
This section contains instructions on using the Internal Print Server in Remote Printer mode under NetWare 3.1x, 4.1x, 5, or IntranetWare.
First, you need to make a printer environment using PCONSOLE or NWADMIN (NetWare Administrator tool). See the target section to make a printer environment.
 |
Note:
|
 |
Be sure that the one of the following Clients is installed in your computer; Novell Client 32 or Novell IntranetWare Client.
|
Making the printer environment with PCONSOLE
For NetWare 3.1x users, follow the steps below to make the printer environment with PCONSOLE.
Creating print queues in a file server
 |
From any NetWare client, log in to the network with supervisor privileges.
|
 |
Run PCONSOLE. From the Available Options screen, select Print Queue Information and press Enter.
|

 |
Press the Insert key on your keyboard and type the print queue name. Press Enter.
|
| |
Note:
|
| |
Since your clients need the print queue name you set here when they use the printer, announce the print queue name to your clients.
|
 |
From the Print Queue list, select the print queue name that you just specified and press Enter. From the Print Queue Information list, select Queue Users and press Enter. Next, select EVERYONE from the list. If EVERYONE is not in the list, press Insert and select EVERYONE from the queue user list.
|
Creating a print server
|
|
From the Available Options screen, select Print Server Information and press Enter.
|

|
|
Press the Insert key on your keyboard and type the print server name. Press Enter. It is a good idea to write down the print server name for later use.
|
|
|
From the Print Server list, select the print server name that you just specified and press Enter.
Then, from the Print Server Information list, select Print Server Configuration and press Enter.
|

|
|
Select Printer Configuration from the Print Server Configuration Menu and press Enter.
|

 |
From the Configured Printers list, select Not Installed (port number = 0) and press Enter.
|

 |
From the Printer configuration screen, specify the printer name. Then, highlight Type and press Enter. Select Remote Parallel, LPT1 for Remote Printer mode.
|

| |
Note:
|
| |
Be sure to select Remote Parallel, LPT1 for Remote Printer mode.
|
 |
Press Esc; then press Enter to save changes.
|
 |
Press Esc.
|
 |
Select Queues Serviced by Printer from the Print Server Configuration menu and press Enter.
|

 |
Select the printer that you want to use from the Defined Printers list and press Enter.
|
 |
Press the Insert key and assign a queue to the print server port from the Available Queues list.
|
 |
Specify a priority level between 1 to 10. One is top priority.
|
 |
Press Esc to exit PCONSOLE.
|
Now go to the section Configuring for NetWare using EpsonNet WinAssist.

[Top]
Making the printer environment with Bindery mode
Follow the steps below to make the printer environment under NetWare 4.1x and IntranetWare with Bindery emulation.
|
Note:
|
| -
Assign Trusteeships for users if necessary.
|
| -
Be sure to use PCONSOLE to set the print queue and print server instead of using NWADMIN.
|
|
|
Turn on the printer.
|
|
|
From any NetWare client, log in to the server as a SUPERVISOR. Make sure to log in with Bindery connection.
|
| |
Note:
|
| |
If the client using this setting has been logged in with NDS mode, press the F4 key while PCONSOLE is starting to switch to the bindery mode.
|
|
|
Run PCONSOLE. From the Available Options screen, select Print Queues and press Enter. Press Insert and type the print queue name. Then press Enter.
|
| |
Note:
|
| |
Since your clients need the print queue name you set here when they use the printer, announce the print queue name to your clients.
|
|
|
From the Print Queue list, select the print queue name that you just specified and press Enter. From the Print Queue Information list, select Queue Users and press Enter. Next, select EVERYONE from the list. If EVERYONE is not in the list, press Insert and select EVERYONE from the queue user list.
|
|
|
From the Available Options screen, select Print Servers and press Enter. Press Insert and type the print server name. Then press Enter.
|
|
|
Press Esc to exit PCONSOLE, and log out from the server.
|
|
|
Then, log in to the server as an ADMIN. Be sure to log in with NDS connection.
|
|
|
Start Nwadmin.
|
|
|
To create the Printer Object, click the container specified as the Bindery context and select Create from the Object menu, then Printer. Type the printer name and click Create.
|
|
|
To assign the print queue, double-click the Printer object icon (created in step 9). The Printer dialog box appears.
|
|
|
Click Assignments and then click Add. From the print queue list, select the queue (created in step 3) and click OK.
|
|
|
Click Configuration in the Printer dialog box, and select Parallel from the Printer type pull-down menu.
|
|
|
Click Communication. The Parallel Communication dialog box appears.
|
 |
Select LPT1 for Port; select Polled for Interrupts; and select Manual load (Remote from Print Server) for Connection type. Then, click OK.
|
 |
Click OK in the Printer dialog box.
|
 |
To assign the printer, double-click the Print Server object icon (created in step 5). The Print Server dialog box appears.
|
 |
Click Assignments and then click Add. From the printer object list, select the printer object (created in step 9) and click OK.
|
 |
In the Print Server dialog box, select the assigned printer from the printer object list, and click the Printer Number button to set the printer number from 0 to 15. Then click OK.
|
 |
To confirm the objects you have assigned, double-click the Print Server object icon. Click Print Layout, and check that the print server, printer, and print queue are connected.
|
Now go to the section Configuring for NetWare using EpsonNet WinAssist.
[Top]
Making the printer environment with NDS mode
Follow the steps below to make the printer environment using NWADMIN under NetWare 4.1x, Intranet Ware, and NetWare 5 with NDS mode.
|
|
Turn on the printer.
|
|
|
From any NetWare client, log in to the target context of the NDS tree as an ADMIN.
|
|
|
Run the Administrator tool (Nwadmin).
|
|
|
Create a printer:
|
Click the directory context icon, and select Create from the Object menu, then Printer. Type the Printer name and click Create.

|
|
Create a print server:
|
Click the directory context icon, and select Create from the Object menu, then Print Server. Type the Print Server name and click Create.

|
|
Create a print queue:
|
Click the directory context icon, and select Create from the Object menu, then Print Queue. Type the Print Queue name and select the Print Queue Volume. Then click Create. Then double-click the print queue object, and register the user.
| |
Note:
|
| |
Since your clients need the print queue name you set here when they use the printer, announce the print queue name to your clients.
|

|
|
Double-click the Printer Object icon in the NetWare Administrator screen.
|

|
|
The Printer dialog box appears. Click Assignments and then click Add.
|

|
|
From the print queue list, select the queue you created in step 6 and click OK.
|
|
|
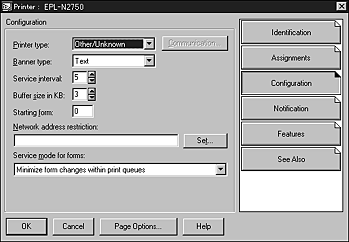
Click Configuration, select Other/Unknown for the Printer type list box and click OK.
|
|
|
Double-click the Print Server Object icon in the NetWare Administrator screen.
|

|
|
In the Print Server dialog box that appears, click Assignments and then click Add.
|

|
|
From the printer object list, select the printer object you want to assign and click OK.
|
|
|
Go back to the screen in step 12, and click the Printer Number button to set the printer number from 0 to 254.
|

|
|
To confirm the objects you have assigned, double-click the Print Server object icon. Click Print Layout, and check that the print server, printer, and print queue are connected.
|
See your NetWare documentation for more detailed information.
Now go to the next section Configuring for NetWare using EpsonNet WinAssist.
[Top]
Configuring for NetWare using EpsonNet WinAssist
Configure the Internal Print Server using EpsonNet WinAssist.
|
|
Turn on the printer.
|
|
|
From any NetWare client, log in to the target NetWare server with supervisor privileges or ADMIN.
|
|
|
Load the print server from the file server's system console on which the print queue volume is set.
>LOAD PSERVER print server name set in PCONSOLE or NWADMIN
|
|
|
Run EpsonNet WinAssist from the Start menu.
|
|
|
Click IPX. Select the printer you want to configure from the list, then click Configuration.
|

| |
Note:
|
| | -
If you have connected more than one printer with the same type of print server to the network, you can distinguish between the printers by the MAC address.
|
| | -
If the IP address is set to the default IP address, the printer model may not appear.
|
| | -
If printers do not appear in the IPX group, check that the printer is turned on. If it is on, check that the printer is in the same segment as the computer.
|
| | -
You can search printers in other segments by setting the Search Options (IPX) in the Tool menu in EpsonNet WinAssist. See Optional settings for more information.
|
|
|
Click the NetWare tab to make the settings.
|
| |
Note:
|
| |
If the current login environment is different from the current configuration for the Internal Print Server, a message appears. Follow the on-screen instructions to change your configuration.
|
|
|
Make the following settings for Remote printer mode.
|

Mode:
Select Remote printer.
Frame type:
Select Auto. Do not select other frame types.
Tree name:
Leave as is.
Context:
Leave as is.
Primary printserver name:
Specify the print server name which you have created using PCONSOLE or NWADMIN.
Printer port number:
Specify the same port number you assigned to the print server using PCONSOLE or NWADMIN.
|
|
After making the settings, click OK. The Password dialog box appears.
|
|
|
Type your password (up to 20 characters) and click OK to save the settings. If you need to set a password, see About passwords.
|
Follow the on-screen instructions. After updating is complete, refresh the configuration by selecting Refresh from the View menu.
|  |
Caution:
|
| |
Since it takes 2 or 3 minutes to send new settings to the Internal Print Server, you must wait until the on-screen message appears before turning off your printer.
|
[Top]
| Version 1.00E, Copyright © 2001, SEIKO EPSON CORPORATION |

