![]()
Reference Guide
|
|
Index |
|
Search |
|
Glossary | |||||
|
|
Contents |
|
Help |
|
||||||
|
|
|
|||||||||||||||||||||||||||||||||
Using the Printer Driver / For Windows
Accessing the printer driver
The printer driver lets you choose from a wide variety of settings to get the best results from your printer.
| Note: |
|
|
|
You can access the printer driver from any application program, or directly from your Windows operating system.
The printer settings made from many Windows applications override settings made when the printer driver is accessed from the operating system, so you should access the printer driver from your application to make sure you get the result you want.
| Note: |
|
| Note: |
|
You can change the print quality or resolution of printouts to favor speed or detail. If you need high quality output, choose a higher number. Please note that doing so reduces the print speed.
There are three levels of print output; 600 dpi, Class 1200 dpi, and True 1200 dpi. Class 1200 dpi provides high quality printing results on par with 1200 dpi with the Enh. MG and RITech functions (under 600 dpi).
 | Click the Basic Settings tab. |
 | Select the desired printing resolution from the Print Quality drop-down list. |
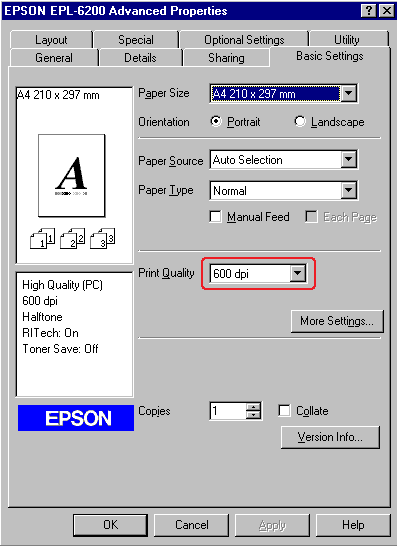
 | Click OK to accept the setting. |
| Note: |
|
|
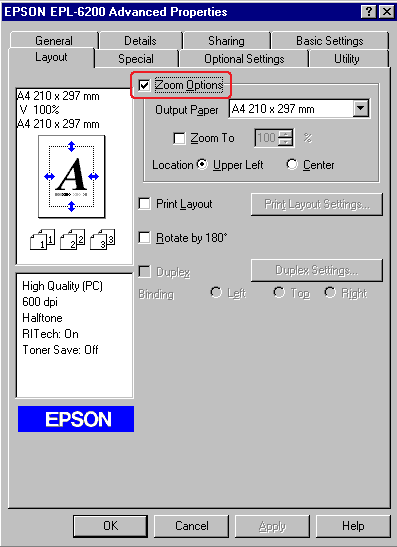
You can have your document enlarged or reduced automatically during printing.
|
| Click the Layout tab. |
|
| Select the Zoom Options check box. |
|
| Select the desired paper size from the Output Paper drop-down list. The page will be printed to fit on the paper you have selected. |
 | Select Upper Left for Location to print the enlarged or reduced page image at the upper left corner of the paper. Select Center to print the enlarged or reduced page image with centering. |
 | Click OK to accept the settings. |
|
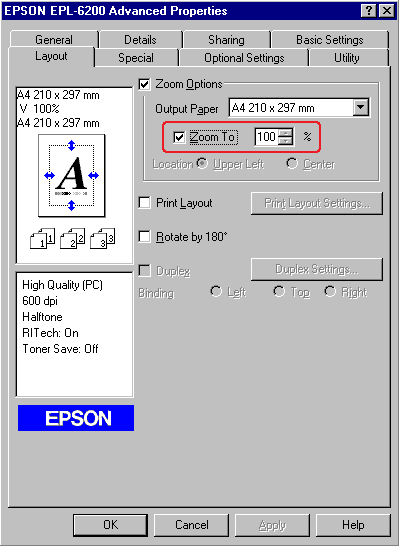
| Click the Layout tab. |
|
| Select the Zoom Options check box. |
|
| Select the Zoom To check box. |
|
| Specify the magnification percentage in the box, then click OK. The percentage can be set between 50% and 200% in 1% increments. |
If necessary, select the paper size to be printed from the Output Paper drop-down list.
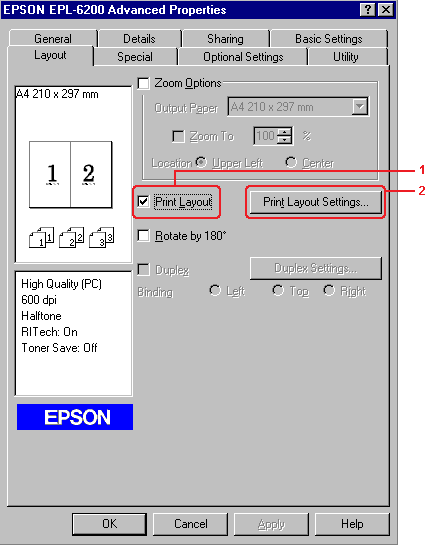
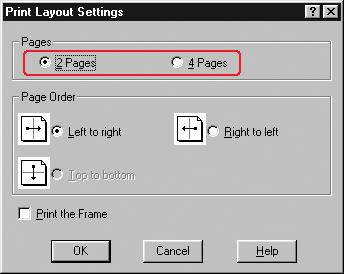
"Layout printing" prints either 2 or 4 pages onto a single page and specifies the printing order, automatically resizing each page to fit the specified paper size. You can also choose to print documents surrounded by a frame.
|
| Click the Layout tab. |
|
| Select the Print Layout check box, and click Print Layout Settings. The Print Layout Settings dialog box appears. |
|
| Select the number of pages you want to print on one sheet of paper. |
|
| Select the Page Order in which the pages are printed on each sheet. |
| Note: |
|
|
| Click OK to close the Print Layout Settings dialog box. |
 | Click OK on the Layout menu to accept the settings. |
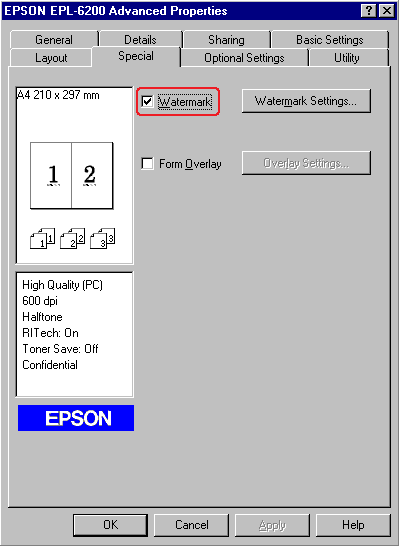
Follow the steps to use a watermark on your document. In the Watermark dialog box, you can select from a list of predefined watermarks, or you can select a bitmap (.BMP) or text (.TXT) file as your own custom watermark. The Watermark dialog box also allows you to make a variety of detailed watermark settings. For example, you can select the size, intensity, and position of your watermark.
|
| Click the Special tab. |
|
| Select the Watermark check box. |
|
| Click Watermark Settings. The Watermark dialog box appears. |
|
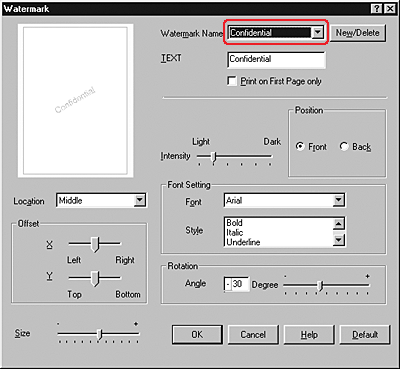
| Select a watermark from the Watermark Name drop-down list. |
|
| Select the location on the page where you want to print the watermark from the Location list box. |
|
| Adjust the horizontal or vertical Offset position. |
 | Adjust the image intensity of the watermark with the Intensity slider bar. |
 | Adjust the size of the watermark with the Size slider bar. |
 | Select Front (to print the watermark on the face of the document) or Back (to print the watermark on the backside of the document) for the Position setting. |
 | Click OK to accept the settings. |
You can make a new watermark as follows:
|
| Click the Special tab. |
|
| Select the Watermark check box. |
|
| Click Watermark Settings. The Watermark dialog box appears. |
|
| Click New/Delete. The User Defined Watermarks dialog box appears. |
|
| Select Text or BMP and type a name for the new watermark in the Name box. |
|
| If you select Text, type the watermark text in the Text box. If you select BMP, click Browse, and select the BMP file you want to use, then click OK. |
| Note: |
|
|
| Click Save to close the User Defined Watermarks dialog box. Your watermark will appear in the list box. |
|
| Click OK to register the new watermark settings. |
| Note: |
|
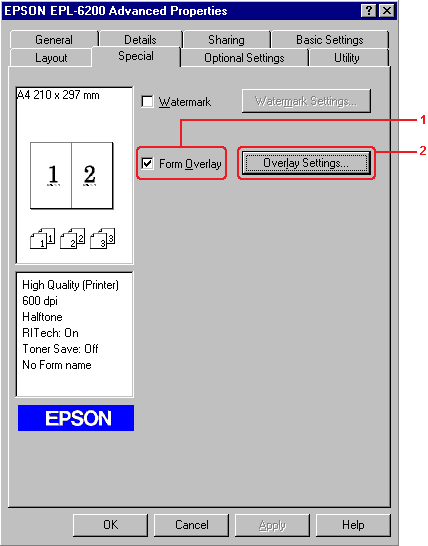
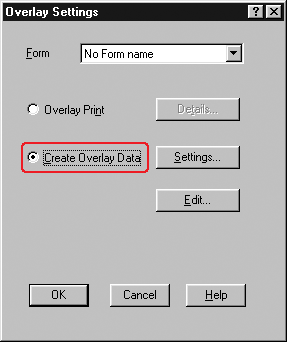
The Overlay settings dialog box allows you to print form data overlaid with data made by another application.
| Note: |
|
You can create form data and save it as a file.
|
| Open the application that you will use to create the overlay. |
|
| From the application, access the printer driver. Open the File menu and choose Print or Print Setup. Then click Printer, Setup, Options, or Properties, or click a combination of these buttons, depending on the application you use. |
|
| Select the Special tab. |
|
| Select the Form Overlay check box, and click Overlay Settings to open the Overlay Settings dialog box. |
|
| Click Create Overlay Data. |
|
| Click Settings. |
|
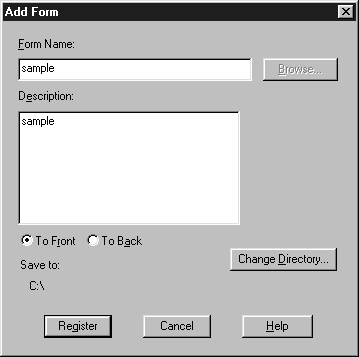
| Select the Use Form Name check box. Then click Add Form Name. The Add Form dialog box appears. |
|
| In the Add Form dialog box, type the form name in the Form Name box and its description in the Description box. |
|
| Click To Front (to print the overlay on the face of the document) or To Back (to print the overlay on the back side of the document). |
|
| In the Add Form dialog box, click Register. |
 | In the Form Settings dialog box, click OK. |
 | In the Overlay Settings dialog box, click OK. If you want to stop the procedure, click Cancel. |
| Note: |
|
 | Print the file saved as overlay data. It is possible to save any kind of file as an overlay. The overlay data is created. |
Follow the steps to print a document with overlay data.
|
| Open the file to print with overlay data. |
|
| From the application, access the printer driver. Open the File menu and choose Print or Print Setup. Then click Printer, Setup, Options, or Properties, or click a combination of these buttons, depending on the application you use. |
|
| Select the Special tab. |
|
| Select the Form Overlay check box, and click Overlay Settings to open the Overlay Settings dialog box. |
|
| In the Overlay Settings dialog box, choose the form from the Form list, then click OK. |
|
| Click OK to print the data. |
The overlay data is made with the current printer settings such as Resolution: 600 dpi. If you want to make the same overlay with different printer settings such as 1200 dpi, follow the instructions below.
|
| Re-access the printer driver as described in step 2 in Creating an overlay. |
|
| Make the printer settings and exit the printer driver. |
|
| Send the same data that you made by application to the printer as in step 12 in Creating an overlay. |
This setting is available only for Form Name data.
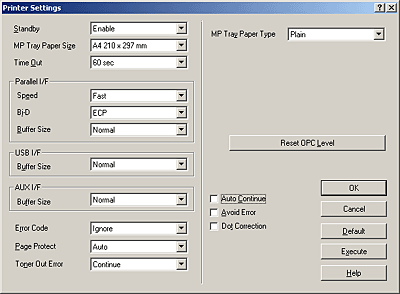
After replacing a photoconductor unit, reset the photoconductor counter by using the printer driver. When you are finished installing a new a photoconductor unit, see Resetting the photoconductor counter.
|
| Click the Optional Settings tab, and then click Printer Settings. The Printer Settings dialog box appears. |
|
| Click Reset OPC Level. The photoconductor clear dialog box appears. |
EPL-6200
EPL-6200L
|
| Click OK to reset the OPC level counter. |
Duplex printing prints on both sides of the paper. When printing for binding, the binding edge can be specified as required to produce the desired page order.
As an ENERGY STAR® partner, EPSON recommends the use of the double-sided printing function. Refer to ENERGY STAR® Compliance for more information on the ENERGY STAR® program.
|
| Click the Layout tab. |
|
| Select the Duplex check box. Then select the Left, Top, or Right button as Binding position. |
|
| Click Duplex Settings to open the Duplex Settings dialog box. |
|
| Specify the Binding Margin for the front and back sides of the paper. Then select whether the front or back side of the paper is to be printed as the Start Page. |
|
| When printing for binding as a booklet, click the Binding Method check box and make appropriate settings. For details about each setting, see online help. |
|
| Click OK to accept the settings and return to the Layout menu. |
When you print graphics or a large amount of data, the printer may stop due to insufficient memory. Follow the steps below to avoid memory errors and continue printing.
| Note: |
|
|
| Click the Optional Settings tab. |
|
| Click Extended Settings. The following dialog box appears. |

| Note: |
|
|
| Select the Avoid Insufficient Memory Error check box. |
|
| Click OK to accept the settings. |
When you want to print PostScript-formatted files, use the PostScript printer driver to print. For instructions on installing the PostScript printer driver that shipped with your printer, see Installing the PostScript printer driver (EPL-6200 only).
You can access the PostScript printer driver either from the application that you are printing from, or directly from your operating system. If you access the PostScript printer driver through an application, any changes made to print settings apply only to the current print job. To make permanent print setting changes, access the PostScript printer driver directly from the operating system.
The PostScript printer driver enables you to change the settings for your PostScript print job. The settings are grouped into various categories that you can access by clicking the appropriate tab in the printer's Properties dialog box.
Online help is also available to help you with the settings. There are two online help options. Click the Help button for procedural help on the settings. If you want help on a particular item, click the "?" icon on the top-right corner of the dialog box's title bar and then click the name of the setting that you want more information on. An explanation of the setting and its options will be displayed.
Select the desired paper size. This setting must match the size of the paper loaded in the printer. The paper sizes that are available will differ according to the printer. The default setting is either A4 or Letter, depending on your country of purchase.
Specify how the document is to be positioned on the page. The options are Portrait (vertical) and Landscape (horizontal).
Select this check box to print multiple copies of the document in page order. If this check box is not selected, each page is printed out the specified number of times before the following page is printed.
| Note: |
|
Select the desired duplex print style. Flip on long edge produces two-sided printouts that turn like a book, while Flip on short edge produces two-sided printouts that turn like a calendar. This feature is available only if the optional Duplex unit is installed.
Select the paper source for your print job. The options are AutoSelect Tray, MP Tray, Cassette 1, Manual Feed 1st Page, and Manual Feed EachPage. However, the actual paper sources that are available will differ according to the printer and the options installed.
Select the desired paper type to print on. The options are Normal, Thick W, Thick N, and Transparency. Make sure to select the correct paper type to avoid smearing or wasting ink.
Click this button to set the margins for your printout. You can select to specify in Inches or Millimeters.
Click this button to reset the settings on this sheet to their default values.
Select the resolution that you want to print in. The options are Fast, Quality, and Super. The Quality and Super settings print at higher resolutions, but the printing time will be longer.
Select this check box if you want to print the document as a negative image. This feature prints by reversing the RGB or black-and-white values of the image, and is useful for printing black-and-white or coarse RGB images.
Select this check box if you want to print the document as a mirror image. This feature prints by reversing the horizontal coordinates of the image.
Specify how many pages of your document to print on one sheet of paper. The options are 1-up, 2-up, 4-up, 6-up, 9-up, and 16-up.
Select this check box if you want the borders of the pages to be printed when printing more than one page of the document on one sheet of paper.
This setting enables you to shrink or enlarge the image to print. You can enter any percentage from 25% to 400%. To shrink the image, specify a percentage that is lower than 100%. To enlarge the image, specify a percentage that is higher than 100%. However, if you can shrink or enlarge the image to print in the application that you are printing from, do so in the application and not through the printer driver.
Click this button to reset the settings on this sheet to their default values.
Select this radio button to have the computer download TrueType fonts to the printer according to the settings in the Font Substitution Table. This setting can speed up printing.
Click this button to edit the Font Substitution Table.
Select this radio button to have the computer always download all the TrueType fonts used in the document to be printed to the printer. This will slow down printing, but the fonts in the printout will be identical to that shown on the screen.
Select this check box to add the symbol for the Euro currency to the set of PostScript fonts residing on the printer.
Click this button to update the list of installed PostScript Type 1 fonts so that they are printed correctly.
Click this button to specify advanced settings for the downloading of fonts to the printer. See online help for details on each of the available settings.
Click this button to reset the settings on this sheet to their default values.
Specify the amount of available printer memory. If the entered value does not match the actual amount of memory on the printer and printing problems occur, change the setting.
Displays the amount of font cache memory available to Type 32 fonts. The printer driver automatically adjusts the font cache size according the memory setting specified under Installable options.
Specify the density to print in. The options are Lightest, Light, Medium, Dark, and Darkest.
Select whether to use RITech when printing. RITech improves the appearance of printed lines, text, and graphics. The options are On and Off.
Select whether to use the Toner Save Mode when printing. When the Toner Save Mode is turned on, the printer uses about 50% less toner than normal. The options are On and Off.
This setting enables you to specify whether to use lossy compression when memory runs low during printing. The options are On and Off. When Image Protect is set to On, lossy compression is not used. If it is set to Off, lossy compression is used when memory resources are too low.
Specify whether to start printing from the first page or second (back) page. The options are Front and Back. If Back is selected, the first page is left blank. This setting is enabled only when Print on Both Sides is selected.
This setting enables you to select the color for separation printing. The options are None, Cyan, Magenta, Yellow, and Black.
The settings available under Installable options enable you to specify whether certain options are installed into the printer, and if so, what they are. Use the Change setting for drop-down list to specify the details of the options installed.
Click this button to reset the settings on this sheet to their default values.
Specify the format for PostScript files. The options are PostScript (optimize for speed), PostScript (optimize for portability-ADSC), Encapsulated PostScript (EPS), and Archive format. See online help for details on each of these formats.
This setting enables you to specify how header information is sent to the printer. The options are Download header with each print job and Assume header is downloaded and retained.
Click this button to send the PostScript header information to the printer immediately. This button is available only when the Download header with each print job radio button is selected. If you click the Send Header Now button and then click OK, the Assume header is downloaded and retained radio button is automatically selected.
Select this check box to have the printer automatically print out a page with PostScript error messages when an error occurs in the print job. Turn this option on if you are having printing problems.
Specify the maximum number of seconds that can elapse for a print job to get from the computer to the printer before the printer stops trying to print the document. If you enter "0" (zero), the printer will continue trying to print indefinitely.
Specify the maximum number of seconds that the printer will wait to get more PostScript information from the computer before the print job is automatically canceled. After the specified time elapses, the printer will stop trying to print the document and prints an error message instead. If you enter "0" (zero), the printer will wait indefinitely.You may want to increase this value when printing complicated documents.
This setting enables you to prevent the printer from stalling if and when the computer that sends the print job stalls.
Click this button to specify the following advanced PostScript options:
PostScript language level
Specify the PostScript language level to use. Select the highest PostScript language level that your printer supports to optimize its features. Use a lower PostScript language level only if you are experiencing printing problems or if you intend to print the file using another printer.
Data format
Select the data format to use. The options are ASCII data, Binary communications protocol, Tagged binary communications protocol, and Pure binary data. However, only ASCII data and Tagged binary communications protocol can be selected when running under Windows Me/98/95.
If you select ASCII data, print data is sent in the ASCII (7-bit) format, which may take longer to print, but which can be sent through any I/O channel, including serial, parallel, and Ethernet.
If you select Tagged binary communications protocol, all data except for special control characters is sent in binary (8-bit) format. The binary format can be sent over parallel or serial communications ports and are faster then sending data in the ASCII format.
| Note: |
|
Send CTRL+D before job
Select this check box to specify for the CTRL+D character to be sent at the beginning of every PostScript document. CTRL+D at the beginning-of-file (BOF) will reset your printer to its default settings to ensure that prior print jobs will not affect the current print job. However, activating this setting may cause the print job to fail if it is connected through a network instead of the parallel or serial interface.
Send CTRL+D after job
Select this check box to specify for the CTRL+D character to be sent at the end of every PostScript document. CTRL+D at the end-of-file (EOF) will reset your printer to its default settings to ensure that the current print job will not affect future print jobs. However, activating this setting may cause the print job to fail if it is connected through a network instead of the parallel or serial interface.
Display alert for applications incompatible with driver features
Select this check box if you want the printer driver to display messages to alert you to incompatibilities between the printer's features and those of the application that you are using to print.
Click this button to reset the settings on this sheet to their default values.
Specify whether to use a watermark when printing. The options are None, CONFIDENTIAL, COPY, and DRAFT.
Click this button to edit the selected watermark. This button is not available when None is selected under Select a watermark.
Click this button to create a new watermark.
Click this button to delete the selected watermark. This button is not available when None is selected under Select a watermark.
Specify how the selected watermark should be printed. The options are On first page only, In background, and As outline only.
Re-Print Job
Select whether the printer reprints a job. The options are On and Off.
Verify Job
Select whether a job is verified or not. The options are On and Off.
Stored Job
Select whether a job is stored or not. The options are On and Off.
Confidential Job
Specify whether the job is a confidential job. The options are On and Off.
Password
If the job is a confidential job, set a password for it. This setting is available only if On is selected for Confidential Job.
User Name
Specify a user name for the reserve job.
Job Name
Specify a job name for the reserve job.
Preview
Select whether to use the Preview function or not. This setting is available only when Quick Print Job is specified. The options are On and Off.
Job Management On
Select whether to use the Job Management function. The options are On and Off. If the Job Management On check box is selected, information on the job is sent to the printer.
The Print dialog box, which is accessed by selecting Print on the File menu of the application that you are using, enables you to specify print settings for the current document. The available settings are grouped under the Page Setup and Advanced tabs. In addition, settings specific to your printer are available through the Device Settings tab of the printer's Properties dialog box. See below for a brief description of each available setting.
Online help is available to help you with the settings. If you want help on a particular item, click the "?" icon on the top-right corner of the dialog box's title bar and then click the name of the setting that you want more information on. An explanation of the setting and its options will be displayed.
Select the desired paper size. This setting must match the size of the paper loaded in the printer. The paper sizes that are available will differ according to the printer. The default setting is either A4 or Letter, depending on your country of purchase.
Select the paper source for your print job. The options are Automatically Select, MP Tray, Cassette 1, Manual Feed 1st Page, and Manual Feed EachPage. However, the actual paper sources that are available will differ according to the printer and the options installed.
Specify the number of copies to print.
This check box appears only if more than one copy is specified for Copy Count. Select this check box to print multiple copies of the document in page order. If this check box is not selected, each page is printed out the specified number of times before the following page is printed.
| Note: |
|
Specify how the document is to be positioned on the page. The options are Portrait (vertical), Landscape (horizontal), and Rotated (rotated 90° counterclockwise).
Specify whether to print the document in grayscale or color. The options are Monochrome and Color.
Undo Changed Option/s
Click this button to undo all the changes that have been made to the settings. The settings return to their default values. This button is enabled only if one or more of the default values have been changed.
About Adobe PostScript Printer Driver
Click this button to view information on the currently installed PostScript printer driver.
Paper Size
If you specified the Paper Size setting on the Page Setup sheet, that setting is reflected here. To change this setting, select the desired paper size from the options displayed at the bottom of the dialog box. For more information on this setting, see Paper Size.
Orientation
If you specified the Orientation setting on the Page Setup sheet, that setting is reflected here. To change this setting, select the desired orientation from the options displayed at the bottom of the dialog box. For more information on this setting, see Orientation.
Paper Source
If you specified the Paper Source setting on the Page Setup sheet, that setting is reflected here. To change this setting, select the desired paper source from the options displayed at the bottom of the dialog box. For more information on this setting, see Paper Source.
Media
Select the desired paper type to print on. The options are Normal, Thick, Extra Thick, and Transparency. Make sure to select the correct paper type to avoid smearing or wasting ink.
Copy Count
If you specified the Copy Count setting on the Page Setup sheet, that setting is reflected here. To change this setting, enter the desired number of pages to print into the text box at the bottom of the dialog box. For more information on this setting, see Copy Count.
Resolution
Select the resolution that you want to print in. The options are Fast and Quality. The Quality setting prints at a higher resolution, but the printing time will be longer.
Color Appearance
If you specified the Color Appearance setting on the Page Setup sheet, that setting is reflected here. To change this setting, select the desired setting from the options displayed at the bottom of the dialog box. For more information on this setting, see Color Appearance.
Scaling
This setting enables you to shrink or enlarge the image to print. You can enter any percentage from 1% to 1000%. To shrink the image, specify a percentage that is lower than 100%. To enlarge the image, specify a percentage that is higher than 100%. When you enlarge a document, only the portion of the document that fits on the selected paper will be printed. If you can shrink or enlarge the image to print in the application that you are printing from, do so in the application.
TrueType Font
Specify how TrueType fonts in the document are printed. Select Substitute with Device Font to use equivalent PostScript fonts for printing documents that contain TrueType fonts. Select Download as Softfont to download TrueType fonts to the printer instead of using PostScript fonts.
If your document has overlapping text and graphics, select Substitute with Device Font. Using downloaded TrueType fonts to print when text and graphics overlap may cause output errors.
Page Layout (N-up) Option
Specify how many pages of your document to print on one sheet of paper. The options are Normal (one-up), Two-up (1x2), Four-up (2x2), Six-up (2x3), Nine-up (3x3), and Sixteen-up (4x4).
PostScript Output Option
Specify the format for PostScript files. The options are Optimize for Speed, Optimize for Portability, Encapsulated PostScript (EPS), and Archive Format. See online help for details on each of these formats.
TrueType Font Download Option
Specify how TrueType fonts are downloaded to the printer. The options are Automatic, Outline (scalable outline font), Bitmap (bitmap font), and Native TrueType (outline font).
PostScript Language Level
Specify the PostScript language level to use. The options are 2 and 3.
Send PostScript Error Handler
Specify whether the printer automatically prints out a page with PostScript error messages when an error occurs in the print job. The options are Yes and No.
Mirrored Output
Specify whether the document is printed as a mirror image by reversing the horizontal coordinates of the image. The options are Yes and No.
Density
Specify the density to print in. The options are Lightest, Light, Medium, Dark, and Darkest.
RITech
Select whether to use RITech when printing. RITech improves the appearance of printed lines, text, and graphics. The options are On and Off.
Toner Save Mode
Select whether to use the Toner Save Mode when printing. When the Toner Save Mode is turned on, the printer uses about 50% less toner than normal. The options are On and Off.
Image Protect
This setting enables you to specify whether to use lossy compression when memory runs low during printing. The options are On and Off. When Image Protect is set to On, lossy compression is not used. If it is set to Off, lossy compression is used when memory resources are too low.
Start Page
Specify whether to start printing from the first page or second (back) page. The options are Front and Back. If Back is selected, the first page is left blank. This setting is enabled only when Print on Both Sides is selected.
Separations
This setting enables you to select the color for separation printing. The options are None, Cyan, Magenta, Yellow, and Black.
Undo Changed Option/s
Click this button to undo all the changes that have been made to the settings. The settings return to their default values. This button is enabled only if one or more of the default values have been changed.
About Adobe PostScript Printer Driver
Click this button to view information on the currently installed PostScript printer driver.
Assign the desired paper size to the various available paper sources. Once this setting is specified, the printer will automatically feed paper from the paper source that holds the selected paper size.
The paper source options are MP Tray, Cassette 1, Manual Feed 1st Page, and Manual Feed EachPage. However, the actual paper sources that are available will differ according to the printer and the options installed.
The paper sizes that are available will differ according to the printer. The default setting is either A4 or Letter, depending on your country of purchase.
Double-click to display the Font Substitution Table and the options for the TrueType-to-PostScript font mapping.
Specify the amount of available PostScript memory. The available PostScript memory is a subset of the printer's total physical memory. It is recommended that you use the default setting.
Specify the protocol that the printer will use for print jobs. The options are ASCII, TBCP, and Binary.
| Note: |
|
If ASCII is selected, print data is sent in the ASCII (7-bit) format, which may take longer to print, but which can be sent through any I/O channel, including serial, parallel, and Ethernet.
If you select TBCP (Tagged Binary Communications Protocol), all data except for special control characters is sent in binary (8-bit) format. The binary formats can be sent over parallel or serial communications ports and are faster then sending data in the ASCII format.
| Note: |
|
Specify whether a CTRL+D character should be sent at the beginning of every PostScript document. CTRL+D at the beginning-of-file (BOF) will reset your printer to its default settings to ensure that prior print jobs will not affect the current print job. However, activating this setting may cause the print job to fail if it is connected through a network instead of the parallel or serial interface.
Specify whether a CTRL+D character should be sent at the end of every PostScript document. CTRL+D at the end-of-file (EOF) will reset your printer to its default settings to ensure that the current print job will not affect future print jobs. However, activating this setting may cause the print job to fail if it is connected through a network instead of the parallel or serial interface.
Specify the maximum number of seconds that can elapse for a print job to get from the computer to the printer before the printer stops trying to print the document. If you enter "0" (zero), the printer will continue trying to print indefinitely.
Specify the maximum number of seconds that the printer will wait to get more PostScript information from the computer before the print job is automatically canceled. After the specified time elapses, the printer will stop trying to print the document and prints an error message instead. If you enter "0" (zero), the printer will wait indefinitely. You may want to increase this value when printing complicated documents.
Specify the minimum font size (in pixels) for which the printer driver will download TrueType fonts as outline (Type 1) fonts. A font smaller than the minimum setting will be downloaded as a bitmap (Type 3/Type 32) font.
Specify the maximum font size (in pixels) for which the printer driver will download TrueType fonts as bitmap (Type 3/Type 32) fonts. A font larger than the maximum setting will be downloaded as an outline (Type 1) font.
The settings available under Installable Options enable you to specify whether certain options are installed into the printer, and if so, what they are. The available settings are Installed Memory, Lower Cassette Unit, and Duplex Unit.
Re-Print Job
Select whether the printer reprints a job. The options are On and Off.
Verify Job
Select whether a job is verified or not. The options are On and Off.
Stored Job
Select whether a job is stored or not. The options are On and Off.
Confidential Job
Specify whether the job is a confidential job. The options are On and Off.
Password
If the job is a confidential job, set a password for it. This setting is available only if On is selected for Confidential Job.
User Name
Specify a user name for the reserve job.
Job Name
Specify a job name for the reserve job.
Preview
Select whether to use the Preview function or not. This setting is available only when Quick Print Job is specified. The options are On and Off.
Job Management On
Select whether to use the Job Management function. The options are On and Off. If the Job Management On check box is selected, information on the job is sent to the printer.
Printer settings specific to your printer are available through the Device Settings tab of the PostScript printer's Properties dialog box. In addition to the settings there, click the Printing Preferences button on the General sheet or the Printing Defaults button on the Advanced sheet for more print settings. The basic print settings are grouped under the Layout and Paper/Quality tabs, while more advanced settings are available by clicking the Advanced button on either sheet.
Online help is also available to help you with the settings. There are two online help options. Click the Help button for procedural help on the settings. If you want help on a particular item, click the "?" icon on the top-right corner of the dialog box's title bar and then click the name of the setting that you want more information on. An explanation of the setting and its options will be displayed.
Assign the desired paper size to the various available paper sources. Once this setting is specified, the printer will automatically feed paper from the paper source that holds the selected paper size.
The paper source options are MP Tray, Cassette 1, Manual Feed 1st Page, and Manual Feed EachPage. However, the actual paper sources that are available will differ according to the printer and the options installed.
The paper sizes that are available will differ according to the printer. The default setting is either A4 or Letter, depending on your country of purchase.
Double-click to display the Font Substitution Table and the options for the TrueType-to-PostScript font mapping.
Specify the amount of available PostScript memory. The available PostScript memory is a subset of the printer's total physical memory. It is recommended that you use the default setting.
Specify the protocol that the printer will use for print jobs. The options are ASCII, TBCP, and Binary.
| Note: |
|
If ASCII is selected, print data is sent in the ASCII (7-bit) format, which may take longer to print, but which can be sent through any I/O channel, including serial, parallel, and Ethernet.
If you select TBCP (Tagged Binary Communications Protocol), all data except for special control characters is sent in binary (8-bit) format. The binary formats can be sent over parallel or serial communications ports and are faster then sending data in the ASCII format.
| Note: |
|
Specify whether a CTRL+D character should be sent at the beginning of every PostScript document. CTRL+D at the beginning-of-file (BOF) will reset your printer to its default settings to ensure that prior print jobs will not affect the current print job.
However, activating this setting may cause the print job to fail if it is connected through a network instead of the parallel or serial interface. Conversely, if your document fails to print when sent to a printer connected through a parallel or serial port, change the setting to Yes.
Specify whether a CTRL+D character should be sent at the end of every PostScript document. CTRL+D at the end-of-file (EOF) will reset your printer to its default settings to ensure that the current print job will not affect future print jobs.
However, activating this setting may cause the print job to fail if it is connected through a network instead of the parallel or serial interface. If your document fails to print when sent to a network printer, change the setting to No.
Specify whether to convert true gray (RGB value) in text to the gray provided by the PostScript driver.
Specify whether to convert true gray (RGB value) in graphics to the gray provided by the PostScript driver.
Specify whether to add the symbol for the Euro currency to the set of PostScript fonts residing on the printer.
Specify the maximum number of seconds that can elapse for a print job to get from the computer to the printer before the printer stops trying to print the document. If you enter "0" (zero), the printer will continue trying to print indefinitely.
Specify the maximum number of seconds that the printer will wait to get more PostScript information from the computer before the print job is automatically canceled. After the specified time elapses, the printer will stop trying to print the document and prints an error message instead. If you enter "0" (zero), the printer will wait indefinitely.You may want to increase this value when printing complicated documents.
Specify the minimum font size (in pixels) for which the printer driver will download TrueType fonts as outline (Type 1) fonts. A font smaller than the minimum setting will be downloaded as a bitmap (Type 3) font.
This setting enables you to fine-tune the Automatic setting for the TrueType Font Download Option setting on the Advanced Options dialog box of the Printing Preferences dialog box.
Specify the maximum font size (in pixels) for which the printer driver will download TrueType fonts as bitmap (Type 3) fonts. A font larger than the maximum setting will be downloaded as an outline (Type 1) font.
This setting enables you to fine-tune the Automatic setting or override the Bitmap setting for the TrueType Font Download Option setting on the Advanced Options dialog box of the Printing Preferences dialog box.
The settings available under Installable Options enable you to specify whether certain options are installed into the printer, and if so, what they are. The available settings are Installed Memory, Lower Cassette Unit, and Duplex Unit.
Specify how the document is to be positioned on the page. The options are Portrait (vertical), Landscape (horizontal), and Rotated Landscape (rotated 90° counterclockwise).
Specify whether to print on both sides of the paper, and if so, which edge to flip on. The options are None, Flip on Short Edge, and Flip on Long Edge. This option is available only when the optional Duplex Unit is installed and Installed is specified for Duplex Unit under the Installable Options setting.
Specify the order in which the pages of the document will be printed. The options are Front to Back and Back to Front.
Specify how many pages of your document to print on one sheet of paper. The options are 1, 2, 4, 6, 9, and 16.
Select the paper source for your print job. The options are Automatically Select, MP Tray, Cassette 1, Cassette 2, Cassette 3, and Manual Feed. However, the actual paper sources that are available will differ according to the printer and the options installed.
Select the desired paper type to print on. The options are Normal, Thick, Extra Thick, and Transparency. Make sure to select the correct paper type to avoid smearing or wasting ink.
Specify how color images should be printed. The options are Black & White and Color.
Select the desired paper size. This setting must match the size of the paper loaded in the printer. The paper sizes that are available will differ according to the printer. The default setting is either A4 or Letter, depending on your country of purchase.
Specify the number of copies to print.
This check box appears only if more than one copy is specified for Copy Count. Select this check box to print multiple copies of the document in page order. If this check box is not selected, each page is printed out the specified number of times before the following page is printed.
| Note: |
|
Select the resolution that you want to print in. The options are Fast and Quality. The Quality setting prints at a higher resolution, but the printing time will be longer.
Specify whether to enable Image Color Management, and if so, how it should be handled. The options are ICM Disabled, ICM Handled by Host System, ICM handled by Printer, and ICM Handled by Printer using printer calibration. See online help for details on each of these settings
Specify how color images are to be treated to produce the best possible printout. The options are Graphics (charts, bright colors), Pictures (photos), Proof (print in a specific ink color), and Match (preview color settings from another printer).
This setting enables you to shrink or enlarge the image to print. You can enter any percentage from 1% to 1000%. To shrink the image, specify a percentage that is lower than 100%. To enlarge the image, specify a percentage that is higher than 100%. If you can shrink or enlarge the image to print in the application that you are printing from, do so in the application and not through the printer driver.
Specify how TrueType fonts in the document are printed. Select Substitute with Device Font to use equivalent PostScript fonts for printing documents that contain TrueType fonts. Select Download as Softfont to download TrueType fonts to the printer instead of using PostScript fonts.
Specify whether to enable the advanced printing features. The options are Enabled and Disabled.
Specify the format for PostScript files. The options are Optimize for Speed, Optimize for Portability, Encapsulated PostScript (EPS), and Archive format. See online help for details on each of these formats.
Specify how TrueType fonts are downloaded to the printer. The options are Automatic, Outline (scalable outline font), Bitmap (bitmap font), and Native TrueType (outline font).
Specify the PostScript language level to use. The options are 1, 2, and 3.
Specify whether the printer automatically prints out a page with PostScript error messages when an error occurs in the print job. The options are Yes and No.
Specify whether the document is printed as a mirror image by reversing the horizontal coordinates of the image. The options are Yes and No.
Specify the density to print in. The options are Lightest, Light, Medium, Dark, and Darkest.
Select whether to use RITech when printing. RITech improves the appearance of printed lines, text, and graphics. The options are On and Off.
Select whether to use the Toner Save Mode when printing. When the Toner Save Mode is turned on, the printer uses about 50% less toner than normal. The options are On and Off.
This setting enables you to specify whether to use lossy compression when memory runs low during printing. The options are On and Off. When Image Protect is set to On, lossy compression is not used. If it is set to Off, lossy compression is used when memory resources are too low.
Specify whether to start printing from the first page or second (back) page. The options are Front and Back. If Back is selected, the first page is left blank. This setting is enabled only when Print on Both Sides is selected.
This setting enables you to select the color for separation printing. The options are None, Cyan, Magenta, Yellow, and Black.
Re-Print Job
Select whether the printer reprints a job. The options are On and Off.
Verify Job
Select whether a job is verified or not. The options are On and Off.
Stored Job
Select whether a job is stored or not. The options are On and Off.
Confidential Job
Specify whether the job is a confidential job. The options are On and Off.
Password
If the job is a confidential job, set a password for it. This setting is available only if On is selected for Confidential Job.
User Name
Specify a user name for the reserve job.
Job Name
Specify a job name for the reserve job.
Preview
Select whether to use the Preview function or not. This setting is available only when Quick Print Job is specified. The options are On and Off.
Job Management On
Select whether to use the Job Management function. The options are On and Off. If the Job Management On check box is selected, information on the job is sent to the printer.
Online help is available to help you with the printer driver settings. There are two online help options. Click the Help button for procedural help on the settings. If you want help on a particular item, click the "?" icon on the top-right corner of the dialog box's title bar and then click the name of the setting that you want more information on. An explanation of the setting and its options will be displayed.
 Previous |
 Next |
| Version NPD0232-01, Copyright © 2003, SEIKO EPSON CORPORATION |