|

Reference Guide
|
|
How To / Installing Options
Interface Cards
Your printer comes with a Type B interface slot. Various optional interface cards are available to expand your printer's interface options.
Follow these steps to install an optional interface card.
 |
Caution:
|
 | |
Before you install the interface card, be sure to discharge any static electricity by touching a grounded piece of metal. Otherwise, you may damage static-sensitive components.
|
|
 |
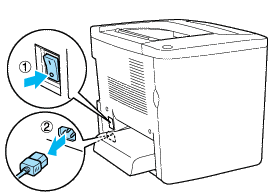
Turn the printer off and unplug the power cord.
|

 |
Be sure to set any switches and jumpers on the card, as necessary. See the interface card's manual for details.
|
 |
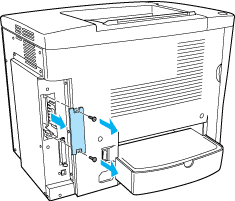
Remove the screws and the cover as shown below.
|

 |  |
Warning:
|
 |  | |
Removing other screws and covers will expose high voltage areas.
|
|
 |  |
Note:
|
 |  | |
Keep the slot cover in a safe place. You will need to reattach it if you remove the interface card later.
|
|
 |
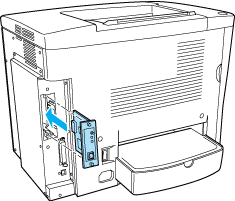
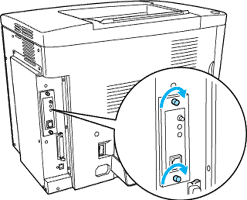
Slide and push the interface card into the slot firmly, then fasten the screw as shown below.
|


 |
Plug the printer's power cord into an electrical outlet.
|
 |
Turn on the printer.
|
Removing an interface card
Perform the installation procedure in reverse.

[Top]
| Version 1.00E, Copyright © 2002, SEIKO EPSON CORPORATION |