|

Reference Guide
|
|
How to / Cleaning and Transporting the Printer
Transporting the Printer
 Finding a place for the printer
 Checking color registration
Long distances
If you need to transport your printer for long distances, carefully repack it using the original box and packing materials.
Follow these steps to repack your printer.
 |
Turn off the printer.
|
 |
Unplug the power cord.
|
 |
Remove the photoconductor unit. For information on removing the photoconductor unit, see Photoconductor Unit. Then pack them in their original boxes with the protective materials they came in.
|
 |
Attach the protective materials to the printer, then repack the printer in its original box.
|
After unpacking and setting your printer at the new location, you need to check the color registration and adjust the color alignment if necessary. See Checking color registration for instructions.
Short distances
Note the following handling precautions when you need to move the printer for a short distance:
-
If you are moving the printer by itself, two or more people should lift and carry the printer. See Moving the printer.
Moving the printer
Follow these steps to move the printer for a short distance.
 |
Turn off the printer and remove the following items:
|
 |
Be sure to lift the printer with two or more people.
|
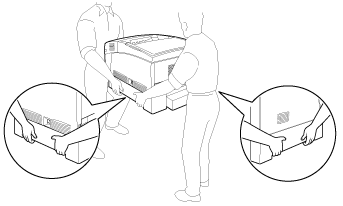
 |  |
Caution:
|
 |  |
Do not hold the printer by the MP tray.
|
 |
When moving the printer, always keep it horizontal.
|
Moving the printer with the Large Capacity Paper Unit installed
Follow these steps to move the printer together with the optional Large Capacity Paper Unit.
 |
Turn off the printer and remove the following items:
|
 |
Unlock the two casters at the bottom of the Large Capacity Paper Unit.
|
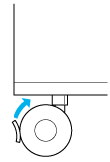
 |
Roll the printer to the new location.
|
 |
Lock the casters after relocating the printer.
|
 |  |
Caution:
|
 |  |
Do not roll the printer on angled or uneven surfaces.
|
Finding a place for the printer
When relocating the printer, always choose a location that has adequate space for easy operation and maintenance. Use the following illustration as a guide for the amount of space required around the printer to ensure smooth operation.
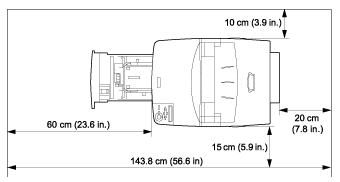
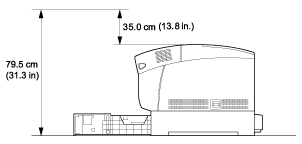
To install and use the Large Capacity Paper Unit, you will need an additional 35.2 cm (14.3 in.) to install the unit beneath the printer.
In addition to space considerations, note the following precautions when finding a place to locate the printer:
-
Place the printer where you can easily unplug the power cord.
-
Keep the entire computer and printer system away from potential sources of interference, such as loudspeakers or the base units of cordless telephones.
-
Avoid using an electrical outlet that is controlled by wall switches or automatic timers. Accidental disruption of power can erase valuable information in your computer's and printer's memories.
 |
Caution:
|
 | -
Leave adequate room around the printer to allow for sufficient ventilation.
|
 | -
Avoid locations that are subject to direct sunlight, excessive heat, moisture, or dust.
|
 | -
Avoid using outlets that other appliances are plugged into.
|
 | -
Use a grounded outlet that matches the printer's power plug. Do not use an adapter plug.
|
 | -
Only use an outlet that meets the power requirements for this printer.
|

[Top]
Checking color registration
If you transported your printer for a long distance, you need to check the color registration for possible misalignment.
Follow these steps to check the color registration.
 |
Turn on the printer.
|
 |
Load paper into the MP tray.
|
 |
Make sure the LCD panel displays Ready or Standby, then press the  Enter button on the control panel twice. Enter button on the control panel twice.
|
 |
Press the  Down button several times to display ColorRegist Sheet. Down button several times to display ColorRegist Sheet.
|
 |
Press the  Enter button. The printer prints a color registration sheet. Enter button. The printer prints a color registration sheet.
|
 |
The arrow ( ) points to the current settings. Check the patterns indicated by the arrows ( ) points to the current settings. Check the patterns indicated by the arrows ( ). If the color segment of the line is in alignment with the black segments on either side to make one straight line, you do not need to adjust the registration for that color. If the line segments are not aligned, adjust the registration as explained below. ). If the color segment of the line is in alignment with the black segments on either side to make one straight line, you do not need to adjust the registration for that color. If the line segments are not aligned, adjust the registration as explained below.
|
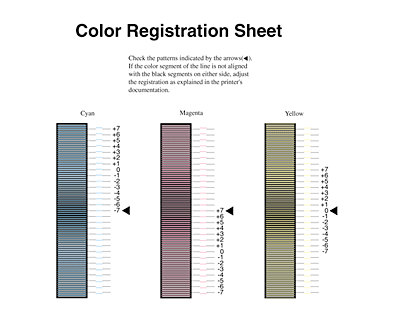
Adjusting color registration alignment
 |
Make sure the LCD panel displays Ready or Standby, then press the  Enter button to access the control panel menus. Enter button to access the control panel menus.
|
 |
Press the  Down button several times until the LCD panel displays Setup Menu, then press the Down button several times until the LCD panel displays Setup Menu, then press the  Enter button. Enter button.
|
 |
Press the  Up button several times until the LCD displays the XXXXRegist item for the color (Cyan, Magenta, and Yellow) you need to adjust, then press the Up button several times until the LCD displays the XXXXRegist item for the color (Cyan, Magenta, and Yellow) you need to adjust, then press the  Enter button. For example, to adjust the cyan registration, scroll up to CyanRegist, then press the Enter button. For example, to adjust the cyan registration, scroll up to CyanRegist, then press the  Enter button. Enter button.
|
 |
On the color registration sheet, find the line segments that are most closely aligned, then use the  Up or Up or  Down button to display the number that corresponds to that pattern. Press the Down button to display the number that corresponds to that pattern. Press the  Enter button to complete the adjustment. Enter button to complete the adjustment.
|
 |
If necessary, print the color registration sheet for confirmation.
|

[Top]
| Version 1.00E, Copyright © 2002, SEIKO EPSON CORPORATION |
Finding a place for the printer
Checking color registration