![]()
Reference Guide
|
|
Index |
|
Search |
|
Glossary | |||||
|
|
Contents |
|
Help |
|
||||||
|
|
|
|||||||||||||||||||||||||||||||||
How To / Using the Printer Software with Macintosh
Accessing the EPSON Status Monitor 3
The EPSON Status Monitor 3 monitors your printer and gives you information about its current status.
You can access the EPSON Status Monitor 3 by selecting the EPSON Status Monitor 3 alias from the Apple menu.
| Note: |
|
|
|
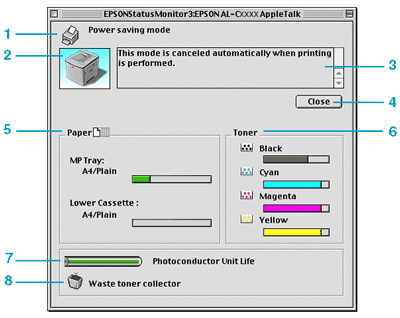
You can monitor printer status and get information on consumable products using the EPSON Status Monitor 3 dialog box.
| Note: |
|
|
1. |
Icon/Message: |
The icon and message shows the printer status. |
|
2. |
Printer image: |
The image at the upper left shows the printer status graphically. |
|
3. |
Text box: |
The text box next to the printer image displays the current status of the printer. When a problem occurs, the most probable solution is displayed. |
|
4. |
Close button: |
Clicking this button closes the dialog box. |
|
5. |
Paper: |
Displays the paper size and the approximate amount of paper remaining in the paper source. Information for the optional cassettes are displayed only if this option is installed. |
|
6. |
Toner: |
Indicates the amount of remaining toner. The toner icon flashes if toner is low. |
|
7. |
Photoconductor Unit Life: |
Indicates the remaining functional life of the photoconductor unit. |
|
8. |
Waste toner collector life: |
Blinks when the waste toner collector is not installed correctly or is near full. |
To make specific monitoring settings, select Monitor Setup from the File menu. The Monitor Setup dialog box appears.
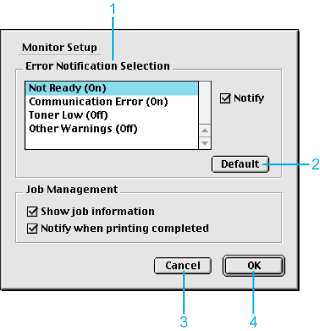
The following settings and buttons appear in the dialog box:
|
1. |
Error Notification Selection: |
Select the types of error that you wish to be notified about. |
|
2. |
Default button: |
Restores default settings. |
|
3. |
Cancel button: |
Cancels any changes. |
|
4. |
OK button: |
Saves new changes. |
The Status Alert window indicates what type of error has occurred and offers you a possible solution. The window closes automatically once the problem is cleared.
This window will also appear according to the selected notification in the Monitoring Preferences dialog box.
If you wish to see information about printer consumables, click Show Details. If you click this button, the Status Alert Window will not disappear even after the problem is cleared. To close the window you need to click Close.
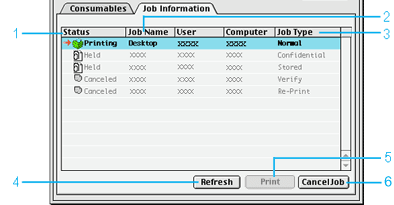
You can obtain information on the print jobs on the Job Information menu on the EPSON Status Monitor 3 dialog box.
To display the Job Information menu, select the Show job information check box on the Monitoring Preferences dialog box. Then click the Job Information menu on the EPSON Status Monitor 3 dialog box.
|
1. |
Status: |
Waiting: |
Waiting to print. |
|
|
|
Printing: |
Current job is being printed. |
|
|
|
Completed: |
Indicates job has been printed. |
|
|
|
Canceled: |
Indicates job has been canceled. |
|
|
|
Held: |
Job is on hold. |
|
2. |
Job Name: |
Displays the user's print job file names. Other users print jobs are displayed as --------. |
|
|
3. |
Job Type: |
Displays the job type. When the Reserve job function is used, the jobs are displayed as Stored, Verify, Re-Print, and Confidential respectively. About the Reserve Job function, see Using the Reserve Job Function. |
|
|
4. |
Refresh button: |
Clicking this button refreshes the information on this menu. |
|
|
5. |
Print button: |
Displays the dialog box to print the spooled and Held status job. See Re-Print Job for details. |
|
|
6. |
Cancel Job button: |
Selecting a print job and clicking this button, cancels the selected print job. |
|
 Previous |
 Next |
| Version 1.00E, Copyright © 2002, SEIKO EPSON CORPORATION |