![]()
Administrator's Guide
|
|
Index |
|
Search | |||||||
|
|
Contents |
|
Help | |||||||
|
|
|
|||||||||||||||||||||||||||||||||
Configuring the Internal Print Server / EpsonNet WinAssist Configuration Utility
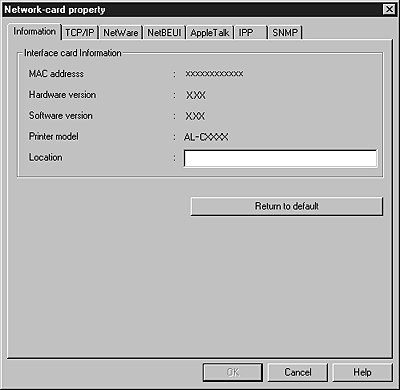
Information
The Information menu shows the various Internal Print Server parameters.
|
Items |
Explanations |
|
MAC address |
Displays the name of the Internal Print Server. |
|
Hardware version |
Displays the hardware version of the Internal Print Server. |
|
Software version |
Displays the software version of the Internal Print Server. |
|
Printer model |
Displays the product name of the printer. |
|
Location |
Enter the location of the Internal Print Server. |
|
Return to default |
Resets all configuration settings of the Internal Print Server to the default settings. |
|
OK |
Updates the settings. |
|
Cancel |
Cancels any changes. |
|
Help |
Accesses help. |
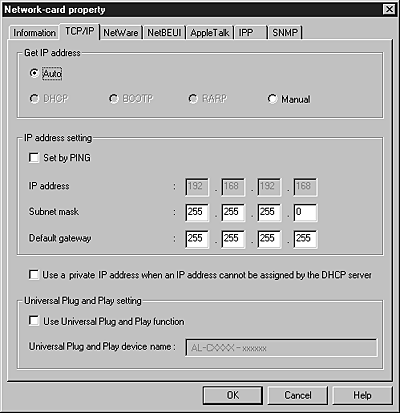
To use the printer in the TCP/IP environment, configure the Internal Print Server on this screen. See Configuring Your Printer Using EpsonNet WinAssist for more details.
|
Items |
Explanations |
|
Get IP address |
Select a method for acquiring IP addresses. |
|
Set by PING |
Enables or disables IP address setting using the ping command. |
|
IP address |
Enter an IP address for the Internal Print Server. Be sure that the IP address is unique and does not conflict with any other device on the network. |
|
Subnet mask |
Enter the subnet mask of the IP address. |
|
Default gateway |
Enter the gateway address. |
|
Use a private IP address when an IP address cannot be assigned by the DHCP server |
Select this check box to assign an private IP address automatically without using the DHCP server on your network. |
|
Universal Plug and Play |
Enables or disables the Universal Plug and Play. |
|
Universal Plug and Play device name |
Enter the device name for the Universal Plug and Play. |
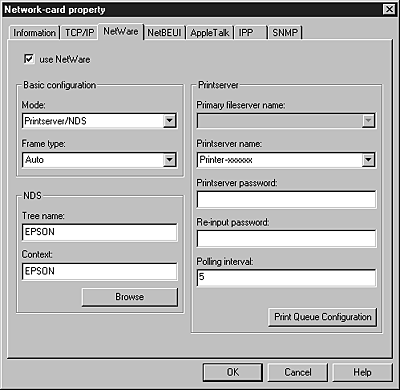
To use the printer in the NetWare environment, configure the Internal Print Server on this screen. You can configure the Internal Print Server either in Print Server mode or Remote Printer mode.
| Note: |
|
|
To use the printer with Print Server mode, configure the Internal Print Server on this screen.
| Note: |
|
|
Items |
Explanations |
|
use NetWare |
Select this box when using NetWare. This check box is dimmed when using the printer only in the NetWare environment. |
|
Mode |
Select the mode, either Print Server/Bindery or Print Server/NDS. |
|
Frame type |
Leave the default frame type (Auto) as it is. |
|
Tree name |
Only for the NDS mode: |
|
Context |
Only for the NDS mode: |
|
Browse |
Browse the NDS context. |
|
Primary file server name |
Only for the Bindery mode: |
|
Print server name |
Select or enter the print server name. |
|
Print server password |
Enter the password to log in to the print server (up to 20 characters). See the NetWare documentation for more details. Usually you do not need to set. |
|
Re-Input password |
Enter the password again. |
|
Polling interval |
Set the polling interval between 5 to 90 seconds. See the NetWare documentation for more details. Usually you do not need to set. |
|
Print Queue Configuration |
Make print queue settings. If you have assigned the queue with PCONSOLE, NWAdmin, or EpsonNet!2 for Windows (an older version of the configuration utility), reassign the print queue here. |
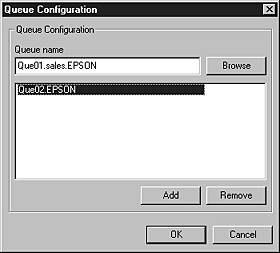
When you click the Print Queue Configuration button in the Print server menu, the following dialog box appears.
| Note: |
|
|
Items |
Explanations |
|
Queue name |
Displays the queue name that is assigned to the print server by browsing the queue. |
|
Browse |
Click the Browse button to select a queue. You can also create or delete a queue. |
|
Queue list box |
Lists the print queues. |
|
Add |
Adds a print queue. |
|
Remove |
Removes a print queue. |
|
OK |
Updates the settings. |
|
Cancel |
Cancels any changes. |
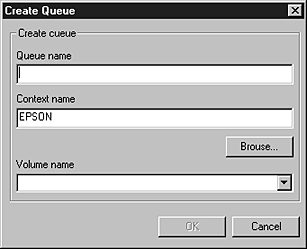
For NDS mode: Select the context where you want to create a queue, right-click it, and then select Create Queue. Type a queue name (up to 47 characters). Browse for the context, and select the volume name from the drop down list. The queue will be created under the SYS volume of the file server. If you want to create a queue in another volume, use PCONSOLE or NWAdmin to create a queue.
To use the printer with Remote Printer mode, configure the Internal Print Server on this screen.

|
Items |
Explanations |
|
use NetWare |
Select this box when using NetWare. This check box is dimmed when using the printer only in the NetWare environment. |
|
Mode |
Select Remote Printer. |
|
Frame type |
Leave the default frame type (Auto) as it is. |
|
Tree name |
Leave as is. |
|
Context |
Leave as is. |
|
Browse |
Not available. |
|
Primary print server name |
Enter the primary print server name which is created by PCONSOLE or NWAdmin (up to 47 characters). For NDPS Gateway, enter the SAP name you have set for NetWare (up to 47 characters). |
|
Printer port number |
Enter the printer port number. For NDPS Gateway, enter the same printer number you have set for NetWare (between 0 and 254). |
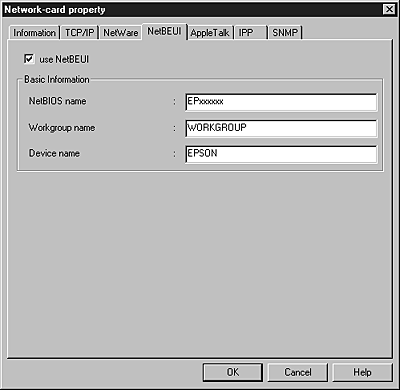
To use the printer in the NetBEUI environment, configure the Internal Print Server on this screen.
|
Items |
Explanations |
|
use NetBEUI |
Select this box when using NetBEUI. This check box is dimmed when using the printer only in the NetBEUI environment. |
|
NetBIOS name |
Enter the printer's NetBIOS name (up to 15 characters). Be sure to give a unique name that will not cause conflicts with any other device on the network. |
|
Workgroup name |
Enter the workgroup name or domain name used for the Windows network environment (up to 15 characters). |
|
Device name |
Enter the printer's device name (up to 12 characters). Do not use LPT1, LPT2, LPT3, or COM. |
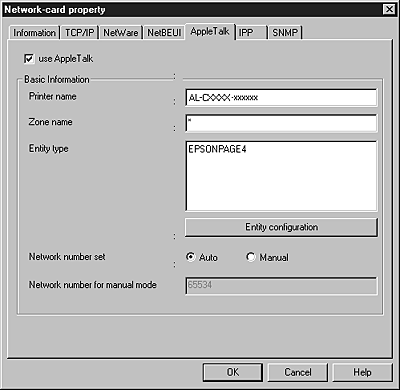
To use the printer in the AppleTalk environment, configure the Internal Print Server on this screen.
| Note: |
|
|
|
|
|
Items |
Explanations |
|
use AppleTalk |
Select this box when using AppleTalk. |
|
Printer name |
Enter the name of the printer (up to 32 characters). |
|
Zone name |
Enter the network zone name (up to 32 characters). To have the zone selected automatically, select Auto as the Network number set option and enter an asterisk (*) in this box. |
|
Entity type |
Displays the entity type of the printer. Do not change the entity type unless "epson" is displayed. If "epson" is displayed, click the Entity configuration button and enter the entity type to match the driver for the printer. |
|
Entity configuration |
If "epson" is displayed in the Entity type box, press this button and enter the entity type (up to 32 characters). |
|
Network number set |
Selects the method for acquiring the network number. Auto is usually preferred. |
|
Network number for manual mode |
Enter a value between 0 and 65534 when Manual is selected for the Network number setting. |
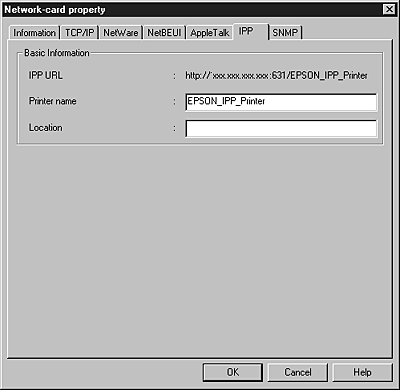
To use the printer in the IPP environment, configure the Internal Print Server on this screen.
|
Items |
Explanations |
|
IPP URL |
Displays the printer's URL for Internet Printing.
Format:
Example: |
|
Printer name |
Enter the printer name to use for Internet Printing (up to 127 characters).
Example: |
|
Location |
Enter the name of the printer's physical location (up to 64 characters). |
In the SNMP menu, you can set SNMP information.
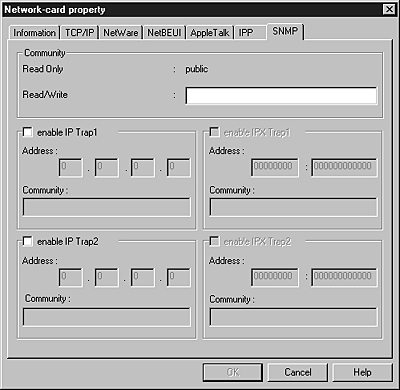
|
Items |
Explanations |
|
Read Only |
The word "public" is always displayed. |
|
Read/Write |
Enter the Read/Write community name (up to 32 characters). |
|
enable IP Trap 1 or/and 2 |
Enable or Disable the IP trap 1 or/and 2. |
|
Address |
Enter the IP address of the server to which the trap is transmitted. |
|
Community |
Enter the community name (up to 32 characters). |
|
enable IPX Trap 1 or/and 2 |
Enable or Disable the IPX trap 1 or/and 2. |
|
Address |
Enter the Network Address and Node Number (MAC Address) of the server to which the trap is transmitted.
Format: Assume that Network Address is A7E00BB0 (hexadecimal) and Node Number is 000048930000 (hexadecimal). In this case, the address is A7E00BB0:000048930000. |
|
Community |
Enter the community name (up to 32 characters). |
 Previous |
 Next |
| Version 1.00E, Copyright © 2002, SEIKO EPSON CORPORATION |