|

Reference Guide
|
|
Maintenance and Transportation
Transporting the Printer
 A long distance
 A short distance
 Setting up the printer after transporting it
When you transport the printer, follow the instructions, described in this section.
A long distance
When you need to transport your printer a long distance, the printer should be repacked using the original box and packing materials. Contact your dealer for assistance.

[Top]
A short distance
When you need to move the printer a short distance, follow the steps below. If you move the printer using the casters on the optional Stand, see To move the printer using casters.
 |
Note:
|
 |
If the printer remains horizontal during the move, you do not have to remove the ink cartridges.
|
 |
Turn on the printer.
|
 |
Turn off the printer so that it discharges all the ink from the tubes.
|
 |
Note
|
 | -
Follow the steps shown on the label attached to the inside of the ink compartment cover when you discharge the ink.
|
 | -
While discharging the ink, the Operate light flashes and then goes off when the operation is finished. Completely discharging the ink requires approximately 2 minutes.
|
 | -
After transportation, leaving the printer for a long time as it is may cause difficulties in ink flow through the ink tube to the nozzle. After transporting the printer, install the ink cartridges as soon as possible, then check the printing performance.
|
 | -
If you reinstall the ink cartridges you have removed above, the printer cannot determine the correct level of ink remaining. The corresponding Ink Out light may not flash to warn you even when the cartridge is almost out of ink. After transporting the printer, install new ink cartridges.
|
 |
Make sure that the paper set lever is up and the lower cover is closed. Press the Power button. The print heads move to the home (far right) position. TRANSPORT PREP nn% appears on the LCD panel and the Operate light flashes for a few minutes. The Operate light goes off and the printer shuts off.
|
 |  |
Caution:
|
 |  |
Do not unplug the power cord while the Operate light is flashing.
|
 |
Make sure that the printer is off. Remove the following parts and push in the paper guides if necessary.
|
To disassemble your printer and optional Stand and transfer them separately, continue with the step 6.
 |
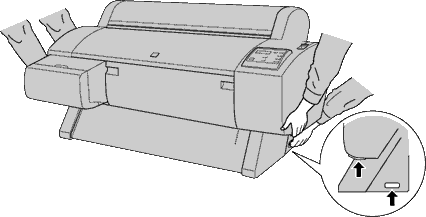
Have two or more people lift the printer using the hand grips and keep the printer level while moving it. The printer unit weighs approximately 43.5 kg (95.8 lb) and should be lifted carefully.
|

 |
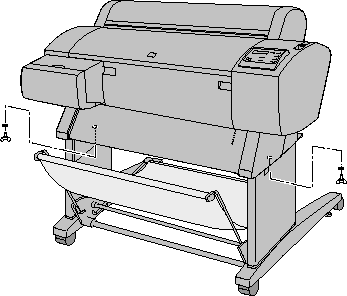
While holding the printer unit, remove the wing screws and washers from the left and right sides, and keep them in a safe place.
|

 |
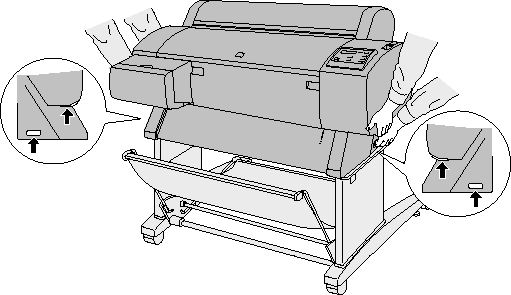
Have two or more people lift the printer unit off of the optional Stand, using the hand grips. The printer unit weighs approximately 43.5 kg (95.8 lb) and should be lifted carefully.
|

 |
Keep the printer level while moving it.
|
To set up the printer after transporting it, see Setting up the printer after transporting it. Before you use the printer after transporting, you may need to perform a nozzle check and realign the print heads. See your Startup Guide.
To move the printer using casters
When you want to transport the printer a very short distance, such as within the same room, you can slide the printer on its casters.
 |
Caution:
|
 |
Do not slide the printer on angled or uneven surfaces.
|
 |
Make sure that the power cord, interface cable, roll paper spindle, and sheet media are removed, and the roll paper cover and lower cover are closed.
|
 |  |
Note:
|
 |  |
If you only need to transport your printer a very short distance using the casters, you do not need to remove the ink cartridges.
|
 |
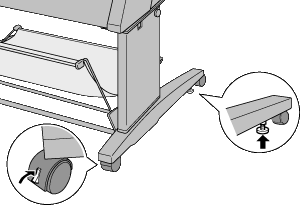
Release the front casters and retract the stabilizer knobs.
|

 |
Move the printer to the new location carefully. Relock the casters and extend the stabilizer knobs after moving the printer.
|

[Top]
Setting up the printer after transporting it
The steps you need to take to set up the printer after transporting it are almost identical to the steps carried out the first time you set up the printer. When you set up the printer again, see the Assembly and Setup Instructions, and note the following points:
-
After transporting the printer, EPSON recommends you perform a nozzle check, clean the print heads, and realign the print heads to ensure print quality. See your Startup Guide.
-
EPSON recommends installing new ink cartridges after transporting the printer. If you reinstall the cartridges you removed before transporting, the printer cannot determine the correct level of remaining ink. The Ink Out lights may not flash to warn you when a cartridge is almost out of ink.

[Top]
| Version 1.00E, Copyright © 2001, SEIKO EPSON CORPORATION |
A long distance
A short distance
Setting up the printer after transporting it