![]()
Reference Guide
|
|
Index |
|
Search |
|
Glossary | |||||
|
|
Contents |
|
Help |
|
||||||
|
|
|
|||||||||||||||||||||||||||||||||
The Control Panel
When to use SelecType
SelecType mode enables you to make printer settings similar to those you would normally make in the driver or software, as well as other additional settings, directly through the control panel. Keep the following points in mind when making SelecType settings:
The following is the basic SelecType setting procedure.
 |
Enter SelecType mode Make sure that READY is displayed on the LCD panel, then press the SelecType button. The first menu, PRINTER SETTING MENU is displayed. |
 |
Select a menu Press the SelecType button to select a desired menu. For example: PRINTER SETTING MENU |
To return to the READY status, press the Pause button.
 |
Select an item Press the Item button. The first item of the selected menu is displayed. Press the Item button to select a desired item. For example: PAGE LINE = ON  ( indicates that the displayed parameter is the current setting value.) ( indicates that the displayed parameter is the current setting value.)
|
If the item is for execution only, press the Enter button to execute the function for the item. After execution, the printer exits SelecType mode and returns to READY status.
For example: INIT. PANEL = EXEC. (Initializes the current panel settings to the factory-set values.)
 |
Select a parameter Press the + or - button to select a parameter for the item. For example: PAGE LINE = OFF. Note that the asterisk ( ) disappears. This means that the selected parameter (OFF) is not yet stored as the current setting value.
|
To display the next item without changing the default value, press the Item button.
 |
Set the parameter Press the Enter button to store the selected parameter as the current setting value. For example: PAGE LINE = OFF is displayed.
|
Press the Item button to return to step 3 if you want to select another item.
 |
Exit SelecType mode Press the Pause button. |
 | Note: |
|
|
The six SelecType menus are described below.
|
Various printer settings are available. |
|
|
You can print a nozzle check pattern and status sheet. |
|
|
You can see the firmware version, total prints since delivery, and ink cartridge/parts life, on the LCD. |
|
|
You can register the paper thickness and ink drying time, and select the specified value. |
|
|
Follow this menu when you replace the cutter. For details, see Replacing the Paper Cutter. |
|
|
You can correct any head misalignment to obtain optimum printing results. For details, see Performing the head alignment. |
This menu contains the following settings.
Normally, leave this set to AUTO. If the printed image is smeared, select WIDE.
Select whether page lines are printed on the roll paper.
The Print Page Line operation changes according to the Auto Cut settings as shown.
|
Roll Auto Cut light |
Print Page Line |
Printer's Operation |
|
On |
On |
Prints page line on the right side only, and cuts paper automatically after the print job. |
|
On |
Off |
Cuts paper automatically after the print job. |
|
Roll Cutter Off light |
Print Page Line |
Printer's Operation |
|
On |
On |
Prints page lines on the right side and below the document. |
|
On |
Off |
Does not print page lines or cut. |
| Note: |
| When the Sheet light is on, the Print Page Line setting is not available. |
When AUTO is selected, the printer automatically switches between interfaces depending on which one is receiving data first. If no more print jobs have been received, the printer returns to an idle state after 10 seconds or more. You can also select the interface from parallel/USB (PARA./USB), or optional (OPTION).
Select the parallel interface mode from compatible (COMPAT) and ECP. If you are using a USB connection, select COMPAT.
Select the code page from PC437 and PC850.
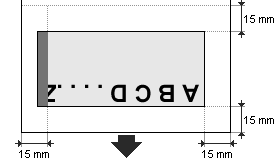
Select margins for roll paper from 3 MM, 15 MM, and T/B 15 MM.
|
Margin settings |
Top/Bottom |
Left/Right |
|
3 MM |
3 mm |
3 mm |
|
15 MM |
15 mm |
15 mm |
|
T/B 15 MM |
15 mm |
3 mm |
| Note: |
| The combination of "Top/Bottom = 3 mm, Left/Right = 15 mm" is not possible. |
When the same image is printed with a 3 mm margin and a 15 mm margin and compared, you may notice that part of the right side of the 15 mm margin image is not printed.
When you select ON, the printer stops printing and RELOAD PAPER appears on the printer's control panel when the paper width loaded in the printer does not match the image width. When OFF is selected, the printer continues to print even if the paper width does not match the images and the printer may print off of paper.
When you select ON, the printer stops printing and PAPER NOT STRAIGHT appears on the printer's control panel if slippage has occurred and the paper was fed at an angle. If OFF is selected, the printer continues to print even if the paper was fed at an angle.
Erases all the SelecType settings that you have made, and resets them all to the factory default settings.
This menu contains the following settings.
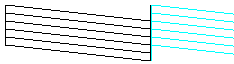
Prints the nozzle check pattern for the six colors. From the printing results, you can check for missing dots. Also, the firmware version is printed. For details, see Printing a nozzle check pattern.
You can perform the nozzle check pattern printing using the utility included in the Software CD-ROM shipped with the printer.
Prints the current SelecType status. For details, see Printing a status sheet.
This menu contains the following settings.
Shows the firmware version.
Displays the amount of ink left in the Black/Cyan/Magenta/Light Cyan/Light Magenta/Yellow ink cartridges.
|
E |
|
F |
(100-81%) |
|
E |
|
F |
(80-61%) |
|
E |
|
F |
(60-41%) |
|
E |
|
F |
(40-21%) |
|
E |
|
F |
(20-11%) |
|
nn% |
(less than 10%) |
||
For maintenance service personnel only.
This menu allows you to register four kinds of paper thickness together with ink drying time and suction setting from 1 to 4. You can select whether the paper thickness is determined automatically (STD (standard)) or by the registered value (1, 2, 3, or 4). You can also register the ink drying time and suction setting for the STD setting. The procedure for registering and recalling the paper thickness setting is described in Setting the paper thickness.
| Note: |
| When you are loading very thin paper, set the Suction setting to LOW. Otherwise, the paper may not be ejected properly and paper error may occur. |
This menu enables you to replace the paper cutter. For a detailed description, see Replacing the Paper Cutter.
This menu allows you to correct any head misalignment to obtain optimum printing results. For details, see Performing the head alignment.
You can perform the head alignment using the utility included in the Software CD-ROM shipped with the printer for the paper supplied by EPSON.
A nozzle check pattern can be printed to check the six colors for missing dots.
|
| Load paper in your printer as described in Using Roll Paper or Using Cut Sheet Media. |
|
| In SelecType mode, press the SelecType button until TEST PRINT MENU is displayed on the LCD panel. |
|
| Press the Item button to display NOZZLE CHECK = PRINT. |
|
|
Press the Enter button. The nozzle check pattern is printed as shown below. After printing, the printer exits SelecType mode and returns to READY status. |
|
good |
head cleaning necessary |
 |
 |
If you find that any segments are missing from the test lines in the pattern, you need to clean the print heads. Press the Cleaning button on the control panel for more than 3 seconds or access the Head Cleaning utility from the EPSON printer utilities in your software. See Using the Printer Utilities.
 | Caution: |
| Before you start printing images, make sure that the nozzle check pattern printing is complete. Otherwise, print quality may decline. |
The procedure for head alignment using SelecType is described below.
|
||
|
||
|
||
|
|
| Load paper in your printer as described in Using Roll Paper or Using Cut Sheet Media. |
| Note: |
| When you load roll paper, select Roll Cutter Off. Depending on the kind of paper used, automatic cutting may not be possible. |
|
| In SelecType mode, press the SelecType button until HEAD ALIGNMENT MENU is displayed on the LCD panel. |
|
| Press the Item button. PAPER THICK = STD appears. When you want to print on EPSON media, leave this setting as STD. When you want to print on non-EPSON media, enter the thickness value of the paper in 0.1 mm increments by pressing the + or - button. |
|
| Press the Enter button to register your value. ADJUST. PATT. = ALL appears. |
|
| If you want to print all the adjustment patterns, press the Enter button. If you want to print a single adjustment pattern, press the + or - button until the pattern number (#1, #2, #3...) that you want to adjust appears. Then press the Enter button. The printer starts printing all the adjustment patterns or the selected pattern. |
| Note: |
| It takes 7 minutes or less to print all the adjustment patterns. Use of 0.5 m roll paper is necessary. |
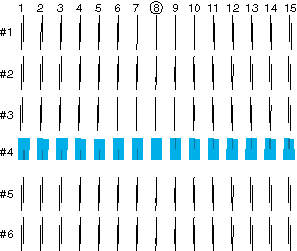
Head alignment pattern example:
|
|
After printing, the pattern number and current set number are displayed (for example, #1 = 8). Select the set that has the smallest gaps, then press the + or - button to display the number for that set.
|
| Note: |
| If set 8 shows the smallest gaps out of all the printed patterns, the print heads are aligned. Press the Pause button to exit SelecType mode. |
 | Press the Enter button to register the set number. The next pattern number appears. Repeat step 6. |
 | After you set the pattern(s), press the Pause button to return to READY status. |
| Note: |
| You can return to step 6 by pressing the Enter button. |
When you use media other than EPSON special media, you may need to set the paper thickness. You can select whether the thickness of the paper you are using is determined automatically (STD (standard)) or by the registered value (1, 2, 3, or 4) in the Paper Configuration menu. To register and recall the settings you made, see the following sections. You can also register the ink drying time and suction setting for respective paper settings including STD. To select the registered setting, see Selecting the registered settings.
To register the paper thickness and ink drying time settings, follow the steps below.
|
| Load the paper you want to check and register its thickness in your printer, as described in Using Roll Paper or Using Cut Sheet Media. |
| Note: |
| When you load roll paper, select Roll Cutter Off. Depending on the kind of paper used, automatic cutting may not be possible. |
|
| In SelecType mode, press the SelecType button until PAPER CONFIG. MENU appears on the LCD panel. |
|
|
Press the Item button. You may see PAPER NUMBER = STD.
|
|
| Press the + or - button to select the number you want to register as the setting, then press the Enter button. When you select STD, skip to step 8 to set the ink drying time. |
|
| Press the Item button. THICK. PAT. = PRINT appears. Then press the Enter button. The printer prints the paper thickness test pattern. |
Paper thickness test pattern example:

|
| Examine the printed pattern to determine which set of lines are aligned (show the smallest gap), and note the corresponding number. |
|
|
You may see PAPER THICK. NO. = 1. Press the + or - button to select the number noted in step 6.
|
| Note: |
| The default value depends on the PAPER THICK. value in the Head Alignment menu and is displayed as a PAPER THICK. NO. in the Paper Configuration menu as shown below: |
|
PAPER THICK. value |
PAPER THICK. NO. |
|
0.0 MM |
1 |
|
| Press the Enter button to save the selected value. |
 |
Press the Item button. DRYING TIME = 0 MIN appears. Press the + or - button to select time in minutes.
|
 | Press the Enter button to save the selected value. |
 |
Press the Item button. SUCTION = NORM appears. Press the + or - button to select NORM or LOW.
|
| Note: |
| When you are loading very thin paper, set the Suction setting to LOW. |
 | Press the Enter button to save the setting. |
 | Press the Pause button to exit SelecType mode. |
To select the registered settings, follow the steps below.
|
| In SelecType mode, press the SelecType button until PAPER CONFIG. MENU appears on the LCD panel. |
|
|
Press the Item button. You may see PAPER NUMBER = 1.
|
|
| Press the + or - button to select the registered number that you want to use. Then press the Enter button. |
|
| Press the Pause button to exit SelecType mode. |
In SelecType mode, a status sheet can be printed to see the current SelecType default values.
|
| Load paper as described in Using Roll Paper or Using Cut Sheet Media. |
|
| In SelecType mode, press the SelecType button until TEST PRINT MENU is displayed. |
|
| Press the Item button until STATUS CHECK = PRINT is displayed. |
|
|
Press the Enter button. A status sheet is printed. After printing, the printer exits SelecType mode and returns to READY status. |
 Previous |
 Next |
| Version 1.00E, Copyright © 2001, SEIKO EPSON CORPORATION |