 |
|
|||
 |
||||
Double-Sided Printing
You can perform double-sided printing. There are two types of double-sided printing available. Standard double-sided printing allows you to print the odd-numbered pages first. Once these pages are printed, the paper can be reloaded for printing the even-numbered pages onto the opposite side of the paper.
You can also perform Folded Booklet double-sided printing. It lets you make single-fold booklets.
 Note:
Note:|
The double-sided printing feature is not available when the printer is accessed over a network or used as a shared printer or your system is not configured to support bi-directional communication.
Only use media types that are suitable for double-sided printing; otherwise, the print quality may deteriorate.
Depending on the type of paper and the amount of ink used to print text and images, ink may bleed through to the other side of the paper.
The surface of the paper may be smeared during double-sided printing.
This function is available only when Sheet is selected as the Paper Source setting.
|
Standard double-sided printing
To print odd and even numbered pages on the opposite sides of a sheet, follow the steps below.
 |
Open the printer driver window.
|
 |
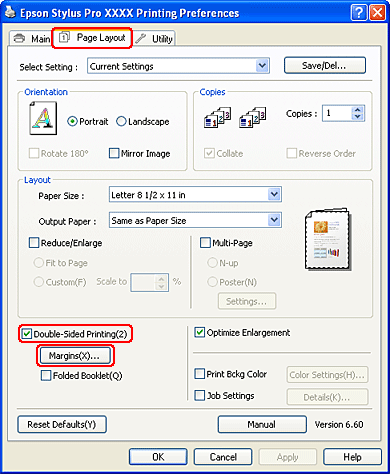
Click the Page Layout tab, select the Double-Sided Printing check box, and then click Margins.
|
 |
Specify the edge of the paper where binding will be placed. You can choose Left, Top, or Right. Then, specify the width of the binding margin, using the Binding Margin text box. You can specify any width from 3 to 30 mm (0.12 to 1.18 inches).
|
Note:|
The actual binding margin may vary depending on the settings specified in your application. We recommend that you test the print quality before printing the entire job.
|

 |
Click OK to return to the Page Layout menu, and then click OK to save your settings.
|
 |
Make sure paper is loaded, and then send a print job from your application. Instructions for generating the even-numbered pages will be displayed while the odd-numbered pages are output.
|
 |
Follow the on-screen instructions and reload the paper.
|
Note:|
The paper may curl during printing due to the amount of ink used. If this problem occurs, slightly curl the sheets in the opposite direction prior to reloading them into the printer.
Align the sheet stack by tapping its edges against a hard, flat surface prior to reloading the stack into the printer.
Follow the instructions provided when reloading the printouts. Paper jams or improperly placed binding margins may occur if the printouts are not reloaded correctly.
In the event of a paper jam, see Clearing paper jams.
|
 |
Once the paper is reloaded, click Resume to print the even-numbered pages.
|

Folded Booklet double-sided printing
You can also make single-fold booklets using the double-sided printing feature. When you create a single-fold booklet, the pages that appear on the outside (after the booklet is folded) are printed first. The pages that will appear inside the booklet can then be printed after the paper is reloaded into the printer.

 Binding Edge
A booklet can be created by printing pages 1 and 4 on the first sheet of paper, pages 5 and 8 on the second sheet of paper, and pages 9 and 12 on the third sheet of paper. After these sheets are reloaded into the sheet feeder, you can then print pages 2 and 3 on the back of the first sheet of paper, pages 6 and 7 on the back of the second sheet of paper, and pages 10 and 11 on the back of the third sheet of paper. The resulting pages can then be folded and bound together into a booklet.
To create the booklet, follow the steps below.
|
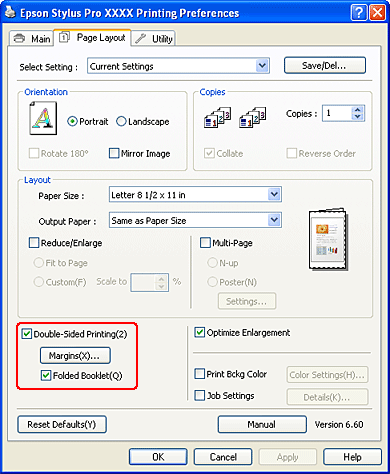
Select Double-Sided Printing, and then select Folded Booklet, and then click Margins.
|
|
Specify the edge of the paper where binding will be placed. You can choose Left, Top, or Right.
|
Note:|
When Portrait is selected as the Orientation setting on the Paper menu, Left or Right binding positions are available. The Top binding position is supported when Landscape is selected as the Orientation setting.
|

|
Specify the width of the binding margin, using the Binding Margin text box. You can specify any width from 3 to 30 mm. The specified margin width will be used on both sides of the fold. For example, if a 10-mm margin is specified, a 20-mm margin will be inserted. (A margin of 10 mm will be placed on each side of the fold.)
|
 Folding Edge Margin
 |
Click OK to return to the Layout menu, and then click OK to save your settings.
|
|
Make sure paper is loaded, and then send a print job from your application.
|
|
Instructions for printing the inside pages will be displayed while the outside pages are output. Follow the on-screen instructions to reload the paper.
|
Note:|
The paper may curl during printing due to the amount of ink used. If this problem occurs, slightly curl the sheets in the opposite direction prior to reloading them into the printer.
Align the sheet stack by tapping its edges against a hard, flat surface prior to reloading the stack into the printer.
Follow the instructions provided when reloading the printouts. Paper jams or improperly placed binding margins may occur if the printouts are not reloaded correctly.
|
|
Once the paper is reloaded, click Resume to print the inside pages.
|
 |
Once printing is complete, fold the sheets and bind them together using a stapler or other binding method.
|