|

Reference Guide
|
|
Problem Solver
Print Quality Problems
 Horizontal banding
 Vertical misalignment or banding
 Color gaps
 Incorrect or missing colors
 Blurry or smeared printout
 Print quality does not improve after head cleaning
If you are having print quality problems, first perform a . Then, compare your test printing with the illustrations below. Click the caption under the illustration that best resembles your printout.
Horizontal banding
Try one or more of these solutions:
-
Make sure that the printable side of the paper is face up in the sheet feeder.
-
Run the Head Cleaning utility to clear any clogged ink nozzles. Windows Me, 98, or 95 users can start the now.
-
Clear all customized settings by selecting Automatic as the Mode setting on your printer software's Main menu (Windows) or in the Print dialog box (Macintosh).
-
Check the
 error light. If the light is flashing, replace the appropriate ink cartridge. See Replacing an Ink Cartridge for details.
-
Make sure that Maximum is not selected as the Printable Area setting in your printer software. When this setting is selected, banding may occur in the expanded area.
-
Make sure that the Media Type selected in the printer software is appropriate for the type of media loaded in the printer.

[Top]
Vertical misalignment or banding
Try one or more of these solutions:
-
Make sure that the printable side of the paper is face up in the sheet feeder.
-
Run the Print Head Alignment utility. Windows Me, 98 or 95 users can start the now.
-
Run the Head Cleaning utility to clear any clogged ink nozzles. Windows Me, 98 or 95 users can start the now.
-
Make sure that the Media Type setting selected in the printer software is appropriate for the type of media loaded in the printer.

[Top]
Color gaps
Try one or more of these solutions:
-
Make sure that your paper is not damaged, dirty, or too old. Also, make sure that the printable side of the paper is face up in the sheet feeder.
-
Run the Head Cleaning utility to clear any clogged ink nozzles. Windows Me, 98 or 95 users can start the now.
-
Clear all setting, and select Automatic as the Mode setting on your printer software's Main menu (Windows) or in the Print dialog box (Macintosh).
-
Make sure that the Media Type setting selected in the printer software is appropriate for the type of media that is loaded in the printer.

[Top]
Incorrect or missing colors
Try one or more of these solutions:
-
Run the Head Cleaning utility. Windows Me, 98 or 95 users can start the now. If colors are still incorrect or missing, replace the color ink cartridge. If the problem persists, replace the black ink cartridge. See Replacing an Ink Cartridge.
-
Do not use ink cartridges beyond the expiration date printed on the cartridge package. Also, if the printer has not been used for a long time, replace the ink cartridges. See Replacing an Ink Cartridge.

[Top]
Blurry or smeared printout
Try one or more of these solutions:
-
Make sure that you are using the appropriate printer driver for your printer.
-
Use only paper recommended by EPSON.
-
Make sure that the printer is on a flat, stable surface that extends beyond the printer base in all directions. The printer will not operate properly if it is tilted.
-
Make sure that your paper is not damaged, dirty, or too old. Also, make sure that the printable side of the paper is face up in the sheet feeder.
-
Make sure that your paper is dry and that the printable side is facing up. Also, make sure that you are using an acceptable paper type. See Paper for specifications.
-
Clear all customized settings by selecting Automatic as the Mode setting on your printer software's Main menu (Windows) or in the Print dialog box (Macintosh).
-
If the paper is curled toward the printable side, flatten it or curl it slightly toward the opposite side.
-
Remove each sheet from the output tray as it is printed, especially if you are using transparencies.
-
If you are printing on glossy media or transparencies, place a support sheet (or a sheet of plain paper) beneath the stack. Or, load only one sheet at a time.
-
Run the Head Cleaning utility. Windows Me, 98 or 95 users can start the now.
-
Run the Print Head Alignment utility. Windows Me, 98 or 95 users can start the now.
-
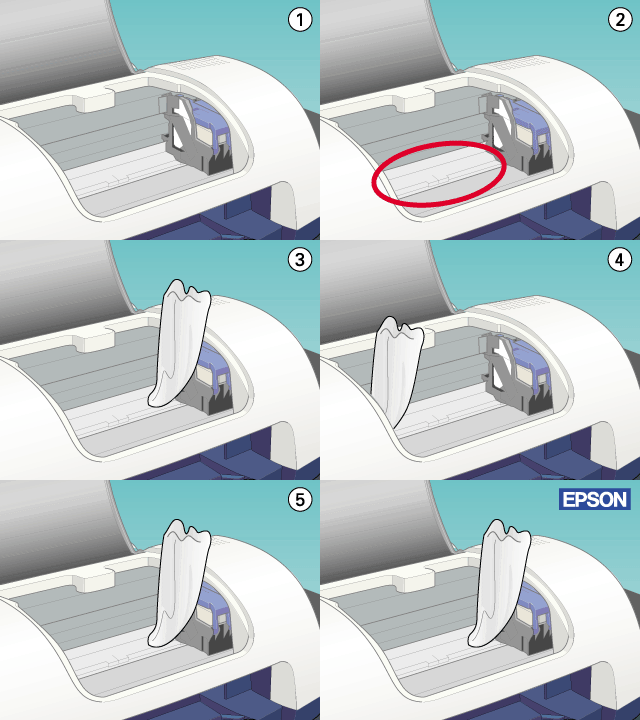
Load and eject dry paper several times. If the problem persists, ink may have leaked inside the printer, so wipe the inside of the printer with a soft, clean cloth.

 |  |
Warning:
|
 |  |
Be careful not to touch the gears inside the printer.
|
 |  |
Caution:
|
 |  |
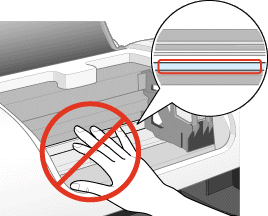
Be careful not to wipe the print head guide rail.
|


[Top]
Print quality does not improve after head cleaning
If the quality of your printouts remains poor even after repeatedly cleaning and aligning the print head, one or both of the ink cartridges may be old or damaged and should be replaced.
To replace an ink cartridge before the Status Monitor notifies you that the cartridge is empty, use the printer's control panel as described below.
 |
Make sure that printer is on. The  power light should be on, but not flashing. power light should be on, but not flashing.
|
 |
Open the printer cover.
|
 |
Hold down  maintenance button for 6 seconds. The print head moves to the black ink cartridge replacement position. maintenance button for 6 seconds. The print head moves to the black ink cartridge replacement position.
|
 |  |
Caution:
|
 |  | -
Do not move the print head by hand, as this may damage the printer. Always press the
 maintenance button to move it. maintenance button to move it.
|
 |  | -
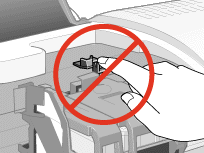
When replacing ink cartridges, be careful not to touch the cartridge sensor shown below.
|

 |
If you want to replace the black ink cartridge, open the ink cartridge clamp, then lift the cartridge out of the printer and dispose of it properly.
|
If you want to replace the color ink cartridge only, press the  maintenance button again without opening the black ink cartridge clamp. The print head moves to the color ink cartridge replacement position. Open the ink cartridge clamp and lift the cartridge out of the printer.
 |  |
Warning:
|
 |  |
If ink gets on your hands, wash them thoroughly with soap and water. If ink gets into your eyes, flush them immediately with water. If discomfort or vision problems remain after a thorough flushing, see a doctor immediately. Do not take the used cartridge apart or try to refill it.
|
 |
Remove the new ink cartridge from its protective bag. Next, remove only the yellow tape seal from the cartridge.
|
 |
Place the ink cartridge into the ink cartridge holder. Do not apply excessive force to the cartridge.
|
 |
Close the ink cartridge clamp until it locks into place. If you are replacing both cartridges, press the  maintenance button to switch to the color ink cartridge replacement position, and replace the cartridge as explained above. maintenance button to switch to the color ink cartridge replacement position, and replace the cartridge as explained above.
|
 |
When you are finished replacing cartridges, close the printer cover.
|
 |
Press the  maintenance button. The printer moves the print head and begins charging the ink delivery system. This process takes about thirty seconds to complete. maintenance button. The printer moves the print head and begins charging the ink delivery system. This process takes about thirty seconds to complete.
|
When the ink charging process is finished, the printer returns the print head to its home position, the  power light stops flashing and remains on, and the
  error light goes off.

[Top]
| Version 1.00E, Copyright © 2002, SEIKO EPSON CORPORATION |
Horizontal banding
Vertical misalignment or banding
Color gaps
Incorrect or missing colors
Blurry or smeared printout
Print quality does not improve after head cleaning
maintenance button again without opening the black ink cartridge clamp. The print head moves to the color ink cartridge replacement position. Open the ink cartridge clamp and lift the cartridge out of the printer.
power light stops flashing and remains on, and the
error light goes off.