 |
 |
|
||
 |
||||
Basic Printing
 Note:
Note:|
The screen shots in this section may vary depending on the model.
Before you print, load paper properly.
For details on the printable area, click the Appendix tab in the right corner of the User’s Guide window. Then click Product Information and Technical Specifications.
After completing the settings, print one test copy and examine the results before printing an entire job.
|
Basic printer settings for Windows
 Note:
Note:|
The order in which ink cartridges are listed varies depending on the printer.
|
 |
Open the file you want to print.
|
 |
Access the printer settings.
|

 |
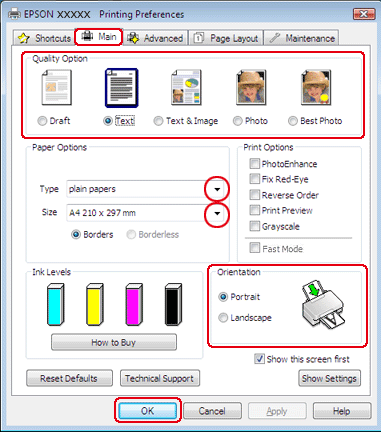
Click the Main tab, then select one of the following Quality Option settings:
|
 |
Select the appropriate Type setting.
|
 |
Select Borderless if you want to print borderless photos.
|
If you want to control the amount of the image that extends beyond the edges of the paper, click the Page Layout tab, select Auto Expand as the Enlargement Method, and then adjust the Expansion slider.
 |
Select the appropriate Size setting. You can also define a custom paper size. For details, see the online help.
|
 |
Select Portrait (tall) or Landscape (wide) to change the orientation of your printout.
|
 Note:
Note:|
Select Landscape when printing on envelopes.
|
 |
Click OK to close the printer settings window.
|
 |
Print your file.
|
Basic printer settings for Mac OS X
 Note:
Note:|
Screen shots of the printer driver windows in this section are from Mac OS X 10.5.
|
 |
Open the file you want to print.
|
 |
Access the Print dialog box.
|
 |
Click the Show Details button (for Mac OS X 10.7) or the
 button (for Mac OS X 10.6 or 10.5) to extend this dialog box. button (for Mac OS X 10.6 or 10.5) to extend this dialog box. |

 |
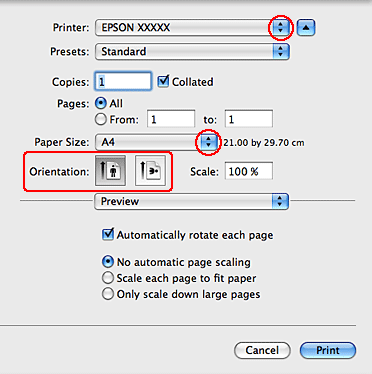
Select the printer you are using as the Printer setting.
|

 Note:
Note:|
Depending on your application, you may not be able to select some of the items in this dialog box. If so, click Page Setup on the File menu of your application, and then make suitable settings.
|
 |
Select the appropriate Paper Size setting.
|
 Note:
Note:|
Select XXX (Borderless) as the Paper Size if you want to print borderless photos.
|
 |
Select the appropriate Orientation setting.
|
 Note:
Note:|
Select landscape orientation when printing envelopes.
|
 |
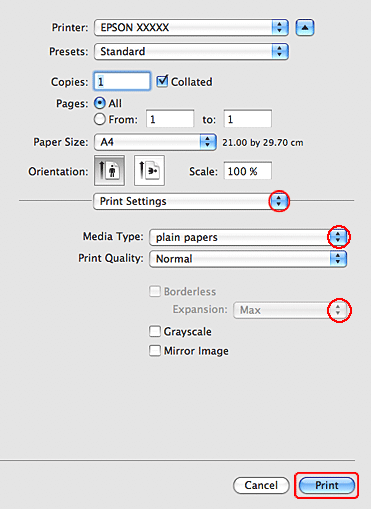
Select Print Settings from the pop-up menu.
|

 |
Select the appropriate Media Type setting.
|
 |
Select the appropriate Expansion setting during borderless printing to control the amount of the image that extends beyond the edges of the paper.
|
 |
Click Print to start printing.
|
