 |
 |
|
||
 |
||||
2-Sided Printing
Two types of 2-sided printing are available: standard and folded booklet.
 Note:
Note:|
Automatic 2-sided printing may not be available depending on the model.
If the ink runs low during automatic 2-sided printing, the printer stops printing and the ink needs to be replaced. When ink replacement is complete, the printer starts printing again, but there may be some missing parts in your print out. If this happens, print the missing parts again.
|
 Note for Windows:
|
Manual 2-sided printing is available only when Status Monitor 3 is enabled. To enable the status monitor, access the printer driver and click the Maintenance tab followed by the Extended Settings button. In the Extended Settings window, check the Enable EPSON Status Monitor 3 check box.
|
 Note for Mac OS X:
|
Mac OS X supports automatic standard 2-sided printing only. This feature may not be available with some models.
|
Standard 2-sided printing allows you to print both sides of a sheet.
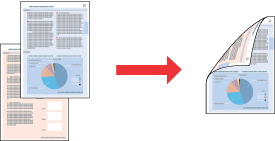
Choose automatic or manual printing. When you print manually, the even-numbered pages are printed first. Once these pages are printed, you can reload them to print the odd-numbered pages onto the opposite side of the paper.
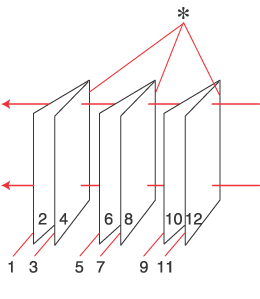
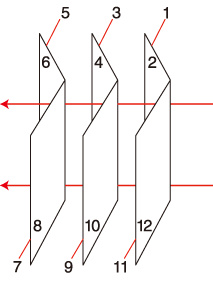
Folded booklet 2-sided printing allows you to make single-fold booklets.
 |
 |
|
Side Binding
|
Center Binding
|
 : Binding edge
Choose automatic or manual printing. When you print manually, the pages that will appear on the inside (after the page is folded) are printed first. The pages that will appear outside the booklet can then be printed after you reload the paper into the printer.
The resulting pages can then be folded and bound together into a booklet.
2-sided printing is only available for the following papers and sizes.
|
Paper
|
Size
|
|
Plain paper
|
Legal*, A3+*, A3*, B4*, Letter, A4, B5, A5*, A6*
|
|
Epson Bright White Ink Jet Paper
|
A4
|
* Manual 2-sided printing only.
 Note:
Note:|
This feature is not available with borderless printing.
Only use papers that are suitable for 2-sided printing. Otherwise, the printout quality may deteriorate.
Depending on the paper and the amount of ink used to print text and images, ink may bleed through to the other side of the paper.
The surface of the paper may be smeared during 2-sided printing.
Manual 2-sided printing may not be available when the printer is accessed over a network or is used as a shared printer.
|
Printer settings for Windows
 Note:
Note:|
The screen shots in this section may vary depending on the model.
|
 |
Make adjustments to basic settings.
|
 |
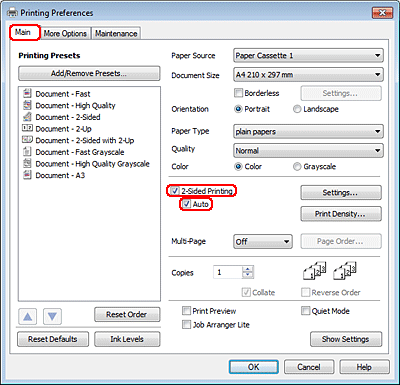
Select 2-Sided Printing check box.
|
 Note:
Note:|
When using automatic printing, make sure the Auto check box is checked.
|
 |
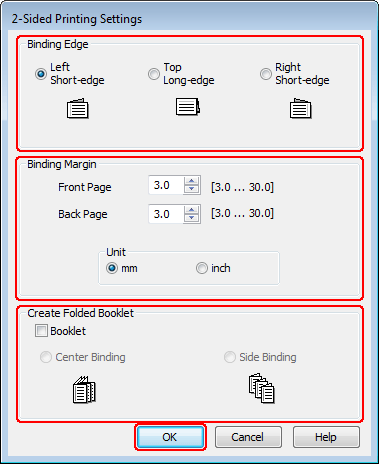
Click Settings to open the 2-Sided Printing Settings window.
|
 |
To print folded booklets using the 2-sided printing option, select the Booklet check box, and choose Center Binding or Side Binding.
|
 Note:
Note:|
Center Binding is not available with manual printing.
|
 |
Select which edge of the document will be bound.
|
 Note:
Note:|
Some settings are not available when Booklet is selected.
|
 |
Choose mm or inch as the Unit setting. Then specify the width of the binding margin.
|
 |
|
|
Portrait
|
Landscape
|
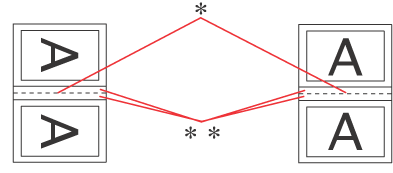
* : Folding edge
** : Margin
When folded booklets are printed using the 2-sided printing option, a margin of the specified width will appear on both sides of the fold. For example, if you specify a 10 mm margin, you will get a 20 mm margin (a margin of 10 mm will be placed on each side of the fold).
 Note:
Note:|
The actual binding margin may be different from the specified settings depending on your application. Experiment with a few sheets to examine actual results before printing the entire job.
|
 |
Click OK to return to the Main window.
|
 |
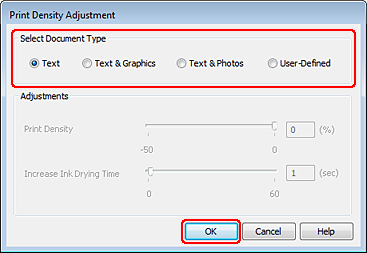
Click the Print Density button to open the Print Density Adjustment window.
|
 Note:
Note:|
This button is not available when you print manually.
|
 |
Select one of the Select Document Type settings. This automatically adjusts Print Density and Increase Ink Drying Time.
|
 Note:
Note:|
If you are printing high-density data, such as graphs, we recommend adjusting settings manually.
|
 |
Click OK to return to the Main window.
|
 |
Make sure all of the settings are correct, and then click OK to close the printer settings window.
|
After completing the steps above, print one test copy and examine the results before printing an entire job.
 Note:
Note:|
If you are printing manually, instructions for printing the back pages will be displayed while the face pages are printed. Follow the on-screen instructions to reload the paper.
|
Printer settings for Mac OS X 10.5 or 10.6
 |
Make adjustments to basic settings.
|
 |
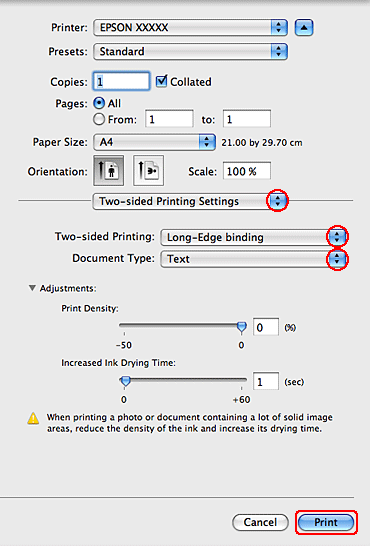
Select Two-sided Printing Settings from the pop-up menu.
|
 |
Select Long-Edge binding or Short-Edge binding from the Two-sided Printing.
|
 |
Select one of the Document Type settings. This automatically adjusts Print Density and Increased Ink Drying Time.
|
 Note:
Note:|
If you are printing high-density data, such as graphs, we recommend adjusting settings manually.
|
 |
Click Print to start printing.
|
Printer settings for Mac OS X 10.4
 |
Make adjustments to basic settings.
|
 |
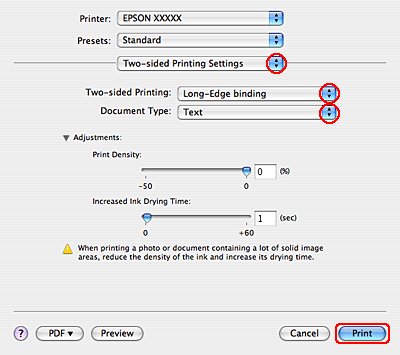
Select Two-sided Printing Settings from the pop-up menu.
|
 |
Select Long-Edge binding or Short-Edge binding from the Two-sided Printing.
|
 |
Select one of the Document Type settings. This automatically adjusts Print Density and Increased Ink Drying Time.
|
 Note:
Note:|
If you are printing high-density data, such as graphs, we recommend adjusting settings manually.
|
 |
Load paper into the paper cassette, and click Print.
|
 See
See 