 |
Uninstalling Your Scanning Software
 Uninstalling EPSON Scan Uninstalling EPSON Scan
 Uninstalling the EPSON Creativity Suite Uninstalling the EPSON Creativity Suite
 Uninstalling the On-screen User’s Guide Uninstalling the On-screen User’s Guide
You may need to uninstall and then reinstall your scanner software to solve certain problems or if you upgrade your operating system.
Follow the instructions in the section for your operating system to uninstall EPSON Scan.
Uninstalling EPSON Scan for Windows
 |
Note: |
 |
Turn off the scanner using its  On button. On button.
|
 |
Disconnect the scanner’s USB cable from your computer.
|
 |
Open the Windows Control Panel and double-click the Add or Remove Programs icon (Windows XP) or the Add/Remove Programs icon (Windows Me, 98SE, or 2000).
|

 |
Click EPSON Scan in the list of currently installed programs and click Change/Remove (Windows XP or 2000) or Add/Remove (Windows Me or 98SE).
|

 |
When the confirmation window appears, click Yes.
|
 |
Follow the on-screen instructions to uninstall EPSON Scan.
|
In some cases, a message may appear to prompt you to restart the computer. If so, make sure Yes, I want to restart my computer now is selected and click Finish.
Uninstalling EPSON Scan for Mac OS X
 |
Insert the software CD-ROM in your CD-ROM or DVD drive.
|
 |
Double-click the EPSON CD-ROM icon on your desktop.
|
 |
Open the EPSON Scan folder.
|
 |
Double-click the EPSON Scan Installer icon.
|
 |  |
Note: |
 |  |
|
If the Authorization window opens, click the key icon, enter the administrator's name and password, click OK, and click Continue.
|
|
 |
When you see the license agreement, click Accept. The Installer window appears.
|
 |
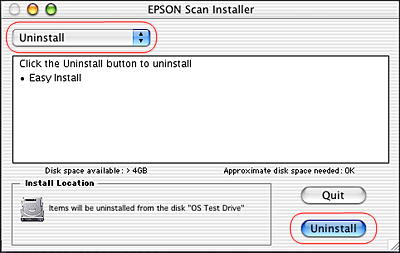
Select Uninstall from the pull-down menu at the top and click the Uninstall button.
|

Uninstalling the EPSON Creativity Suite
Follow the instructions in the section for your operating system to uninstall the EPSON Creativity Suite.
Uninstalling the EPSON Creativity Suite for Windows
 |
Note: |
 |
Open the Windows Control Panel and double-click the Add or Remove Programs icon (Windows XP) or the Add/Remove Programs icon (Windows Me, 98SE, or 2000).
|

 |
Choose the software you want to uninstall from the list of programs.
|
 |
Click Change/Remove in Windows XP or 2000, or Add/Remove in Windows Me or 98SE.
|
 |
When the confirmation window appears, click Yes.
|
 |
Follow the on-screen instructions.
|
 |
In some cases, a message may appear to prompt you to restart the computer. If so, make sure Yes, I want to restart my computer now is selected and click Finish.
|
Uninstalling the EPSON Creativity Suite for Mac OS X
 |
Note: |
 |
|
Log onto a Computer Administrator account to uninstall software. You cannot uninstall programs if you log onto a Limited account.
|
|
 |
Insert the software CD-ROM in your CD-ROM or DVD drive.
|
 |
Double-click the EPSON CD-ROM icon on your desktop.
|
 |
Double-click the EPSON Creativity Suite folder, then open the folder for the program you want to uninstall. (If there are additional folders for specific language versions, open the folder for the language you installed.)
|
 |
If you see an Uninstaller icon, double-click it. Then enter your password or pass-phrase as necessary and follow the on-screen instructions. When you are finished, go to step 9.
|
If you see only an Installer icon, double-click it. Then enter your password or pass-phrase as necessary and go to step 5.
 |
If you see a license agreement screen, click Accept.
|
 |
In the Installer window, select Uninstall from the pull-down menu in the upper left corner.
|
 |
Click the Uninstall button.
|
 |
When uninstallation is finished, click OK, then click Quit.
|
 |
Repeat steps 2 through 8 for each program you want to uninstall in the EPSON Creativity Suite folder.
|
 |
If you need to uninstall the Attach to Email program, double-click the Applications folder on your Macintosh hard drive.
|
 |
Open the EPSON folder, then open the Creativity Suite folder.
|
 |
Select the Attach to Email folder icon and drag it to the Trash icon.
|
Uninstalling the On-screen User’s Guide
If you need to uninstall this on-screen User’s Guide, follow the steps here for your operating system.
Uninstalling the On-screen User’s Guide for Windows
 |
Note: |
 |
|
To uninstall programs in Windows XP or 2000, you need to log on as a user with a Computer Administrator account (Windows XP) or as a user who belongs to the Administrators group (Windows 2000).
|
|
 |
Turn off the scanner using its  On button. On button.
|
 |
Disconnect the scanner’s USB cable from your computer.
|
 |
Open the Windows Control Panel and double-click the Add or Remove Programs icon (Windows XP) or the Add/Remove Programs icon (Windows Me, 98SE, or 2000).
|

 |
Click ESPRX650 User’s Guide in the list of currently installed programs and click Change/Remove (Windows XP or 2000) or Add/Remove (Windows Me or 98SE).
|
 |
When the confirmation window appears, click Yes.
|
 |
Follow the on-screen instructions to uninstall the User’s Guide.
|
Uninstalling the On-screen User’s Guide for Mac OS X
Drag the following folder and icon into the Trash:
|  |


 Uninstalling EPSON Scan

 On button.


 Top
Top


