 |
 |
|
||
 |
||||
Using the Control Panel
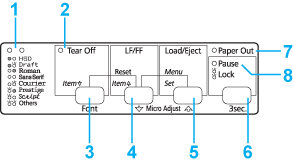
You can control simple printer operations—such as line feeding, form feeding, loading and ejecting paper, and selecting fonts—with the buttons on the control panel. The control panel lights show the printer’s status.
Control Panel Buttons and Lights

1. Font selection lights
Indicates the current font selection setting.
  |
High Speed Draft
|
  |
Draft
|
  |
Roman
|
  |
Sans Serif
|
  |
Courier
|
  |
Prestige
|
  |
Script
|
  |
Others
|
 = on,
= on,  = off,
  = flashing
Lights up and continues under the default settings.
2. Tear Off (Font) light
Flashes when continuous paper is in the tear-off position.
3. Tear Off (Font) button*
Advances continuous paper to the tear-off position.
Feeds continuous paper backward from the tear-off position to the top-of-form position.
4. LF/FF button**
Feeds paper line by line when pressed and released.
Ejects a single sheet or advances continuous paper to the next top-of-form position when held down.
5. Load/Eject button**
Loads a single sheet of paper.
Ejects a single sheet of paper if a sheet is loaded.
Loads continuous paper from the standby position.
Feeds continuous paper backwards to the standby position.
6. Pause button
Stops printing temporarily, and resumes printing when pressed again. When pressed for three seconds, turns on the Micro Adjust mode**. To turn off, press again.
7. Paper Out light
On when no paper is loaded in the selected paper source or when paper is not loaded correctly.
Flashes when paper has not been fully ejected or a paper jam has occurred.
Flashes for three seconds along with the Pause light when the lock-out mode is turned on.
8. Pause light
On when the printer is paused.
Flashes when the printer is in the Micro Adjust mode**.
Flashes when the print head has overheated.
Flashes for three seconds along with the Paper Out light when the lock-out mode is turned on.
Only this light is on in sleep mode. All other lights are off.
* Font select: In the Micro Adjust mode, you can select the font to use for printing by pressing the Tear Off (Font) button. The font selection lights turn on, off or flash to indicate the selected font.
** Micro Adjust mode: When you hold down the Pause button for three seconds, the printer enters the micro adjust mode. In this mode, you can press the LF/FF  and Load/Eject
  buttons to adjust the top-of-form or tear-off position. See Adjusting the top-of-form position.
 and Load/Eject
  buttons to adjust the top-of-form or tear-off position. See Adjusting the top-of-form position.
Selecting a built-in font
Follow these steps to select a built-in font using the buttons on the printer’s control panel:
 |
Make sure that the printer is not printing. If it is, wait until printing is complete.
|
 |
Hold down the Pause button for three seconds to enter the Micro Adjust mode. The Pause light begins to flash. The two font selection lights show the current font selection.
|
 |
Press the Tear Off (Font) button repeatedly to cycle through all of the available selections; then stop when you reach the desired font with a pattern shown on the control panel. Your selection stays in effect until you change it again.
|
 Note:
Note:|
Settings you make in your application programs usually override settings you make from the printer’s control panel. For best results, use your application to select a font and pitch.
Bar code fonts cannot be selected via the control panel.
|
Panel operations during sleep mode
The printer enters sleep mode if 4 minutes and 30 seconds has passed since the previous operation and no errors have occurred. The following operations return the printer from sleep mode.
Sending print data.
Pressing a control panel button. Pressing a button once returns the printer from sleep mode and shows the current status using the control panel lights. To use the normal button functions, press a button one more time.
 Note:
Note:|
Pressing a button only once returns the printer from sleep mode. It returns to sleep mode again if more than 20 seconds pass without any additional operations being made.
|
