 Scan to PDF button.
  |
 |
|
||
 |
||||
Scanning Directly to a PDF File
Starting a Scan With the Scan to PDF Button
You can scan multiple document pages, photos, film images, or slides and save them as one PDF file on your computer using the scanner’s  Scan to PDF button.
 Scan to PDF button.
  |
Place the first page of your original. See one of these sections for instructions.
|
Documents or photos: Placing Documents or Photos
Film or slides: Placing Film or Slides
 |
Press the
 Scan to PDF button on the scanner. You see the Scan to PDF window. Scan to PDF button on the scanner. You see the Scan to PDF window. |
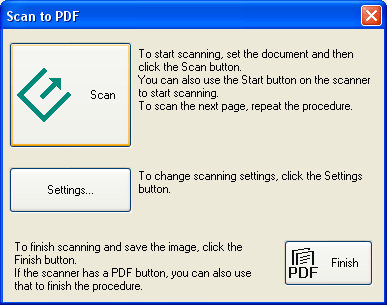
 |
Click the Settings button. You see the Scan to PDF Settings window.
|
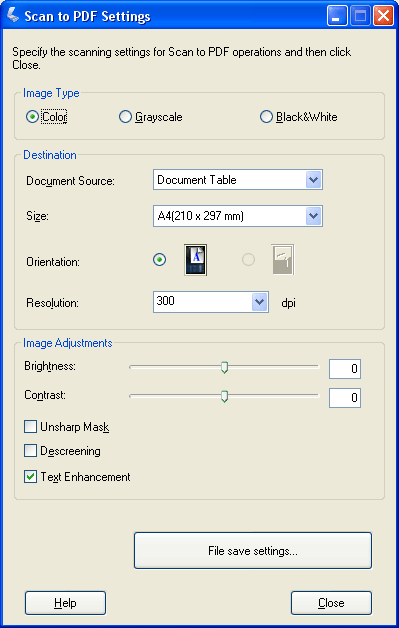
 |
Click the Color, Grayscale, or Black&White button to select the colors in the original.
|
 |
Click the arrow to open the Size list and select the size of your original.
|
 |
If you need to select a size that is not in the Size list, you can create a custom size. Click the arrow in the Size list and select Customize. You see the Source Size window.
|
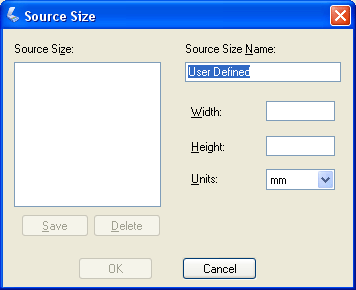
Type a name for your custom size, enter the size, click the Save button, then click OK. Your new size appears in the Size list.
 |
Click the arrow next to the Resolution list and select the number of dots per inch at which you want to scan. See the table below for guidelines.
|
|
What you will do with the scanned image
|
Suggested scan resolution
|
|
Send via e-mail, upload to web, view only on the screen
|
96 to 150 dpi
|
|
Print
|
300 dpi
|
 |
Use the settings in the Image Adjustments area of the window to modify the image quality if necessary. See the table below for guidelines.
|
|
Setting
|
Description
|
|
Brightness
|
Adjusts the overall image lightness and darkness
|
|
Contrast
|
Adjusts the difference between the light and dark areas of the overall image.
|
|
Unsharp Mask
|
Turn on to make the edges of image areas clearer for an overall sharper image. Turn off to leave softer edges.
|
|
Descreening
|
Removes the rippled pattern that can appear in subtly shaded image areas, such as skin tones. Also improves results when scanning magazine or newspaper images that include screening in their original print process.
|
|
Text Enhancement
|
Improves the definition of text and line art.
|
|
Threshold
|
Adjusts the level at which the black areas in text and line art are delineated. (Available only when you select Black&White as the Image Type setting.)
|
 |
Click the File save settings button. The File Save Settings window appears. The current Paper Size, Orientation, Margin, and Compression Level settings are displayed below it.
|
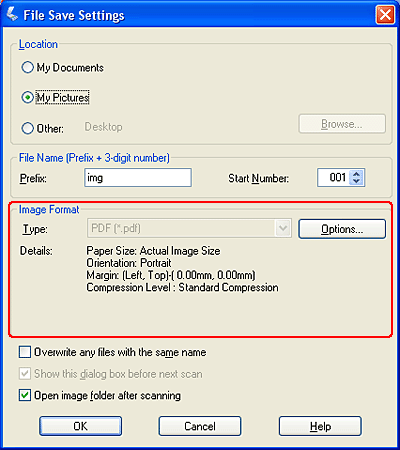
 |
If you need to change any of the current PDF settings, click the Options button. You see the Epson PDF Plug-in Settings window.
|
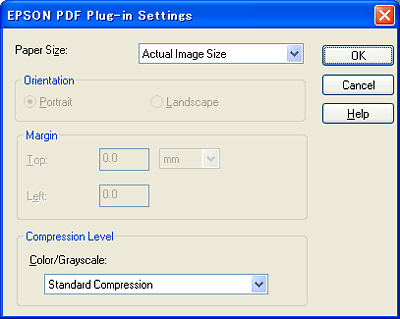
Select the settings that match your document and click OK. You return to the File Save Settings window.
 |
Click OK again, click Close, then click Scan or press the
 Start button on the scanner. Epson Scan scans your page. Start button on the scanner. Epson Scan scans your page. |
 |
If you are scanning multiple pages, replace the first page on the document table with the second page and click Scan or press the
 Start button again. Repeat this step for each page in your document. Start button again. Repeat this step for each page in your document. |
 |
When you are finished, click Finish or press the
 Scan to PDF button on the scanner. Your document is saved as a PDF file in the Pictures or My Pictures folder. Scan to PDF button on the scanner. Your document is saved as a PDF file in the Pictures or My Pictures folder. |
Starting a Scan With Epson Scan (Full Auto Mode)
Using Full Auto Mode, you can scan a document to a PDF file quickly and easily.
 |
Place your original document on the document table. See one of these sections for instructions.
|
Documents or photos: Placing Documents or Photos
Film or slides: Placing Film or Slides
 |
Start Epson Scan. See one of these sections for instructions.
|
Documents or photos:
Film or slides:
You see an Epson Scan window.
 |
If the Mode box at the top right of the Epson Scan window is set to Full Auto Mode, click the Customize button.
|
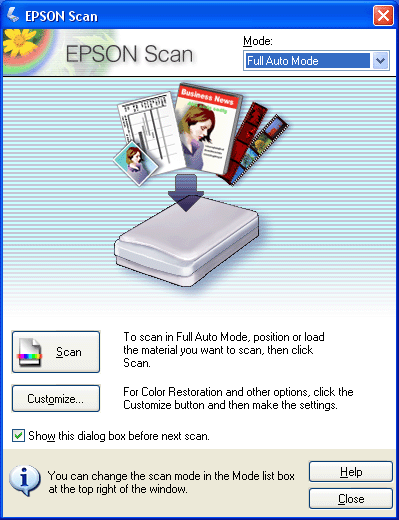
 Note:
Note:|
If you want to change the scan mode, see Changing the Scan Mode for documents and photos or Changing the Scan Mode for film and slides.
|
 |
The Customize window appears.
|
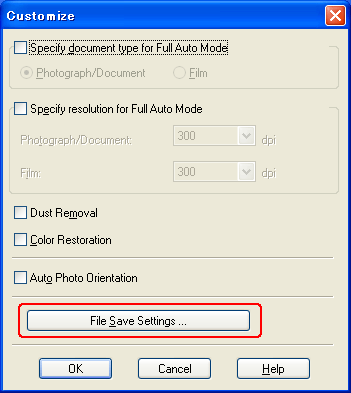
Click the File Save Settings button.
 |
The File Save Settings window appears.
|
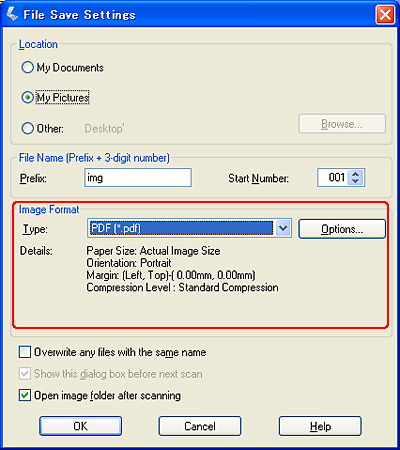
Select PDF as the Type setting. The current Paper Size, Orientation, Margin, and Compression Level setting are displayed below it.
 |
If you need to change any of the current PDF settings, click the Options button. You see the Epson PDF Plug-in Settings window.
|

Select the settings that match your document and click OK. You return to the File Save Settings window.
 |
When you are finished selecting file settings, click OK. Click OK again to close the Customize window.
|
 |
Click the Scan button. Epson Scan starts scanning in Full Auto Mode.
|
 |
Depending on how you started Epson Scan, the program saves the file to the location you specified or opens the scanned image in your scanning program. See one of these sections for details.
|
Documents or photos: Finishing the Scan
Film or slides: Finishing the Scan
Starting a Scan With Epson Scan (Home/Professional Mode)
You can scan multiple document pages, photos, film images, or slides and save them as one PDF file on your computer using Epson Scan.
 |
Place the first page of your original. See one of these sections for instructions.
|
Documents or photos: Placing Documents or Photos.
Film or slides: Placing Film or Slides.
 |
Start Epson Scan. See one of these sections for instructions.
|
Documents or photos:
Film or slides:
 |
When the Epson Scan window appears, set the scan mode to Home Mode or Professional Mode. Then select the basic settings for the type of original(s) you are scanning and select the destination setting for the way you will use your image(s). See one of these sections for instructions.
|
Documents or photos: Selecting Basic Settings
Film or slides: Selecting Basic Settings
 Note:
Note:|
To change the scan mode, see Changing the Scan Mode for documents and photos or Changing the Scan Mode for film and slides.
|
 |
Click the Preview button to preview your image(s), then select your scan area. See one of these sections for instructions.
|
Documents or photos: Previewing and Adjusting the Scan Area
Film or slides: Previewing and Adjusting the Scan Area
 |
When you are finished selecting settings and previewing, click the Scan button.
|
 |
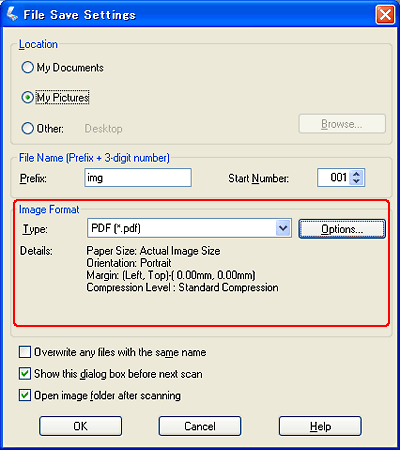
The File Save Settings window appears. Select PDF as the Type setting. The current Paper Size, Orientation, Margin, and Compression Level settings are displayed below it.
|
 |
If you need to change any of the current PDF settings, click the Options button. You see the Epson PDF Plug-in Settings window.
|

Select the settings that match your document and click OK. You return to the File Save Settings window.
 |
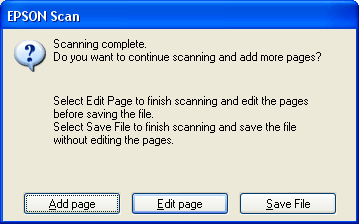
When you are finished selecting file settings, click OK. Epson Scan scans your page and displays this window.
|
 |
If you are only scanning one document page, or you don’t need to edit your pages, click Save File and go to step 12.
|
If you are scanning multiple pages, click Add Page, replace the first page on the document table with the second page, and click Scan. Repeat this step for each page in your document. When you are finished, click Edit Page and go to step 10.
 |
You see the Editing Page window displaying thumbnail images of each scanned page.
|
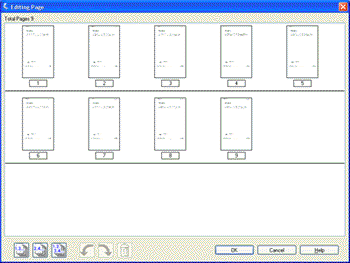
The Editing Page window displays thumbnails of each scanned page. You can use the tools below the main window to select, rotate, reorder, and delete pages in your document. Click the Help button for details.
If you want to include all the document pages in your PDF file as they currently look, go to step 11.
If you do not need to include some of the pages, click the  odd pages or
  even pages icons, or click the individual pages you do not need. Then click the
  delete icon to delete them.
 odd pages or
  even pages icons, or click the individual pages you do not need. Then click the
  delete icon to delete them.
If you want to rotate pages, click the pages or use the  odd pages,
  even pages, or
  all pages icon to select the pages. Then click the
  left or
  right rotate icon to rotate them.
 odd pages,
  even pages, or
  all pages icon to select the pages. Then click the
  left or
  right rotate icon to rotate them.
 Note:
Note:|
The
 delete icon is not available when all document pages are selected. delete icon is not available when all document pages are selected. |
 |
When you have finished editing your document pages, click OK. Your document is saved as a PDF file in the Pictures or My Pictures folder and you return to the Epson Scan window.
|
 |
Click Close to exit Epson Scan.
|
