 |
Scanning and Printing Color Accurate Images
 Scanning and Saving Your Image Scanning and Saving Your Image
 Printing Your Image Printing Your Image
You can optimize the color accuracy of your images using a photo-editing application, such as Adobe Photoshop Elements.
Scanning and Saving Your Image
 |
Open Adobe Photoshop Elements and select Edit and Enhance Photos.
|
 |
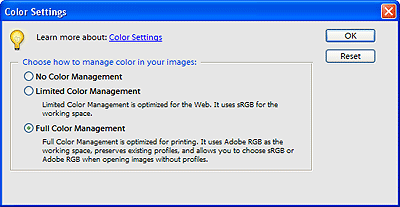
Click Edit and select Color Settings.
|
 |
Select Full Color Management and click OK.
|

 |
Select File > Import > EPSON Perfection V350. Select Home Mode or Professional Mode, then click the Preview button to prescan your image and adjust the marquee.
|
 |  |
Note: |
 |  |
|
You cannot use Full Auto Mode for color management.
|
|
 |
Click the Configuration button, then click the Color tab and select ICM (Windows) or ColorSync (Mac OS X).
|
 |
For the Source (Scanner) setting, select EPSON Standard. If you have color management software and created a custom ICC profile, select it as the Source (Scanner) setting.
|
 |  |
Note: |
 |  |
|
When creating a custom ICC profile for the scanner, be sure to place the profile in the following folder.
|
|
 |
For the Target setting, select Adobe RGB.
|
 |
Select Display Preview using monitor compensation, then click OK to return to the EPSON Scan window.
|
 |
Click Scan to scan your image.
|
 |
When EPSON Scan is finished scanning, click the Close button to close the EPSON Scan window.
|
 |
Save your image by selecting File > Save As.
|
In the Save Options area of the Save As window, select ICC Profile (Windows) or Embed Color Profile (Mac OS X) to save the profile with your image.
 |
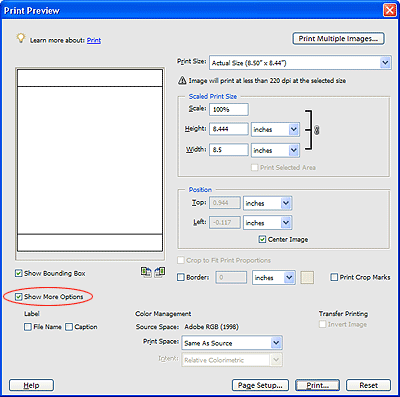
From the File menu, select Print.
|
 |
Click the Show More Options box and select Same As Source as the Print Space setting.
|

 |
Check the settings in your printer software and make any changes necessary for your print job, then click Print to print your image. For details on selecting printer settings, see your printer’s documentation.
|
|  |


 Scanning and Saving Your Image


 Top
Top