|

Online Reference Guide
|
|
Understanding EPSON TWAIN Pro Features / Using the Preview Window
Using the Densitometer
The Densitometer shows the RGB and luminosity (L) values of a selected pixel or group of pixels, and indicates the difference between these values before and after making adjustments to the previewed image.
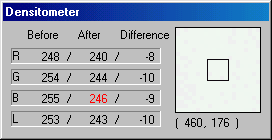
To use the Densitometer, place the cursor over an area of the image in the Preview window to sample a pixel or group of pixels. A close-up of the area being sampled appears on the right side of the Densitometer window, and the values of the sampled pixel or group of pixels are displayed on the left side of the window.
The values that appear in the Densitometer window depend on the Pixel Depth setting in the Image Type dialog box. If Pixel Depth is set to one of the color settings, both RGB and luminosity values are shown. If Pixel Depth is set to one of the gray settings, only the luminosity value is shown. If Pixel Depth is set to Black & White, then RGB and luminosity values are replaced with a Bit value.
 |
Note:
|
 | -
The luminosity value is calculated by the following formula: 0.2R+0.6G+0.2B.
|
Specifying the number of pixels to be sampled
You can choose to sample one pixel at a time, 3 x 3 pixels at a time, or 5 x 5 pixels at a time. To change the number of pixels being sampled, press the Ctrl and E keys on your keyboard. The square in the center of the close-up changes size to indicate the amount of pixels being sampled.
|
Note:
|
| -
The values shown for a group of pixels are an average of each pixel's values.
|
| -
In the Configuration dialog box, you can specify the default number of pixels to be sampled when the Densitometer opens. See Densitometer menu for instructions.
|

[Top]
| Version 1.00E, Copyright © 2001, SEIKO EPSON CORPORATION |

