 |
 Paper jams in the feeding area Paper jams in the feeding area
Paper jams inside of the printer or in the output area
Paper jams in the feeding area
Follow these steps to clear paper jams in the feeding area:
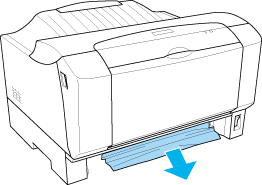
This section describes an example of how to clear jammed paper in the feeding area of the lower cassette.
 |
Remove the lower cassette from the printer.
|
 |
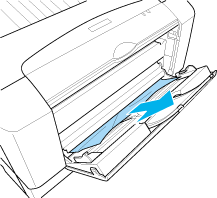
When the paper is jammed in the lower cassette, remove the paper as shown below.
|
 |
Remove any folded paper from the lower cassette, and discard any curled or wrinkled sheets.
|
 |
Remove the cover of the lower cassette and take the paper stack out. Tap the edge on a flat surface and reinsert it into the lower cassette making sure the paper is evenly aligned and that the cartridge is not overloaded.
|
|  |
Note: |
| |
|
Make sure that you are using the correct size of paper and set the paper size switch according to the paper size. Also make sure that you are using paper that meets the specifications for this printer.
|
|
 |
Reattach the cassette cover and reinsert the lower cassette into the printer.
|
The jammed page’s print data is automatically reprinted.
Paper jams inside of the printer or in the output area
Follow these steps to clear paper jams inside of the printer or in the output area:
 |
Warning: |
|
|
Be careful not to touch the fuser, which is marked CAUTION Hot Surface Avoid Contact, or the surrounding areas. If the printer has been in use, the fuser and the surrounding areas may be very hot.
|
|
|
|
Open the MP tray and remove the jammed paper.
|
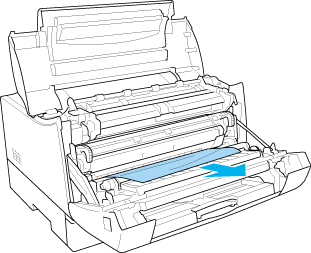
When the jammed paper is fed toward the output tray, open the front cover and the top cover and make sure that the paper is not wrinkled there. Then pull the jammed paper in the direction as shown below.
|  |
Caution: |
|
|
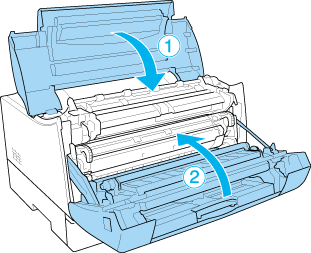
Close the top cover, and close the front cover.
|
| |
Caution: |
| |
Note: |
| |
|
Because the toner on the paper inside the printer may not have been fixed on the page, toner may come off on your hands when you remove the paper. If you spill toner on your clothing, rinse it off with cold water. Using hot water may leave a permanent stain.
|
|
| |


 Top
Top