Making Changes to Printer Settings
 Making the print quality settings Making the print quality settings
Resizing printouts
Modifying the print layout
Using a watermark
Making Extended Settings
Printing a status sheet
Ordering Consumables
Making the print quality settings
You can change the print quality of printouts through settings in the printer driver. With the printer driver, you can make the print settings by choosing from a list of predefined settings, or customizing the settings.
Choosing the print quality by using the Automatic setting
You can change the print quality of printouts to favor speed or detail. There are three quality modes.
When Automatic is selected in the Basic Settings tab, the printer driver takes care of all detailed settings. Print quality is the only setting you have to make. You can change other settings such as paper size or orientation in most applications.
 |
Note: |
 |
|
The printer driver’s online help provides details on printer driver settings.
|
|
 |
Click the Basic Settings tab.
|
 |
Click Automatic, then choose desired printing quality.
|

 |
Click OK to apply the settings.
|
The printer driver provides the following quality modes.
Draft, Text&Image, Photo
|
Note: |
|
|
If printing is unsuccessful or a memory-related error message appears, selecting a different print quality may allow printing to proceed.
|
|
Using the predefined settings
The predefined settings are provided to help you optimize print settings for a particular kind of printout, such as presentation documents or images taken by a video or digital camera.
Follow the steps below to use the predefined settings.
|
|
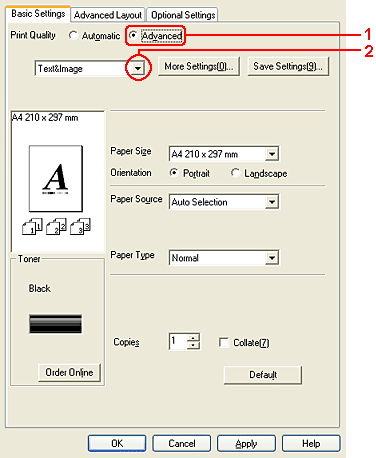
Click the Basic Settings tab.
|
|
|
Select Advanced. You will find the predefined settings in the list below of Automatic.
|
| |
Note: |
| |
|
This screen may vary depending on your operating system version.
|
|
|
|
Select the most appropriate setting from the list according to the type of document or image you want to print.
|
When you choose a predefined setting, other settings such as Halftoning, and Toner Save are set automatically. Changes are shown in the current settings list on the Setting Information dialog box that appears by pressing the Setting Info. button on the Optional Settings tab.
This printer driver provides the following predefined settings:
Draft
Suitable for printing inexpensive drafts.
Text & Image
Suitable for printing documents that include text and images.
Photo
Suitable for printing photos.
Customizing print settings
If you need to change detailed settings, make the settings manually.
Follow the steps below to customize your print settings.
|
|
Click the Basic Settings tab.
|
|
|
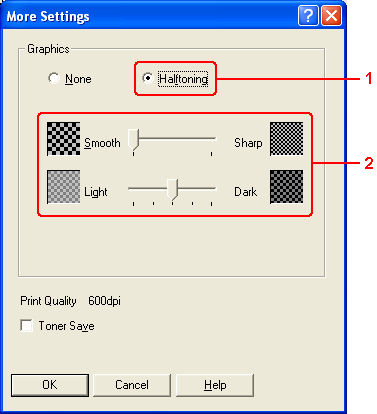
Click Advanced, then click More Settings.
|
|
|
Select Halftoning and use the slider bars to adjust the definition and intensity.
|
| |
Note: |
 |
Click OK to apply the settings and return to the Basic Settings tab.
|
To save your custom settings, click Advanced, then click Save Settings on the Basic Settings tab. The Custom Settings dialog box appears.
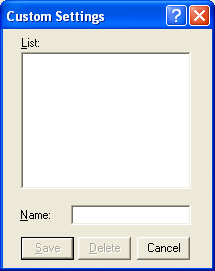
Type a name for your custom settings in the Name box, then click Save. Your settings will appear in the list below of Automatic in the Basic Settings tab.
|
Note: |
|
-
To delete a custom setting, click Advanced, click Save Settings in the Basic Settings tab, select the setting in the Custom Settings dialog box, then click Delete.
|
|
If you change any setting in the More Settings dialog box when one of your custom settings is selected in the Advanced Settings list on the Basic Settings tab, the setting selected in the list changes to Custom Settings. The custom setting that was previously selected is not affected by this change. To return to your custom setting, simply reselect it from the current settings list.
You can have your document enlarged or reduced during printing.
To automatically resize pages to fit the output paper
|
|
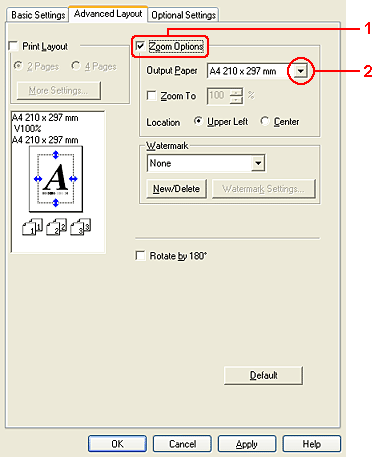
Click the Advanced Layout tab.
|
|
|
Select the Zoom Options check box, then select the desired paper size from the Output Paper drop-down list. The page will be printed to fit on the paper you have selected.
|
|
|
Select Upper Left (to print reduced page image at upper left corner of the paper) or Center (to print reduced page image with centering) for Location setting.
|
|
|
Click OK to apply the settings.
|
Resizing pages by a specified percentage
|
|
Click the Advanced Layout tab.
|
|
|
Select the Zoom Options check box.
|
|
|
Select the Zoom To check box, then specify the magnification percentage in the box.
|

| |
Note: |
| |
|
The percentage can be set between 50% and 200% in 1% increments.
|
|
|
|
Click OK to apply the settings.
|
If necessary, select the paper size to be printed from the Output Paper drop-down list.
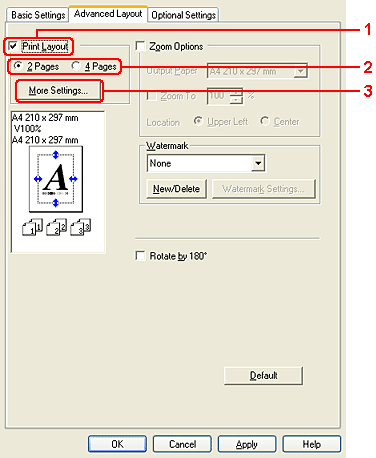
Modifying the print layout
Your printer can print either two or four pages onto a single page and specifies the printing order, automatically resizing each page to fit the specified paper size. You can also choose to print documents surrounded by a frame.
|
|
Click the Advanced Layout tab.
|
|
|
Select the Print Layout check box and the number of pages you want to print on one sheet of paper. Then click More Settings. The Print Layout Settings dialog box appears.
|
|
|
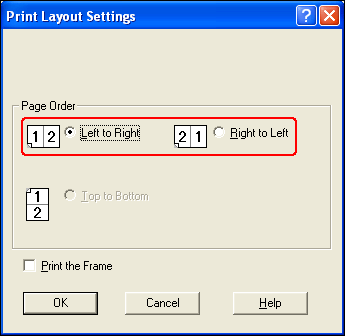
Select the Page Order in which the pages are printed on each sheet.
|
|
|
Select the Print the Frame check box when you want to print the pages surrounded by a frame.
|
| |
Note: |
| |
|
The Page Order choices depend on the number of pages selected above, and the paper orientation (Portrait or Landscape) selected on the Basic Settings tab.
|
|
 |
Click OK to apply the settings and return to the Advanced Layout tab.
|
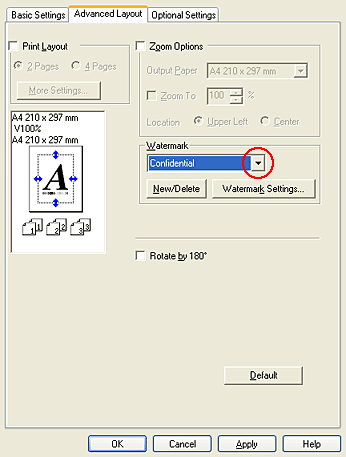
Follow the steps below to use a watermark on your document. In the Advanced Layout tab or Watermark dialog box, you can select from a list of predefined watermarks, or you can make an original watermark with text or a bitmap. The Watermark dialog box also allows you to make a variety of detailed watermark settings. For example, you can select the size, intensity, and position of your watermark.
|
|
Click the Advanced Layout tab.
|
|
|
Select a watermark that you want to use from the Watermark drop-down list. If you want to make detailed settings, click Watermark Settings. The Watermark dialog box appears.
|
|
|
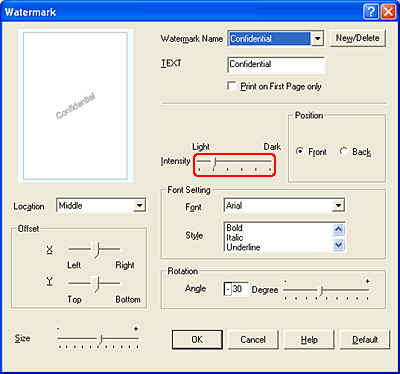
Adjust the image intensity of the watermark with the Intensity slider bar.
|
|
|
Select Front (to print the watermark in the foreground of the document) or Back (to print the watermark in the background of the document) for the Position setting.
|
|
|
Select the location on the page where you want to print the watermark from the Location drop-down list.
|
 |
Adjust the X (horizontal) or Y (vertical) Offset position.
|
 |
Adjust the size of the watermark with the Size slider bar.
|
 |
Click OK to apply the settings and return to the Special tab.
|
You can make a new watermark as follows:
|
|
Click the Advanced Layout tab.
|
|
|
Click New/Delete. The User Defined Watermarks dialog box appears.
|
| |
Note: |
| |
|
The User Defined Watermarks dialog box also appears by clicking New/Delete in the Watermark dialog box.
|
|
|
|
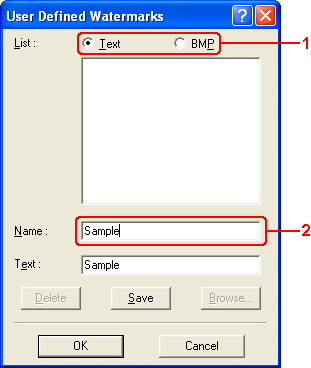
Select Text or BMP and type a name for the new watermark in the Name box.
|
| |
Note: |
| |
|
This screen appears when you select Text.
|
|
|
|
If you select Text, type the watermark text in the Text box. If you select BMP, click Browse, select the BMP file you want to use, then click OK.
|
|
|
Click Save. Your watermark will appear in the List box.
|
|
|
Click OK to apply the new watermark settings.
|
|
Note: |
|
|
You can register up to 10 watermarks.
|
|
You can make various settings in the Extended Settings dialog box. To open the dialog box, click Extended Settings on the Optional Settings tab.
|
Offset:
|
Makes fine adjustments to the printing position on the front and the back of data on a page in 1 mm increments.
|
|
Density:
|
Select a print density in the range 1 to 5.
|
|
Skip Blank Page check box:
|
When you select this check box, the printer skips blank pages.
|
|
Ignore the selected paper size check box*:
|
When you select this check box, the printer prints on loaded paper, regardless of size.
|
|
High Speed Graphics Output check box:
|
Select this check box to optimize the printing speed of graphics composed of line drawings such as overlaid circles and squares.
Clear this check box if graphics do not print correctly.
|
|
Uses the collate settings specified in the application check box:
|
Select this check box to enable the collate settings that are specified on the application.
|
|
Avoid Page Error check box:
|
Select this check box when normal printing cannot be done because of complex fonts or graphics.
|
|
Avoid Insufficient Memory Error check box:
|
Select this check box to compensate for the lack of memory when the printer does not have enough memory to print complex fonts or graphics.
|
|
Auto Continue check box:
|
Select this check box to clear errors automatically and continue printing after a given time (about 5 seconds) when Paper Set, Print Overrun, or Mem Overflow occurs.
|
|
Monitor the printing status check box:
|
Monitor the printing status.
|
|
Uses the spooling method provided by the operating system check box:
|
Select this check box to enable the Spool function for Windows XP, 2000, or Server 2003.
|
|
Default button:
|
Click this button to return the driver settings to the initial settings.
|
|
Help button:
|
Click this button to open online help.
|
|
Cancel button:
|
Click this button to exit the dialog box or printer driver without saving the settings.
|
|
OK button:
|
Click this button to save the settings and to exit the dialog box or printer driver.
|
* Even if this setting is enabled, if the paper that is loaded is shorter than the paper size that is set in the printer driver, then a paper jam may occur after the printed paper is output. To solve the problem, see Documents are printed and output, but a paper jam error occurs.
To confirm the current status of the printer, print a status sheet from the printer driver. The status sheet contains information about the printer, and the current settings.
|
Note: |
|
|
The status sheet cannot be printed if EPSON Status Monitor 3 is not installed.
|
|
Follow the steps below to print a status sheet.
|
|
Access the printer driver.
|
|
|
Click the Optional Settings tab and then click Status Sheet. The printer starts printing a status sheet.
|
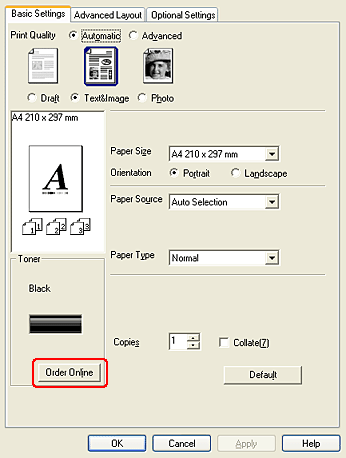
To order consumables online, click the Order Online button on the Basic Settings tab. See Order Online for details.
|
Note: |
|
|
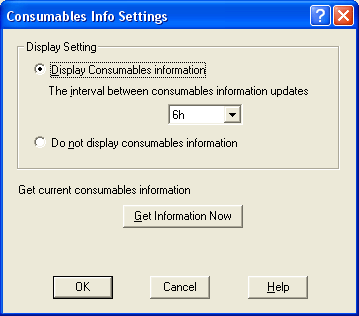
The amount of toner remaining is displayed on the Basic Settings tab when EPSON Status Monitor 3 is installed. You can set the interval of the remaining consumables on the Consumables Info Settings dialog box that appears by clicking the Consumables Info Settings button on the Optional Settings tab.
|
|
| 

 Top
Top