 |
Making Changes to Printer Settings
 Making the print quality settings Making the print quality settings
Resizing printouts
Modifying the print layout
Using a watermark
Making Extended Settings
Printing a status sheet
Making the print quality settings
You can change the print quality of printouts through settings in the printer driver. With the printer driver, you can make the print settings by choosing from a list of predefined settings, or customizing the settings.
Choosing the print quality by using the Automatic setting
When Automatic is selected on the Basic Settings tab, the printer driver takes care of all detailed settings. You can change other settings such as paper size or orientation in most applications.
 |
Note: |
|
|
The printer driver’s online help provides details on printer driver settings.
|
|
For Mac OS X users
 |
Open the Print dialog box.
|
 |
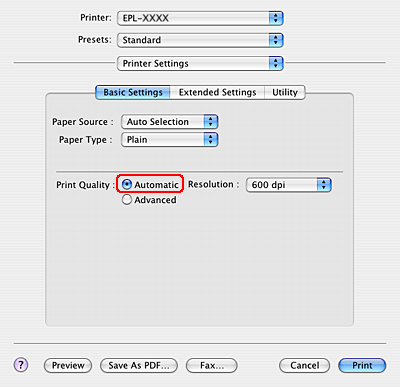
Select Printer Settings from the drop-down list, and select the Basic settings tab.
|
 |
Click Automatic.
|
For Mac OS 9 users
|
|
Open the Basic Settings dialog box.
|
|
|
Click Automatic on Print Quality.
|
Customizing print settings
Your printer provides for customized print settings if you need more control over the printout, want to make the most detailed settings available, or just want to experiment.
For Mac OS X users
|
|
Open the Print dialog.
|
|
|
Select Printer Settings from the drop-down list, and select the Basic Settings tab.
|
|
|
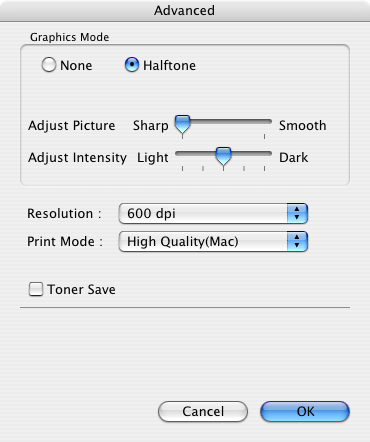
Click Advanced, then click More Settings. The following dialog is displayed.
|
 |
Choose Halftone and use the slider bars to adjust the definition and intensity.
|
 |
Click OK to apply the settings and return to the Print dialog.
|
For Mac OS 9 users
|
|
Open the Basic Settings dialog.
|
|
|
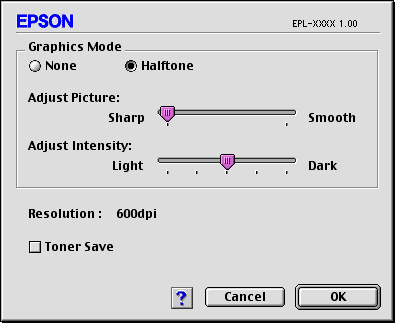
Click Advanced, then click More Settings. The following dialog appears.
|
|
|
Choose Halftone and use the slider bars to adjust the definition and intensity.
|
| |
Note: |
|
|
Click OK to apply the settings and return to the Basic Settings dialog.
|
| |
Note: |
| |
|
For details on each setting, see the online help.
|
|
For Mac OS X users
Use the following procedures to save your custom settings.
For Mac OS X 10.2 or 10.3 users, save your custom settings by Save or Save As in the Preset on the Print dialog box. Type a name for your custom settings in the name box. Your settings will be saved with this name in the Preset drop-down list.
|
Note: |
|
|
The Custom Setting option is a standard feature of Mac OS X.
|
|
For Mac OS 9 users
To save your custom settings, select Advanced, then click Save Settings on the Basic Settings dialog box. The Custom Settings dialog box appears.
Type a name for your custom settings in the Name box, click Save. Your settings will appear in the list on the right of Automatic in the Basic Settings dialog box.
|
Note: |
|
-
To delete a custom setting, select Advanced, click Save Settings on the Basic Settings dialog box, select the setting in the User Settings dialog box, then click Delete.
|
|
If you change any setting in the Advanced Settings dialog box when one of your custom settings is selected in the Advanced Settings list on the Basic Settings dialog box, the setting selected in the list changes to User Settings. The custom setting that was previously selected is not affected by this change. To return to your custom setting, simply reselect it from the current settings list.
The Fit to Page function in the Layout dialog box allows you to have your documents enlarged or reduced during printing according to the specified paper size.
|
Note: |
|
|
Click the  Layout icon on the Basic Settings dialog box. The Layout dialog box appears. Layout icon on the Basic Settings dialog box. The Layout dialog box appears.
|
|
|
Select the Fit to Page check box, then select the desired paper size from the Output Paper drop-down list. The page will be printed to fit on the paper you have selected.
|

|
|
Click OK to apply the settings.
|
Modifying the print layout
You can print either two or four pages onto a single page and to specify the printing order, automatically resizing each page to fit the specified paper size by using Layout printing. You can also choose to print documents surrounded by a frame.
For Mac OS X users
|
|
Open the Print dialog box.
|
|
|
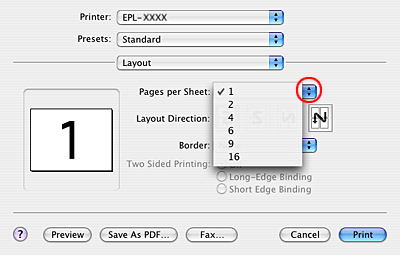
Select Layout from the drop-down list.
|
|
|
Select the number of pages you want to print on one sheet of paper from the drop-down list.
|
|
|
Click Print to start printing.
|
| |
Note: |
| |
|
The Layout settings are a standard feature of Mac OS X.
|
|
For Mac OS 9 users
|
|
Click the Layout icon on the Basic Settings dialog box. The Layout dialog box appears.
|
|
|
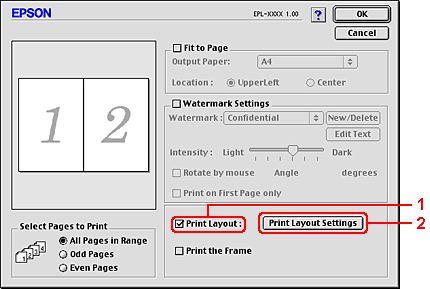
Select the Print Layout check box, then click Print Layout Settings. The Print Layout Setting dialog box appears.
|
|
|
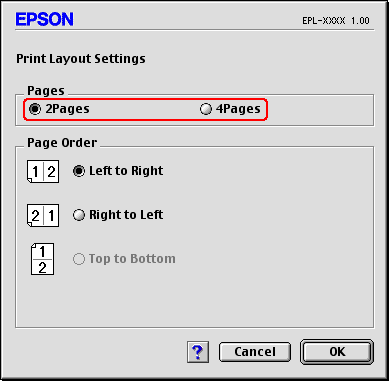
Select the number of pages you want to print on one sheet of paper.
|
|
|
Select the page order in which the pages are printed on each sheet.
|
| |
Note: |
| |
|
Page Order choices depend on Pages selected above, and Orientation.
|
|
|
|
Click OK to apply the settings and return to the Layout dialog box.
|
 |
Select the Print the Frame check box on the Layout dialog box when you want to print the pages surrounded by a frame.
|
 |
Click OK to apply the settings.
|
Follow the steps below to use a watermark on your document. In the Layout dialog box, you can select from a list of predefined watermarks, or you can select a bitmap (PICT) file or text file as your own custom watermark. The Layout dialog box also allows you to make a variety of detailed watermark settings. For example, you can select the size, intensity, and position of your watermark.
|
Note: |
|
|
This function is not available with Mac OS X.
|
|
|
|
Click the Layout icon on the Basic Settings dialog box. The Layout dialog box appears.
|
|
|
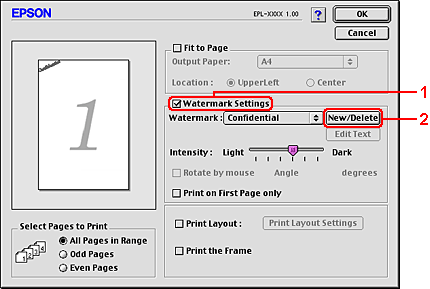
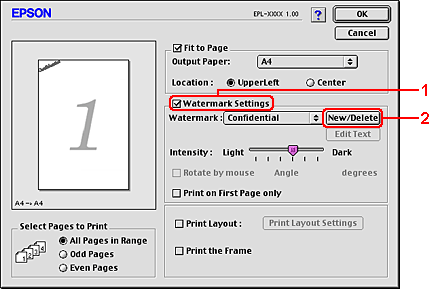
Select the Watermark Settings check box, then select a watermark from the Watermark drop-down list.
|

|
|
Select the location on the page where you want to print the watermark by dragging the watermark image on the preview window. Also, when you want to resize the watermark, drag its handle.
|
|
|
Adjust the image intensity of the watermark with the Intensity slider bar.
|
|
|
For your own custom text watermark, you can rotate it by inputting the degrees in the Angle box. Or select the Rotate by mouse check box, then rotate the text watermark with the pointer on the preview window.
|
|
|
Click OK to apply the settings.
|
You can make a new text or bitmap watermark with the following procedures.
|
|
Click the Layout icon on the Basic Settings dialog box. The Layout dialog box appears.
|
|
|
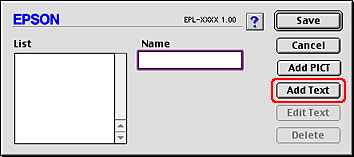
Select the Watermark Settings check box, then click New/Delete. The Custom Watermark dialog box appears.
|
|
|
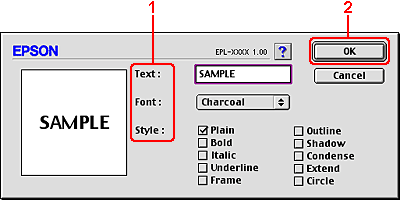
Click Add Text on the Custom Watermark dialog box.
|
|
|
Type the watermark text in the Text box, select the Font and Style, then click OK on the Text Watermark dialog box.
|
|
|
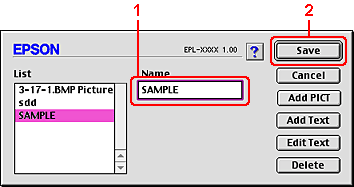
Type the file name in the Name box, then click Save.
|
| |
Note: |
| |
-
To edit the saved text watermark, select it from the List box, then click Edit Text. After editing, be sure to click OK to close the dialog box.
-
To remove the saved text watermark, select it from the List box, then click Delete. After removing it, be sure to click Save to close the dialog box.
|
|
|
|
Select the saved custom watermark from the Watermark drop-down list on the Layout dialog box, then click OK.
|
To make a bitmap watermark
Before making a custom watermark, you should prepare a bitmap (PICT) file.
|
|
Click the Layout icon on the Basic Settings dialog box. The Layout dialog box appears.
|
|
|
Select the Watermark Settings check box, then click New/Delete. The Custom Watermark dialog box appears.
|
|
|
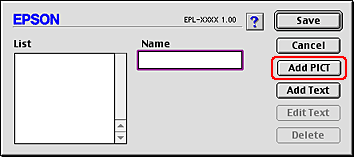
Click Add PICT on the Custom watermark dialog box.
|
|
|
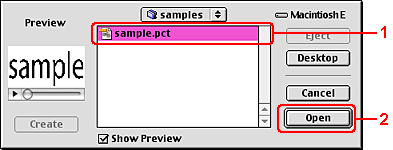
Select the PICT file, then click Open.
|
|
|
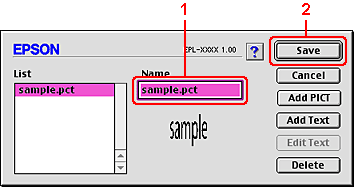
Type the file name in the Name box, then click Save.
|
| |
Note: |
| |
|
To remove the saved watermark, select it from the List box, then click Delete. After removing it, be sure to click Save to close the dialog box.
|
|
|
|
Select the saved custom watermark from the Watermark drop-down list on the Layout dialog box, then click OK.
|
You can make various settings in the Extended Settings dialog box, for example Page Protect.
For Mac OS X users, open the Print dialog box and select Printer Settings from the drop-down list, then select Extended Settings.
For Mac OS 9 users, click the  Extended Settings icon on the Basic Settings dialog box. Extended Settings icon on the Basic Settings dialog box.
|
Offset:
|
Makes fine adjustments to the printing position on the front and the back of data on a page in 1 mm increments.
|
|
Density:
|
Select a print density in the range 1 to 5.
|
|
Ignore the selected paper size check box*:
|
When you select this check box, the printer prints on loaded paper, regardless of size.
|
|
Auto Continue check box:
|
Select this check box to compensate for the lack of memory when the printer does not have enough memory to print complex fonts or graphics.
|
|
Skip Blank Page Check box:
|
When you select this check box, the printer skips blank pages.
|
|
Pattern Smoothing check box:
|
Adjust pattern intensity.
Note:
This function is not available with Mac OS X.
|
|
Avoid Insufficient Memory Error check box:
|
Select this check box to compensate for the lack of memory when the printer does not have enough memory to print complex fonts or graphics.
|
|
Default button:
|
For Mac OS X users, click this button to return the driver settings to the initial settings.
For Mac OS 9 users, click this button to return the settings in the Temporary Spool Folder to the initial settings.
|
|
Select button:
|
Selects spool file saving folder.
Note:
This function is not available with Mac OS X.
|
|
Cancel button:
|
Click this button to exit the dialog box or printer driver without saving the settings.
|
|
OK button:
|
Click this button to save your settings and to exit the dialog box or printer driver. The settings are effective until you make new settings and click OK again.
Note:
This function is not available with Mac OS X.
|
* Even if this setting is enabled, if the paper that is loaded is shorter than the paper size that is set in the printer driver, then a paper jam may occur after the printed paper is output. To solve the problem, see Documents are printed and output, but a paper jam error occurs.
To confirm the current status of the printer, print a status sheet from the printer driver. The status sheet contains information about the printer, the current settings.
For Mac OS X users
|
|
Click Print in the File menu of any application. The Print dialog appears.
|
|
|
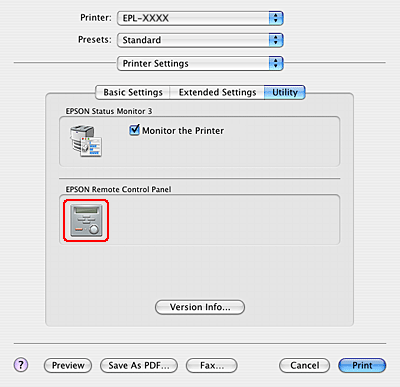
Select Printer Settings from the pop-up menu and select Utility tab.
|
|
|
Click the EPSON Remote Control Panel icon. The Remote Control Panel dialog appears.
|
|
|
Click Status Sheet, and the printer starts printing a status Sheet.
|
For Mac OS 9 users
|
|
Select Chooser from the Apple menu. Click the icon of your printer, and then select the USB port that your printer is connected to. Click Setup, and the Printer Setup dialog appears.
|
|
|
Click Print Status, and the Print Status dialog appears.
|
|
|
Click Status sheet, and the printer starts printing a status Sheet.
|
| |


 button for details on each setting.
 Top
Top