 |
Checking Color Registration
 Printing a color registration sheet Printing a color registration sheet
Adjusting color registration alignment
If you transported your printer for a long distance, you need to check the color registration for possible misalignment.
Printing a color registration sheet
Follow the steps below to print the color registration sheet.
 |
Turn on the printer.
|
 |
Load paper into the MP tray.
|
 |
Make sure the LCD panel displays Ready or Sleep, then press the  Enter button on the control panel twice. Enter button on the control panel twice.
|
 |
Press the  Down button several times to display ColorRegist Sheet. Down button several times to display ColorRegist Sheet.
|
 |
Press the Enter button. The printer prints a color registration sheet.
|
 |
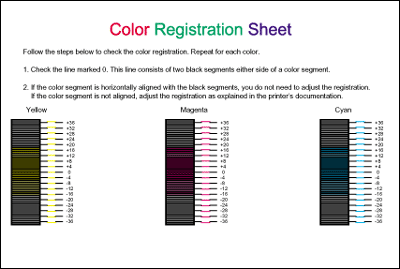
Check the alignment of the lines at the zero position for each color. If the color segment of the line is in alignment with the black segments on either side to make one straight line, you do not need to adjust the registration for that color. If the line segments are not aligned, adjust the registration as explained below.
|
Adjusting color registration alignment
Follow the steps below to adjust color registration.
|
|
Make sure the LCD panel displays Ready or Sleep, then press the Enter button to access the control panel menus.
|
|
|
If necessary, print the color registration sheet for confirmation.
|
| |


 Top
Top Up button several times until the LCD displays the XXXX Regist item for the color (Cyan, Magenta, and Yellow) you need to adjust, then press the