|
 About EpsonNet WebManager About EpsonNet WebManager
 System Requirements System Requirements
 EpsonNet WebManager Functions EpsonNet WebManager Functions
 EpsonNet WebManager Operating Structure EpsonNet WebManager Operating Structure
 Installing EpsonNet WebManager Installing EpsonNet WebManager
 Starting EpsonNet WebManager Starting EpsonNet WebManager
 Opening the Reference Guide Opening the Reference Guide
About EpsonNet WebManager
EpsonNet WebManager is an application designed to manage network devices. It allows network administrators to easily control network devices such as network printers, interface cards, and network adapters attached to a printer. EpsonNet WebManager offers the following features:
 |
Note: |
 |
Note: |
EpsonNet WebManager server operating systems
EpsonNet WebManager server is a computer with EpsonNet WebManager installed.
|
Operating system
|
Windows Server 2003
Windows 2000 Server/Advanced Server (with Service Pack 3 or higher)
Windows NT 4.0 Server/Terminal Server Edition
|
|
Operating system for operational check only
|
Windows XP Home Edition/Professional
Windows 2000 Professional (with Service Pack 3 or higher)
Windows NT 4.0 Workstation (with Service Pack 6 or higher)
|
|
System
|
Pentium 300 MHz or better recommended
|
|
Memory
|
256MB
|
|
Hard disk space
|
100MB
|
EpsonNet WebManager client operating systems
You can access the EpsonNet WebManager server from the following operating systems through a browser.
EpsonNet WebManager Functions
EpsonNet WebManager provides you with the following functions:
 |
Note: |
 |
-
When using EpsonNet WebManager with Internet Explorer in Mac OS, the Printer Layout window, Error Notification window, and Device Details window may not be available.
|
|
EpsonNet WebManager Operating Structure
EpsonNet WebManager must be installed in the computer that functions as the network server. You can select the either of the two methods described below to use EpsonNet WebManager.
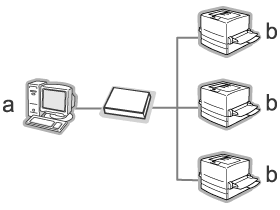
EpsonNet WebManager and a Web browser running on the same PC
No special server is required. Just install EpsonNet WebManager and a Web browser on the same computer that functions as a server. All administration is possible from the network administrator’s Windows XP/Server 2003/2000/NT 4.0 computer.

a. EpsonNet WebManager server
b. Epson printer with built-in network interface
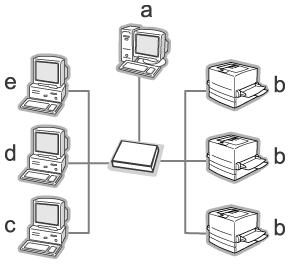
EpsonNet WebManager and a Web browser running on different PCs
Install EpsonNet WebManager in the server, and install a Web browser in the client computers. Run the Web browser on a client computer to access EpsonNet WebManager on the server. Multi-platform network administration is possible from Windows, Macintosh, and UNIX platforms through the browser.

a. EpsonNet WebManager server
b. Epson printer with built-in network interface
c. Client computer running Windows
d. Client computer running Macintosh
e. Client computer running UNIX
Installing EpsonNet WebManager
Follow the steps below to install EpsonNet WebManager.
 |
Insert the Software CD-ROM in the CD-ROM drive.
|
 |
The Software Installation screen opens automatically.
|
If the Software Installation screen does not appear, double-click EPSETUP.EXE on the CD-ROM.
 |
Make sure that all applications are closed, and then click the Continue button.
|
 |
Read the license agreement, and then click the Agree button. If necessary, select the model of your printer.
|
 |
Select Install Network Utility.
|
 |
Click the icon located next to EpsonNet WebManager.
|
 |
Follow the on-screen instructions to complete the installation.
|
 |
Note: |
 |
|
You do not need to install EpsonNet WebManager in the client computer. Just announce the IP address or host name of the server to any clients who use EpsonNet WebManager from a client computer.
|
|
Starting EpsonNet WebManager
Be sure that TCP/IP is installed, and the IP address or host name is set for the computer. (Register the host name in the hosts file in the Windows directory.)
To start EpsonNet WebManager, click Start, point to Programs (for Windows 2000 and NT 4.0 users) or All Programs (for Windows XP and Server 2003 users), and then select EpsonNet WebManager. Click EpsonNet WebManager.
For Windows XP Service Pack 2 users:
If EpsonNet WebManager is installed on the computer running Windows XP Service Pack 2, make the following settings; otherwise the client computers cannot access EpsonNet WebManager.
 |
Click Start, point to Control Panel, and then select Security Center. Click Windows Firewall.
|
 |
Click the Exceptions tab, and then click the Add Port button.
|
 |
Enter the name of the port in the Name text box, and 8090 in the Port number text box, and then select the TCP radio button.
|
 |  |
Note: |
 |  |
|
If necessary, click the Change scope button, and then specify the IP addresses of the client computers for which the port is unblocked.
|
|
 |
Click OK.
|
Run the Web browser and then type the IP address (or the host name) of the server and default port number.
Opening the Reference Guide
After starting EpsonNet WebManager, be sure to read the EpsonNet WebManager’s online reference guide. It provides important information and instructions on using EpsonNet WebManager.
You can access the online guide by using any of the following methods:
| 


 About EpsonNet WebManager
 Top
Top


