 |
 About EpsonNet Internet Print About EpsonNet Internet Print
 System Requirements System Requirements
 Installing EpsonNet Internet Print Installing EpsonNet Internet Print
 Setting Up Your Printer Using EpsonNet Internet Print Setting Up Your Printer Using EpsonNet Internet Print
 Status Alert Window Status Alert Window
About EpsonNet Internet Print
EpsonNet Internet Print is a utility program that supports printing across the Internet using Internet Printing Protocol (IPP). Since the network interface supports IPP, Internet printing is possible using this utility. You can print or make printer settings from Windows 98/95/NT 4.0 systems that can access the Internet. You can also print via a proxy server using this utility.
Before using the EpsonNet Internet Print utility, be sure to read the Readme.txt file found in the EpsonNet Internet Print folder. This file contains the latest information on the EpsonNet Internet Print.
 |
Note: |
 |
-
EPSON Status Monitor is a utility program that monitors your printer and gives you information about its current status. Because this utility does not support IPP, printers connected to the Internet cannot be monitored with EPSON Status Monitor. If you use EpsonNet Internet Print on a computer which has EPSON Status Monitor installed, a communication error message may appear when you view printer properties. To avoid this, click the Optional Settings tab in the target printer’s properties dialog box and click the Update the Printer Option Information Manually radio button.
|
|
Installing EpsonNet Internet Print
Follow the steps below to install EpsonNet Internet Print.
 |
Insert the Software CD-ROM in the CD-ROM drive.
|
 |
The Software Installation screen opens automatically.
|
If the Software Installation screen does not appear, double-click EPSETUP.EXE on the CD-ROM.
 |
Make sure that all applications are closed, and then click the Continue button.
|
 |
Read the license agreement, and then click the Agree button. If necessary, select the model of your printer.
|
 |
Select Install Network Utility.
|
 |
Click the icon located next to EpsonNet Internet Print.
|
 |
Follow the on-screen instructions to complete the installation.
|
 |
Restart the computer after the installation is complete.
|
Setting Up Your Printer Using EpsonNet Internet Print
EpsonNet Internet Print supports printing across the Internet using Internet Printing Protocol. Follow the steps below to set up the printer.
 |
Note: |
 |
|
Before following the steps below, you must make the appropriate IPP settings in EpsonNet Config. See the EpsonNet Config Reference Guide or IPP for instructions on setting up IPP. In the steps below, you will be asked for the IPP URL you set in the IPP setting screen in EpsonNet Config.
|
|
 |
Make sure that TCP/IP is correctly installed and setup in the computer and a valid IP address is set for the computer and printer.
|
 |
Make sure that the IPP settings in EpsonNet Config are correct. See the EpsonNet Config Reference Guide or IPP for instructions on settings for IPP.
|
 |
To start EpsonNet Internet Print, click Start, point to Programs and then EpsonNet Internet Print, then click Add EpsonNet Internet Print Port.
|
 |
The following screen appears. The address you set here becomes the port for Internet printing. Make the settings described below.
|
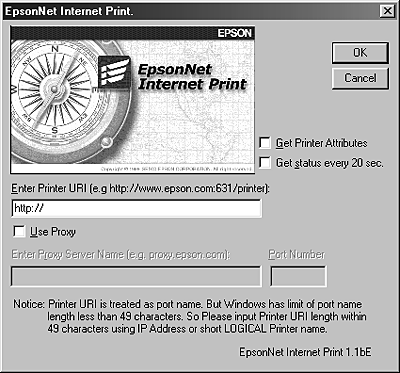
Enter Printer URI:
Enter the target printer’s URI up to 49 characters. The URI you set here must be same as the IPP URL you have set for the IPP setting screen in EpsonNet Config. Do not use the following characters; │ \ [ ] { } < > # " `
Format: http://IP address of printer: 631/printer name
Example: http://192.168.100.201: 631/EPSON_IPP_Printer
Use Proxy:
When using the proxy server, select this box and enter the Proxy Server Name and Port Number. All communication is done via the proxy server.
Enter Proxy Server Name:
Enter the proxy server name or the IP address of the proxy server. You can enter up to 256 characters, but only 127 characters are valid. Do not use the following characters; │ \ [ ] { } < > # " `
Get Printer Attributes:
When you select this box and click OK, EpsonNet Internet Print communicates with the printer and acquires information, so it may take a few minutes before a message appears. This setting is available only when creating a port.
Get status every 20 sec.:
Select this box when you want to receive printer status updates at regular intervals (every 5 seconds during printing and every 20 seconds when idle). If you select this box, a message will appear if an error occurs during printing. You can also check the printer status by double-clicking the printer icon.
 |  |
Note: |
 |  |
-
If the printer power is off or there is a problem on the network, the Get status every 20 sec check box is automatically cleared. If this happens, make sure that the printer power is on and the printer is correctly connected on the network, and then select the Get status every 20 sec check box again.
|
|
 |
Click OK to save settings.
|
 |
When a message appears saying the settings are correctly configured, click OK to start the Add Printer Wizard. Click Next.
|
 |  |
Note: |
 |  |
|
If you click Cancel and then later want to add the printer, start the Add Printer Wizard and follow the steps below.
|
|
 |
Click the Local printer radio button and click Next.
|
 |
Select the printer driver and click Next.
|
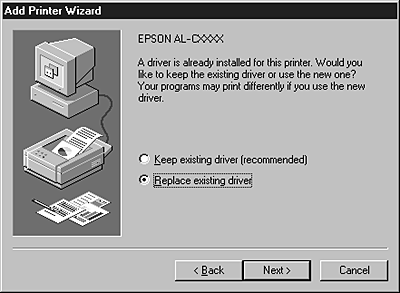
If the following dialog box appears, select Replace existing driver and click Next.
 |
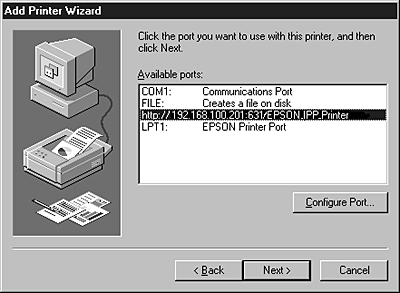
Select the port added by EpsonNet Internet Print in the previous section. Click Next.
|
 |
Follow the on-screen instructions to install the printer driver.
|
 |
If a dialog box instructing you to install EPSON Status Monitor 2 or EPSON Status Monitor 3 appears, click Cancel and terminate the installation.
|
 |
Note: |
 |
Be sure that TCP/IP is correctly installed and setup in the computer and a valid IP address is set for the computer and printer.
|
 |
Make sure that the IPP settings in EpsonNet Config are correct. See the EpsonNet Config Reference Guide or IPP for instructions on settings for IPP.
|
 |
Click Start, point to Settings, and then select Printers.
|
 |
Double-click the Add Printer icon and click Next.
|
 |
Click the My Computer radio button and click Next.
|
 |
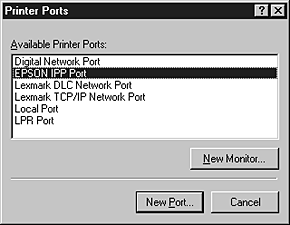
Click the Add Port button, and select EPSON IPP Port from the list. Then click the New Port button.
|
 |
The following screen appears. The address you set here becomes the port for Internet printing. Make the settings described below.
|
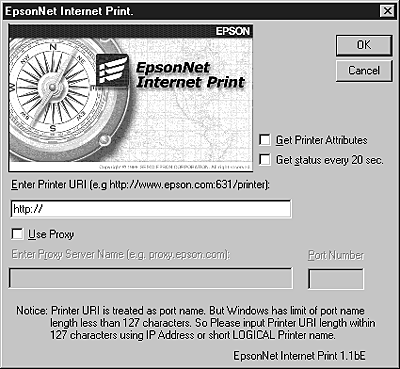
Enter Printer URI:
Enter the target printer’s URI (up to 127 characters). The URI you set here must be the same as the IPP URL you set for the IPP configuration in EpsonNet Config. Do not use the following characters; │ \ [ ] { } < > # " `
Format: http://IP address of printer: 631/printer name
Example: http://192.168.100.201: 631/EPSON_IPP_Printer
Use Proxy:
When using a proxy server, select this box and enter the Proxy Server Name and Port Number. All communication is done via the proxy server.
Enter Proxy Server Name:
Enter the proxy server name or the IP address of the proxy server (up to 256 characters). Do not use the following characters; │ \ [ ] { } < > # " `
Get Printer Attributes:
When you select this box and click OK, EpsonNet Internet Print communicates with the printer and acquires information, so it may take a few minutes before a message appears. This setting is available only when creating a port.
Get status every 20 sec.:
Select this box when you want to receive printer status updates at regular intervals (every 5 seconds during printing and every 20 seconds when idle). If you select this box, a message will appear if an error occurs during printing. You can also check the printer status by double-clicking the printer icon.
 |  |
Note: |
 |  |
-
If the printer power is off or there is a problem in the network, the Get status every 20 sec check box is automatically cleared. If this happens, make sure that the printer power is on and the printer is correctly connected on the network, and then select the Get status every 20 sec check box again.
|
|
 |
Click OK to save the settings.
|
 |
Select the printer driver, and follow the on-screen instructions to install the printer driver.
|
 |
Note: |
 |
|
When you are using EPSON Status Monitor 3 and printing from EpsonNet Internet Print, the message "A communication error has occurred." appears. To clear this message, right-click the printer icon, select Document Defaults, and select the Utility tab. Then select the Monitor the Printing Status check box.
|
|
The EpsonNet Internet Print utility updates the status of the IPP printer if you have selected the Get status every 20 sec check box in the EpsonNet Internet Print dialog box.
The status alert window appears when the printer is out of paper, toner, or ink, if paper is jammed, the cover is open, or when the printer is offline.
The EpsonNet Internet Print utility checks the printer status every 5 seconds during printing and every 20 seconds when idle. If you do not want to check the printer status, clear the Get status every 20 sec check box in the EpsonNet Internet Print dialog box.
|  |


 About EpsonNet Internet Print
 Top
Top


