 |
Installing Components on Your Computer
 About Installing Components on Your Computer About Installing Components on Your Computer
 Windows XP Windows XP
 Windows Me/98 Windows Me/98
 Windows Server 2003 Windows Server 2003
 Windows 2000 Windows 2000
 Windows NT 4.0 Windows NT 4.0
 Macintosh Macintosh
About Installing Components on Your Computer
Before configuring the network interface and printing from the computer, you need to install the necessary components (such as TCP/IP, NetBEUI, etc.) and assign an IP address and subnet mask for your computer, depending on the printing method you want to use. See the section in this chapter appropriate for your operating system.
For Windows XP, use the following procedure to install the necessary components.
 |
Note: |
 |
-
When using TCP/IP or IPP for printing, you need to set the IP address, the subnet mask, and the default gateway of the computer.
|
|
 |
Click Start, highlight Control Panel, and then click Network and Internet Connections. Select Network Connections.
|
 |
Under LAN or High-Speed Internet, click the Local Area Connection icon.
|
 |
Under Network Tasks, click Change settings of this connection.
|
 |
Check if the following necessary components are in the list. If they are already installed, go to the next chapter.
|
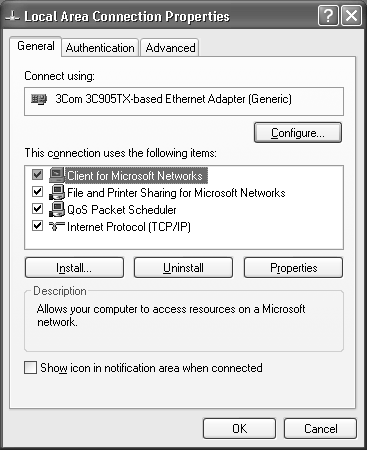
The following table lists the components required for configuring the network interface with EpsonNet Config.
 |
If the necessary components are not in the list, click Install to install them, as described below.
|
For LPR or Internet printing:
Internet Protocol (TCP/IP) is installed by default. You cannot add or delete it.
For Microsoft Network Shared printing:
Select Client and then click Add. Select Client for Microsoft Networks and then click OK.
For printing via NetWare server:
Download the latest Novell Client from the Novell Web site and install it on the computer. Also, be sure to install either IP or IPX. See the Novell Web site for detailed information.
 |
For LPR, Internet, Microsoft Network Shared printing:
Double-click Internet Protocol (TCP/IP) on the Local Area Connection Properties dialog box to open the Internet Protocols (TCP/IP) Properties dialog box. Set the IP address, the subnet mask, etc. and then click OK.
|
 |
Restart the computer.
|
The necessary components are now installed. Go to the section Connecting the Network Interface to the Network.
For Windows Me/98, use the following procedure to install the necessary components.
 |
Note: |
 |
-
When using TCP/IP or IPP for printing, you need to set the IP address, the subnet mask, and the default gateway of the computer.
|
|
 |
Click Start, point to Settings, and then select Control Panel.
|
 |
Double-click the Network icon. Check if the following necessary components are in the list of installed network components on the Configuration menu. If they are already installed, go to the next chapter.
|
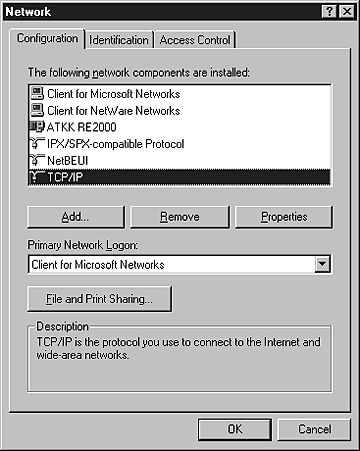
The following table lists the components required for configuring the network interface with EpsonNet Config.
 |  |
Note for users of printers supporting NetWare queue-based printing: |
 |  |
|
Do not run Novell Client for Windows 95/98 version 3.00 and Novell Client for Windows NT version 4.50 when using the following modes: NetWare 3.x/4.x Bindery Print Server mode, NetWare 3.x Remote Printer mode, NetWare 4.x Bindery Remote Printer mode, and NetWare 4.x/5.x NDS Remote Printer mode.
|
|
 |
If the necessary components are not in the list, click Add to install them, as described below.
|
For LPR or Internet printing:
Select Protocol and then click Add. Select Microsoft from the Manufacturers list and TCP/IP from the Network Protocols list. Then click OK.
For Microsoft Network Shared printing:
To use TCP/IP, see the description described earlier to install TCP/IP.
To use NetBEUI, select Protocol and then click Add. Select Microsoft from the Manufacturers list and NetBEUI from the Network Protocols list. Then click OK.
Select Client and then click Add. Select Microsoft from the Manufacturers list and Client for Microsoft Networks from the Network Clients list. Then click OK.
For printing via NetWare server:
Download the latest Novell Client from the Novell Web site and install it on the computer. Also, be sure to install either IP or IPX. See the Novell Web site for detailed information.
 |
For LPR, Internet, Microsoft Network Shared printing:
Double-click TCP/IP on the Configuration menu to open the TCP/IP Properties dialog box. Set the IP address, the subnet mask, etc. and then click OK.
|
 |
Restart the computer.
|
The necessary components are now installed. Go to the section Connecting the Network Interface to the Network.
For Windows Server 2003, use the following procedure to install the necessary components.
 |
Note: |
 |
-
When using TCP/IP or IPP for printing, you need to set the IP address, the subnet mask, and the default gateway of the computer.
|
|
 |
Click Start, point to Control Panel, and then select Network Connections. Click Local Area Connections.
|
 |
Click the Properties button.
|
 |
Check if the following necessary components are in the list. If they are already installed, go to the next chapter.
|
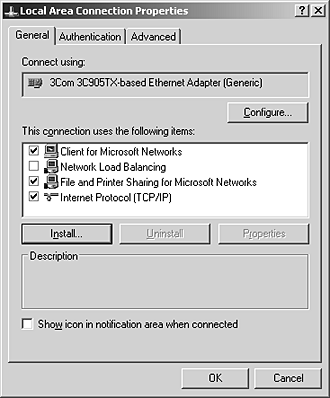
The following table lists the components required for configuring the network interface with EpsonNet Config.
 |
If the necessary components are not in the list, click Install to install them, as described below.
|
For LPR or Internet printing:
Internet Protocol (TCP/IP) is installed by default. You cannot add or delete it.
For Microsoft Network Shared printing:
Select Client and then click Add. Select Client for Microsoft Networks and then click OK.
For printing via NetWare server:
Download the latest Novell Client from the Novell Web site and install it on the computer. Also, be sure to install either IP or IPX. See the Novell Web site for detailed information.
 |
For LPR, Internet, Microsoft Network Shared printing:
Double-click Internet Protocol (TCP/IP) on the Local Area Connection Properties dialog box to open the Internet Protocols (TCP/IP) Properties dialog box. Set the IP address, the subnet mask, etc. and then click OK.
|
 |
Restart the computer.
|
The necessary components are now installed. Go to the section Connecting the Network Interface to the Network.
For Windows 2000, use the following procedure to install the necessary components.
 |
Note: |
 |
-
When using TCP/IP or IPP for printing, you need to set the IP address, the subnet mask, and the default gateway of the computer.
|
|
 |
Click Start, point to Settings, and then select Network and Dial-up Connections. The Network and Dial-up Connections screen appears.
|
 |
Right-click the desired network connection and then select Properties.
|
 |
Check if the following necessary components are in the list. If they are already installed, go to the next chapter.
|
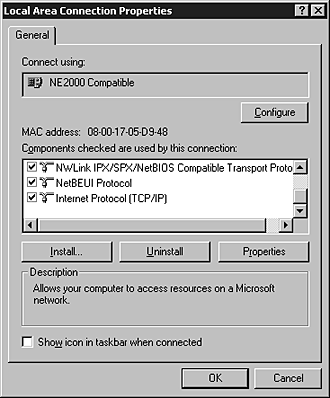
The following table lists the components required for configuring the network interface with EpsonNet Config.
 |  |
Note for users of printers supporting NetWare queue-based printing: |
 |  |
|
Do not run Novell Client for Windows 95/98 version 3.00 and Novell Client for Windows NT version 4.50 when using the following modes: NetWare 3.x/4.x Bindery Print Server mode, NetWare 3.x Remote Printer mode, NetWare 4.x Bindery Remote Printer mode, and NetWare 4.x/5.x NDS Remote Printer mode.
|
|
 |
If the necessary components are not in the list, click Install to install them, as described below.
|
For LPR or Internet printing:
Select Protocol and then click Add. In the Select Network Protocol dialog box, select Internet Protocol (TCP/IP) and then click OK.
For Microsoft Network Shared printing:
To use Internet Protocol, see the description described earlier to install Internet Protocol (TCP/IP).
To use NetBEUI, select Protocol and then click Add. Select NetBEUI Protocol and then click OK.
Select Client and then click Add. Select Client for Microsoft Networks and then click OK.
For printing via NetWare server:
Download the latest Novell Client from the Novell Web site and install it on the computer. Also, be sure to install either IP or IPX. See the Novell Web site for detailed information.
 |
For LPR, Internet, Microsoft Network Shared printing:
Double-click Internet Protocol (TCP/IP) on the Configuration menu to open the TCP/IP Properties dialog box. Set the IP address, the subnet mask, etc. and then click OK.
|
 |
Restart the computer.
|
The necessary components are now installed. Go to the section Connecting the Network Interface to the Network.
For Windows NT 4.0, use the following procedure to install the necessary components.
 |
Note: |
 |
-
When using TCP/IP or IPP for printing, you need to set the IP address, the subnet mask, and the default gateway of the computer.
|
|
 |
Click Start, point to Settings, and then select Control Panel.
|
 |
Double-click the Network icon in the Control Panel.
|
 |
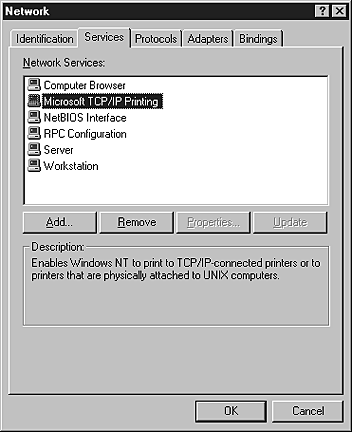
Check if the following necessary components are in the list. If they are already installed, go to the next chapter.
|
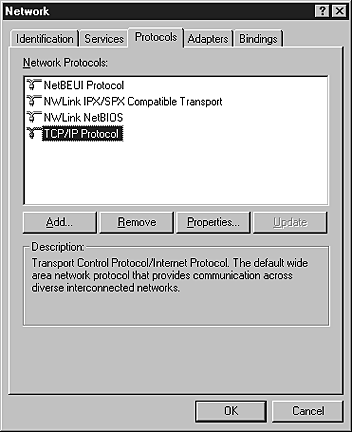
The following table lists the components required for configuring the network interface with EpsonNet Config.
 |  |
Note for users of printers supporting NetWare queue-based printing: |
 |  |
|
Do not run Novell Client for Windows 95/98 version 3.00 and Novell Client for Windows NT version 4.50 when using the following modes: NetWare 3.x/4.x Bindery Print Server mode, NetWare 3.x Remote Printer mode, NetWare 4.x Bindery Remote Printer mode, and NetWare 4.x/5.x NDS Remote Printer mode.
|
|
 |
If the necessary components are not in the list, click Add to install them, as described below.
|
For LPR or Internet printing:
Select the Protocols tab and then click Add. Select TCP/IP from the list and then click OK. Set the IP address, the subnet mask, etc. and then click OK.
Select the Services tab and then click Add. Select Microsoft TCP/IP Printing from the list and then click OK.
For Microsoft Network Shared printing:
To use TCP/IP, see the description described earlier to install TCP/IP.
To use NetBEUI, select the Protocols tab and then click Add. Select NetBEUI from the list and then click OK.
Select the Services tab and then click Add. Select Workstation from the list and then click OK.
For printing via NetWare server:
Download the latest Novell Client from the Novell Web site and install it on the computer. Also, be sure to install either IP or IPX. See the Novell Web site for detailed information.
 |
Restart the computer.
|
The necessary components are now installed. Go to the section Connecting the Network Interface to the Network.
To assign an IP address, subnet mask, etc. to your Macintosh, follow the steps below.
 |
Note: |
 |
|
To print using the AppleTalk protocol and configure the network interface with EpsonNet Config for Macintosh, select Ethernet or Built-in Ethernet on the AppleTalk Control Panel or the AppleTalk tab. Then configure the network interface with EpsonNet Config for Macintosh.
|
|
 |
From the Apple menu, select System Preferences.
|
 |
Open the Network control panel. Click the TCP/IP tab.
|
 |
Select Built-in Ethernet from the Show pull down menu.
|
 |
Assign an IP address and other settings if necessary.
|
 |
Click the Apply Now button to save any changes.
|
Go to the section Connecting the Network Interface to the Network.
 |
From the Apple menu, select Control Panel, and then TCP/IP.
|
 |
Set Connect via to Ethernet.
|
 |
Assign an IP address and other settings if necessary.
|
 |
Close the dialog box to save any changes.
|
Go to the section Connecting the Network Interface to the Network.
|  |


 About Installing Components on Your Computer
 Top
Top


